One of the most customizable gaming experiences is surely inside Roblox. Players are encouraged to create (and even sell) shirts and pants for their avatars. You will need to be a part of the Builder's Club to allow the use of custom creations in the game. So make sure you are a member. If you want to be an entrepreneur in the game or have the best fashion sense among all your friends, here's how to make shirts in Roblox.
 Screenshot via Roblox
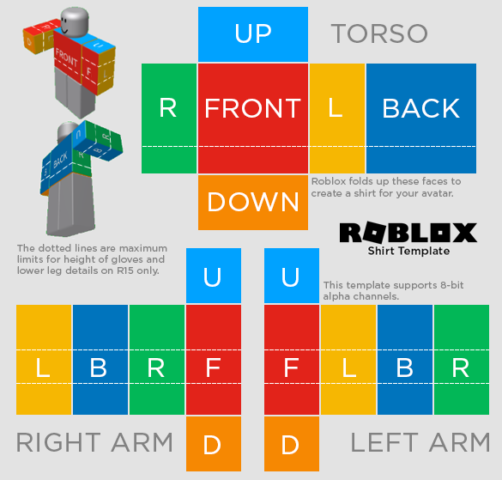
- Step 1: You'll want to download the above photo template first. This guide helps you determine where each image you have collected should be placed.
- Step 2: If you don't have an image editor on your PC or Mac, we recommend that you download a free editing tool such as GIMP or Paint.Net. The editing tool will be used to move your images on the model.
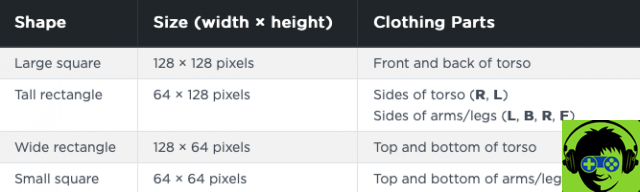
- Step 3: Open the template in your favorite editor and add each image to its legitimate blocks. To make sure they match each box, follow the table below.
 Screenshot via Roblox
- Step 4: When you have finished assembling the shirt, upload the image with the exact dimensions 585 pixels wide by 559 pixels high.
- Step 5: Head to the Creator's Page and select the "Shirts" tab. From there you will be prompted to upload your file.
- Step 6: After downloading it, it will take Roblox time to approve the jersey, however, you will be notified in-game when and if they do. If approved, it should now be in your inventory and ready to use!
Remember, if your clothes are popular, you always have the option of selling them on the Designer page. Unfortunately, nothing can be sold for free, but you can earn Robux with every sale.
Related: Best Roblox RPGs