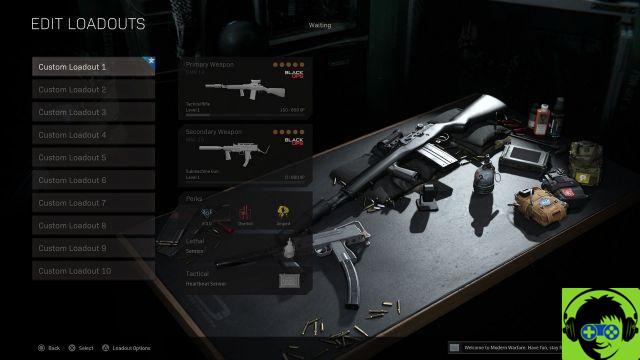
The best MAC-10 class for Warzone
- Primary weapon: MAC-10
- Muzzle: Muzzle brake 9
- Barrel: 6.1 ″ Heavy reinforced
- Stock: Raider stock
- Rear handle: Airborne elastic band
- Ammunition: Except 53 Rnd Fast Mag
- Secondary weapon: DMR 14
- Muzzle: Silent Agency
- Barrel: 16,3 ″ Titanium
- Optical: Visiontech 2x
- Underbarrel: Foregrip field agent
- Ammunition: 30 Rnd
- Advantages
- Advantage 1: DOE
- Advantage 2: Exaggerated
- Advantage 3: Amped
- Equipment
- Deadly: Semtex
- Tactical: Heart rate sensor
The MAC-10 dominates at close range and favors aggressive play, so this class is built around that style of play. Muzzle Brake 9 reduces vertical recoil and makes the weapon a bit easier to control, which should help medium and long range. The same can be said for the reinforced 6,1 ″ heavy barrel, which gives the MAC-10 a higher effective damage range and better bullet speed. As this is the primary weapon in this class, it needs some attachments that make it a complete and solid option, which is why we went with these two attachments to increase range and reduce recoil.
The MAC-10 really shines up close, though, and the rest of the loadout is built around close-range combat. The Raider Stock gives the weapon a better sprint time to fire so you can guarantee you'll get the first shot when you see someone. The airborne elastic wrap allows you to aim faster and reduce shake so you can keep your aim steady under pressure, but it also allows you to aim while lying down. Being able to dropshot is an incredibly useful skill in close range combat, and it will help you gain more engagements than normal while using the MAC-10. Finally, the Salvo 53 Rnd Fast Mag lets you go longer without recharging. Most Warzone loadouts use extended magazines, and the MAC-10 especially needs them due to its rapid rate of fire.
As for the secondary weapon, this loadout uses the DMR 14. It's by far the best weapon in the game right now and it complements the MAC-10's weaknesses perfectly. It uses the same accessories as in our DMR 14 loading guide, which should give you an edge in long distance encounters. The Agency silencer lets you take photos without revealing your location, and the Visiontech 2x optics allow you to fully utilize the weapon's range.
The 16,3-inch titanium barrel increases the rate of fire of the DMR so that it is always viable at close range, and the Field Agent Foregrip reduces overall recoil to compensate for the increased rate of fire. Finally, the 30 Rnd magazine allows you to go longer without reloading, which as we said before is anything but necessary in a Warzone loadout. The MAC-10 is the close-range centerpiece of this class, but this DMR build also makes it viable up close so you don't get caught off guard if someone pushes you while you're shooting.
The benefits and equipment for this class are pretty standard. The Heartbeat Sensor is a very popular choice for most loads, and Semtex is one of the safest bets for the Lethal option. As for the perks, EOD protects you from those pesky grenades and Overkill lets you use both the MAC-10 and DMR 14 in the same class. It's worth sacrificing the Perk 2 slot for, and most classes use Overkill anyway. Finally, Amped lets you switch between the two more quickly, which is incredibly useful considering each weapon's weaknesses. If you're fighting someone from afar with the MAC-10, just switch to DMR and vice versa.
Call of Duty: Warzone is now available on PC, PS4, and Xbox One.
-