Has a picture been taken in a particularly significant period of time because you have seen the date and time of the scatto? Vorresti will publish her Instagram a photo with the data in sovunderressione, per rendere il tuo scatto più originale? No problem: I was sorry, because I was forbidden and I received the request for a question in question.
If you wonder eat fare the photo with the data, sarai felice di sapere che si tratta di un'operazione extremely simplified. Nei prossimi capitoli di questa guida, infatti, ti parlerò di come riuscirci process the use of the free app for Android and iOS, compress Instagram, and di programmi per computer.
How did you say? Are you not sure of the saperne di più e se impaziente di iniziare? In such a case, mettiti seduto beautifully comfortable and turned on your smartphone. I have been following the instruction carefully for the first time and mettile in practice, in the best way possible for you. Arrivati at this point, to me there is no other che augurarti a good letter and a good fun!
Index
App per fare photo with data
If you wonder eat fare the photo with data with il tuo cellulare, sarai felice di sapere che, per riuscirci, non devi far altro che utilizzare alcune app gratuite per Android e iOS, as quelle di cui ti parlerò nelle prossime righe, le quali permettono di scattare delle foto automatically applying the data at the time of the scatto in sovrimpressione.
Come fare photo with data with Android
Per fare the photo with your data AndroidI could use the Timestamp camera Free app (available also for iOS), which allows me to make photo and video automatically applying ad essi the date and time in sovrimpressione. È free, more available in a paid version (Timestamp camera Pro) che, at the cost of € 5,49, offer the possibility of sbloccare diverse funzioni aggiuntive dedicate yourself to the personalization of the font for printing the data and the sugli scatti.
Detto ciò, per scaricare the free version of the app on your device, apri the dedicated page of the Play Store e premi sui pulsnti Install e apri.
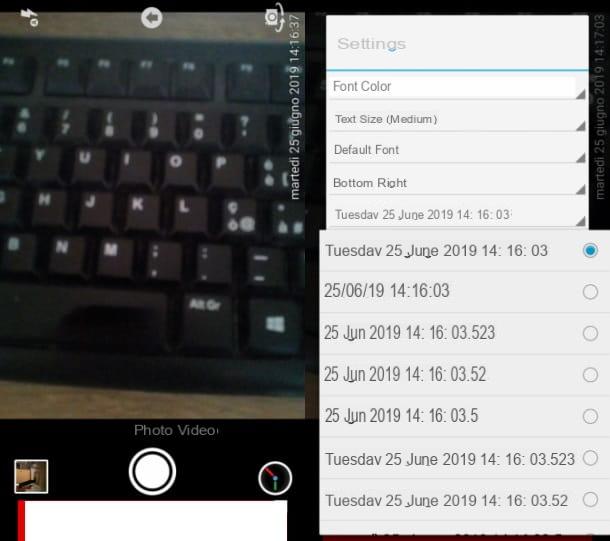
All'avvio dell'app, scegli the photocamera frontal or quella posterioriore is used, pigiando sull 'icona della macchina photography situated nell'angolo in alto a destra. Per attivare il flash, invece, pigia sull 'fulmine icon situata nell'angolo in alto a sinistra.
When I see soon, scatta the photo, pigiando sul pulsating dell'otturatore collocato in basso: the date and l 'Now verranno automatically printed all'immagine ottenuta. Next, I will modify the format of the data, fai tap only with the dell'orology symbol located at the bottom right, then, in the menu Settings that you come showing, pigia sul predefined format della data, to change it.
The scattate photo process Timestamp camera Free I will not save you automatically nell'app Galleria di Android (Gallery o Gallery).
Come fare photo with data with iPhone
If you own a iPhone, the free app with the consiglio di utilizzare per Fare the photo with data è HUJI Cam, the quale automatically prints the data and adds a vintage agli scatti filter. If you characterize, infatti, for the smooth interface dallo style retrò.
Per scaricare l'applicazione sul tuo iPhone, collegati all'App Store and pulsating premium Get. Fatto ciò, sblocca il download and l'installazione della stessa processes il Face ID, il Touch ID or the password of your Apple ID. At the end of the automatic scaricamento, avvia l'app, pigiando su pulsiente apri.
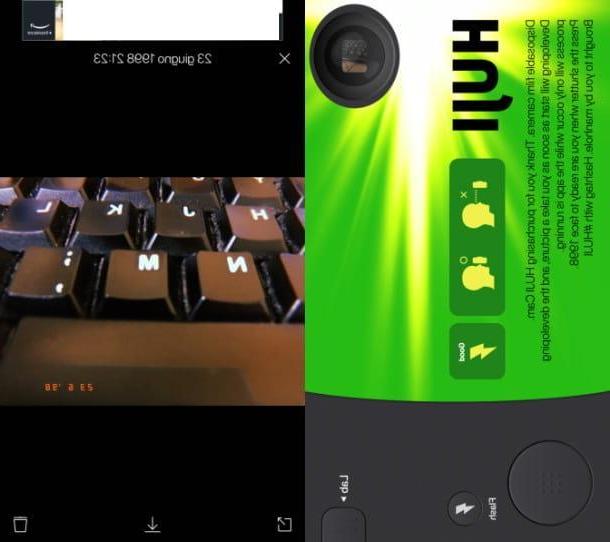
Adesso, per scattare a photo, premi sull 'icon to form of objective che si trova in alto a sinistra, per avviare la modalità fotocamera. Dopodiché, scegli se scattare the photo through the photocamera frontal or with quella posterioriore, pigiando sull 'arrows icon. Per attivare il flash, invece, fai tap sull 'fulmine icon. When I will soon per scattare the photo premieres pulsating dell'otturatore.
Per see the photo scattate premier pulsating Lab and individual, in the successive menu that you are shown, the photo of it appena scattato. Adesso, to save her nell'app Gallery dell'iPhone, premi sul pulsating with l 'icona della freccia verse il basso and acconsenti alle richieste relative all'access to the predefined multimedia gallery of your device, in way of porting to finish the operation.
Inoltre, the format of the data and the printed page of the photo will be modified, pigia on pulsating ☰, then tap on the menu item Data and presses on the voice Current, you see the data and the photo is printed corresponding to that in cui l'hai scattata.
You see it, infine, that HUJI Cam is available on your Android, with a function similar to that of the iOS version.
Come fare vintage photo with data

fare vintage photo with dating, puoi avvalerti delle app di cui ti ho parlato nei capitoli precedenti. Infatti, be stai using the app Timestamp camera Free your Android or iOS, puoi avvalerti del suo database di filtri.
Su Android, dopo see scaricato and avviato l'app following the indicazioni che ti ho fornito in the preceding chapter of the tutorial, fai tap sull 'icon dell'orologio located at the bottom right, then press on the item Advanced and then Show options menu. Imposta, poi, il vintage filter che più ti piace, process il menu Color Effect And that's it.
Su iOS, invece, puoi will access the menu of the filtri pigiando directly sull 'icon dei tre pallini It is located high, in the mode of selection that will be più rispecchia lo stile vintage che desideri applicare allo scatto.
Se, invece, stai using the app Huji Cam his Android and iOS, sarai felice di sapere che, like the capitolo dedicated to his use, quest'app automatically applies a vintage filter to the photo scattate.
I continued, quindi, the indication that you were in the previous chapter, you know how you used the quest'app, and you got a photo with a date and vintage appeal.
Come fare photo with data and pray

Also for fare photo with data and now, puoi avvalerti delle app di cui ti ho parlato finora. Infatti, sia l'app Timestamp camera Free che l'app Huji Cam permettono di scattare delle foto nelle quali comes applicata in automatico la date but also theNow of the shot.
In such a case, quindi, non devi far altro che will follow the indicacionion ti ti ho fornito nei capitoli precedenti di this guide.
How to fare the photo with the data on your Instagram
If you wonder eat fare the photo with the data your Instagram, devi innanzitutto sapere che, quando pubblichi a photo or a video nei post From the social network, the content in question comes data automatically. Infatti, facendo tap his a photo of the pubblicata in questa sezione, troverai la publication date right below the description.
Invece, per quanto it governs the storie, non vi è a native funzionalità che permetta di insert the data in sovrimpressione nelle foto che pubblichi nelle storie. Quindi, per riuscirci, devi insert it manually, scrivendo your photo.
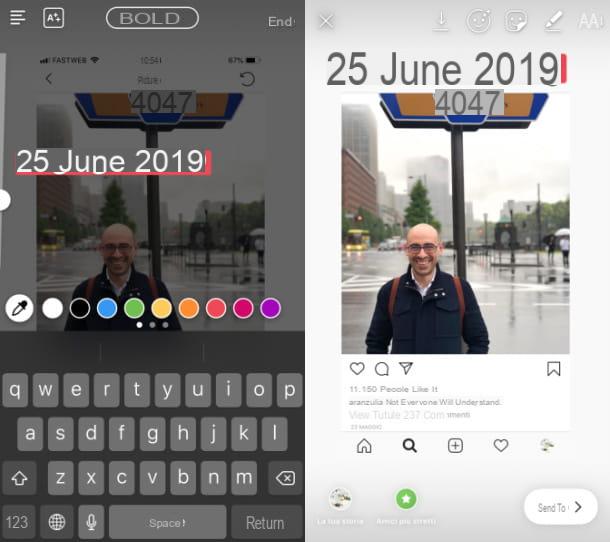
But I will proceed, avvia dunque l'app di Instagram sul tuo device, effettua l'accesso al tuo account e fai tap sull 'camera icon, che trova in alto a sinistra, per avviare lo strumento di creazione delle storie.
Now, use the tools from the stories of Instagram, for scattare a photo or for importing it into the memory of your device, or to modify it through filtri ed effetti.
Fatto ciò, first prize Aa, in mode da aprire the tastiera of your device and enter the date gives imprimere sullo scatto. At the end of the modification, he published the storia realizzata, premendo sul pulsating The tua storia.
As an alternative, the Archivio delle storie has been activated, agreed allo stesso: by sharing a previously scattered photo, you will see the data from the publication published.
Fatto ciò, individual, in questa sezione di Instagram, the photo that is of interest to you and your pulse Share, dopodiché pubblica la storia, premendo sul pulsating The tua storia.
Program per fare photo with the data
Be vuoi avvalerti di programs But I will modify the data of the photo on your PC, but I will print the data directly on the photo, so I will give you the solution that indicates the prossimi paragrafi.
Photo (Windows)
Per datare the photo his Windows, puoi avvalerti dell'app Gallery di Windows 10, the quale permette di will modify the data degli scatti importati da Android, iPhone or da qualsiasi fotocamera digitale.
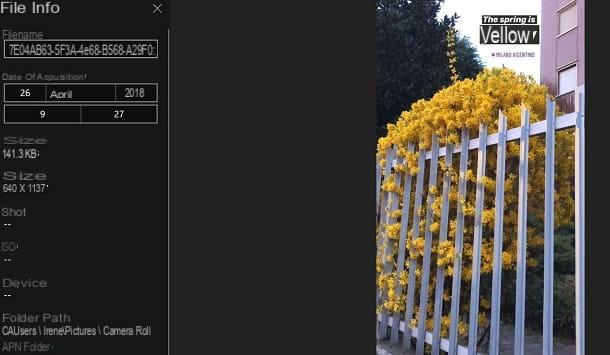
Detto ciò, per procedre, individua la foto di tuo interesse, tra quelle importate nel programma, dopodiché premi sul pulsado (...) situato nell'angolo in alto a destra e fai clic sulla voce File info, on the menu you are shown.
Adesso, but I will modify the date of the photo, if you do not want the menu Acquisition date: therefore sets the date and l 'Now che vuoi che vuoi assegnare alla foto e conferma l'operazione, premendo sul pulsating √.
Photo (macOS)

If you own a Mac, puoi avvalerti dell'applicazione “di serie” Gallery, I will permette di aggiungere or modify the data di scatto delle foto importate da iPhone, Android e fotocamere digitali in maniera facile e veloce.
Detto ciò, avvia l'applicazione Gallery, by clicking on his flower icon located in the bar Dock, and by clicking on the photo your child will be ad agire. Adesso, fai clic sul menu Image, situato in alto, e seleziona l'opzione Regola dates and prays da quest'ultimo.
At this point, nella nuova schermata che ti comes shown, personalizing the date and the time of the scatto, facendo riferimento to the menu to tendina situato in corrispondenza della voce Regulated. Infine, per confermare you modify it, click the button Rule situato in basso. Facile, see?
FastStone Photo Resizer (Windows)
For printing the data on the photo of the PC Windows, puoi avvalerti from the FastStone Photo Resizer program che può essere utilizzato for free per lo scopo oggetto di this tutorial. But for my own fun, but I need to buy a license at the cost of $ 19,95.
Detto ciò, per scaricarlo, collegati al suo sito Internet e fai clic su uno del primi due pulsanti download for free, to download the .exe file on your PC.
A download completo, avvia il file appena scaricato (FSResizerSetupxx.exe) by double clicking on it. To install the software, click first Yes and then Next, I Agree, install. Infine, fai click su FinishI will finish the installation of FastStone Photo Resizer.
Avvia, quindi, il programma, using il suo collegamento situato sul desktop o nel menu Home Windows e, scegli l'immagine di tuo interesse, exploring the poster of the tuo computer che puoi vedere nel pannello di sinistra del software. It matters, quindi, the image in the sezione di destra, facendo clic su di essa e premendo poi sul pulsado Add.
Once this is done, put the check mark next to the item Use Advanced Options and by clicking on the button Advanced Options, per accesre alle impostazioni advance the program.
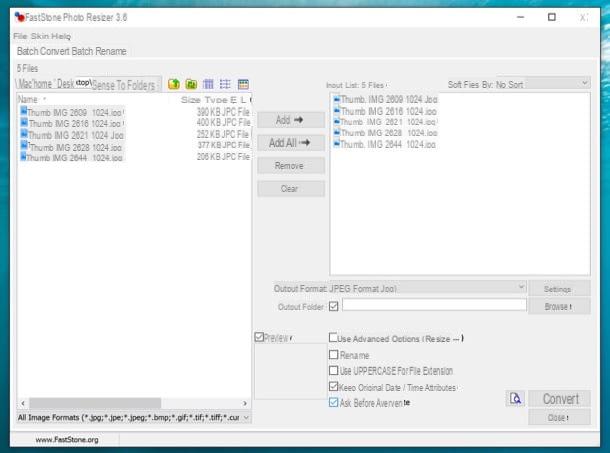
Now, click on the tab Text, put the check mark on the item Add text, then reach the path Insert a Variable > File Date name > Date and time, per aggiungere in sovrimpressione una scritta che mostri la data e l'ora attuale. Dopo aver regolato tutte le impostazioni relative alla personalizzazione della scritta, come per esempio il Font, conferma l'aggiunta, premendo sul pulsating OK.
Per salvare l'immagine, indicates the percorso di esportazione (Output Folder) process the pulsating KATEGORIEN and press pulsating Convert, per portare a terminate l'operazione.
BatchPhoto (macOS)
Su MacOS, you get the free software avvalerti BatchPhoto, but print the data on the photo on your photo. BatchPhoto è anche available in a paid version (il prezzo part dai $ 29,95) che rimuovere il watermark applicato alle foto esportate with the free versione of the software.
Detto ciò, per scaricare il programma gratuito, collegati al suo website ufficiale e premi sul pulsado Try Free.
Now, wait, then, for the automatic download of the dmg file, dopodiché, to install it, fai doppio clic sullo stesso e trascina la sua icona nella cartella Applications say macOS.
After that, to get started, start BatchPhoto, pressing on its icon in the macOS dock bar and clicking on apri (Operazione necessary only to cousin avvio), but bypassare the restriction of macOS that prevented from aprire file non scaricati dal Mac App Store. Dopodiché, premium pulsating Continue Trial, but I will continue with the free version.
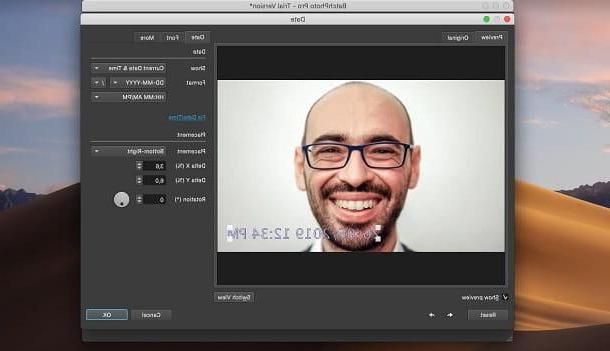
Adesso, transcends the photo in the main software riquadro, processes the drag and drop oppure premium pulsing Add photo situato nell'angolo in alto a destra, for importing it. Fatto ciò, fai clic sulla scheda Edit Photo which you can see at the top, then click on the item Add Filter a sinistra and select the instrument Date.
Then use the menu Size per personalizzare il format della data e dell'ora aggiunta in sovrimpressione, oltre che la sezione Placement but I will position the scritta. Non dimenticare di ridimensionarla, using gli appositi selection handles. At the end of the modification, confirm the premendo sul pulsating OK.
To continue, go to the tab Setup and indicates the format of the poster of the destination (Output format e Folder). Dopodiché, select the scheda Process I awarded her OK, iniziare il processo di esportazione della foto with the printed data. Facile, see?
Come fare the photo with the data