Tell me: are you able to send me all the photos in which my face appears? No? I imagined! But I can do it very well. Do you want to know how? Using the technologies of facial recognition of photos which are integrated into services such as Google Photos and Apple Photos.
How do you say? Would you also like to understand how to best use the facial recognition function integrated in the services just mentioned? Then you've come to the right place at the right time! In the next paragraphs, in fact, I will explain step-by-step how to use this very useful feature to find the photos with the faces of your family and friends more easily and quickly.
So, what are you doing still standing there? Get to work immediately: concentrate on reading this tutorial, strictly follow the instructions contained in the next paragraphs and, above all, put them into practice. I'm sure that, if you follow my "tips", you will no longer have any problem finding photos quickly using the facial recognition technologies of the services listed below. I wish you good reading and have fun!
Google Photo (Android / iOS / Online)
You would like to better organize your photos using the facial recognition present in Google Photos? I'm sorry, but unfortunately this feature is no longer available for users living in cities and in Europe, as it has been removed following some legal debates that have been raised by some EU bodies.
However, you can "bypass" this problem by resorting to one VPN, that is to a virtual private network which, thanks to a particular system called in jargon tunneling, allows you to mask the IP address from which you access the Web and, consequently, to access services available in a geographical area other than that in which you are at a given time.
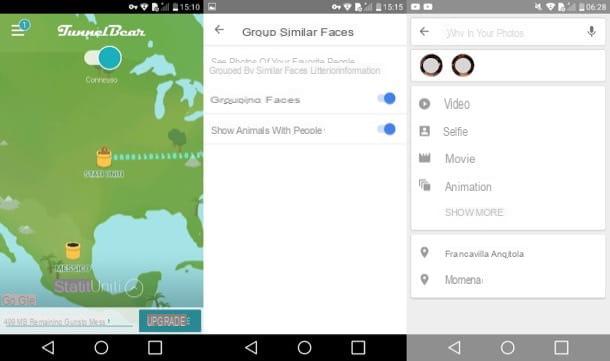
If you have no idea which VPN to use for your purpose, take a look at the tutorial dedicated to the best VPNs - there you will find a slew of services that can come in handy in this circumstance. After choosing the VPN that suits you best (eg. tunnel Bear), start the app related to the latter on your smartphone or tablet and set the United States as your current location.
At this point, if you are using Android and the Google Photos app is "standard" on your device, delete the data relating to the app by going to the menu Settings> Applications> Google Photos> Storage and tapping on the option Clear data.
Now the steps to take are the same on all devices and systems. Open the app Google Photos on your Android or iOS device, log into your Google account (if you haven't done so yet), tap on the symbol (≡), select the voice Settings from the menu that opens, then select the item Similar face grouping and finally move up ON l'interruttore situato accanto alla voce Face grouping.
Now, wait a few minutes for the changes to be implemented by Google Photos and then press on search bar located at the top. As you can see, the faces that have been identified by the Google Photos facial recognition algorithm are now visible: press on one of them to apply a label, tap on the item Add a name and assign the name to the person portrayed in the thumbnail, so as to find the photos in which his face is present more quickly.
Ah… I almost forgot! Once the facial recognition function is enabled on your device, you will no longer need to use the VPN: the function will remain active by default and you can then manually disable it from the Google photos settings.
Please note: facial recognition data is shared with Google's servers (as well as all other data that passes through Google Photos). Please be aware of this possible privacy implication before activating the feature.
Apple Photo
Would you like to activate the facial recognition of photos saved on your devices Apple and you don't like Google Photos? Know that the app Gallery present "standard" on all devices of the "bitten apple" it does this automatically as it recognizes and groups the faces of the subjects portrayed in the saved shots, so that the user can assign them a name and find the photos more easily .
In fact, when you open Photos for the first time, the app scans all the photos in the library by searching for people's faces. As soon as the analysis is completed (the analysis, unlike what happens with Google Photos, is carried out locally and not on Apple's servers, to protect users' privacy), you can open the "People" album , view photo collections organized by the faces appearing in them and give them names. Below you will find everything explained in detail.
iOS
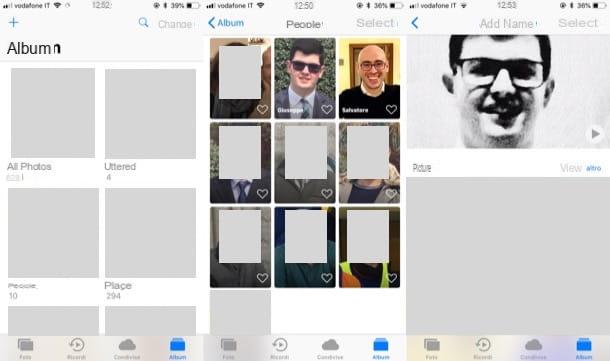
To name the people who have been identified by the facial recognition system of the Apple Photos app, all you have to do is start it on your iPhone or your iPad, then press the button Album located at the bottom right and then open the album People.
Then give a name to the faces portrayed in the photos in order to better organize your library: press the face to which you want to assign a name, tap on the item Add name located at the top and select the name of the person from the list that opens or type it manually and then press on the item NEXT located at the top right.
In the album People the faces of some family or friends present in some of the shots saved on the roll of your iOS device are not displayed? No problem: open one of the photos with the people you want to add, swipe up to see a thumbnail of their faces under the heading People, presses on the thumbnail of the family member or friend you want to add to the album People, tap on the item Add name, then type the name of the person in the appropriate text field (or select it from the list) and then tap on the items NEXT e end.
If a person's photo is incorrectly identified, you can fix it as follows: Go to the album People, presses on the face of the person you want to remove from an album, first presses on the voice Select located at the top right and then on the item Show faces placed at the bottom. Then select the photo in which the "intruder" person is present, tap on the symbol Share (l'icona della freccia rivolta verse l'alto located at the bottom left), then press on the item It is not this person And that's it.
If, on the other hand, you want to associate new photos with a face, select a person from the album People, scroll down the screen and tap on the item Confirm additional photos. The system will propose a series of photos in which the selected person could be portrayed and you will have to tell if the recognition was carried out correctly or not.
I remind you that, if you use the iCloud Photo Library, the people identified in the photos are automatically synchronized on all your devices.
MacOS
You use a Mac? Since the application Gallery is also present on MacOS, you can use facial recognition to your advantage to sort the photos in the library by following more or less the same steps that I indicated in the chapter dedicated to iOS devices.
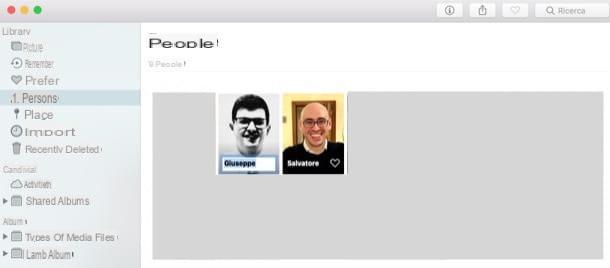
To begin with, open the application Gallery by clicking on its icon located on the Dock or in the Launchpad, you expand the menu library (if necessary) and select the album People. Then double-click on the face of one of the people portrayed to view the photos associated with his face and press on the cards Gallery e Faces to set the display of full photos or only faces, respectively.
To name a face, click on the item Add name (top), then type the name of the person in the appropriate text field (or select it from the list) and then click on the item end.
I remind you once again that, if you use the iCloud Photo Library, the people identified in the photos are automatically synchronized on all your devices.
Facial recognition of photos: how to do it