Lately it has been happening to you with some frequency of having to photograph to the books, for study or professional reasons, or simply to memorize the text and make it so that it can also be read from a screen. You started immediately to search the Internet for all the information you need to get the best possible result, but you did not find an exhaustive guide that was right for you.
I therefore thought of making this tutorial to try to answer your doubts on this particular topic, taking into account the multiple needs related to this operation. Whether you need to photograph the pages and their content, make an artistic shot to be published on social media as a book blogger, or even create evocative images of an ancient book, I am sure that in the next few paragraphs you will find the ideal solution.
What are you waiting for then? The answer is at hand: just take a few minutes of your time to read this article, in which you will find many tips on like photographing a book and the indication of the tools and software essential to achieve perfect shots. I just have to wish you good reading and have fun!
How to photograph pages of a book
One of the most widespread needs is undoubtedly that of understanding like photographing pages of a book, to extract the text, convert it into digital and make it available for reading on the screen of a PC, smartphone or tablet. There are various solutions, both for smartphones and tablets, and for PCs, suitable for the purpose, many of which also integrate functionality OCR (Optical Character Recognition) for text recognition, so as to make it selectable and editable. A few examples? I'll settle you immediately!
Give smartphone and tablet
If you are going to proceed da smartphone or tablet, in this guide I will focus on an application that I consider particularly effective, that is Adobe Scan, which can be downloaded and used for free, however it provides a subscription from 10,99 euros / month with 7 days of free trial to raise the limits of OCR scanning up to 100 pages, export scans as Office files, combine PDFs and have up to 20GB of cloud space. It is available for both Android devices (also on alternative stores for devices without Google services) and iPhone / iPad.
Once you have downloaded the app from the store of your device (just visit the links I just pointed out to you and press the button Installa / Ottieni; if you use iOS / iPadOS you may be asked to verify your identity), launch it, then choose whether to log in with your credentials Google, Facebook o Apple by pressing the relevant button (you will be redirected to the service authentication page) or via a Adobe ID. In the latter case, press on the item Log in or register: if you already have an Adobe account, enter theemail address to do tap su Continue, then, on the next screen, enter the Password and presses up again Continue.
If, on the other hand, you need to register a new account, tap on the item Create an account and, in the following screen, click on the fields E-mail address, Your name, Last name, Password, to type in the respective information. Under the section Birthday, press on the fields Day, Month e Year to fill them in from the appropriate drop-down menus, then repeat the operation for the field Country / Region. When finished, tap the button Create Account.
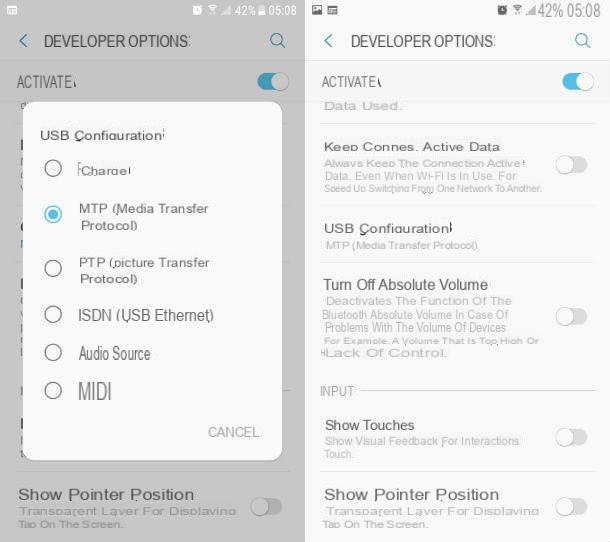
In the first screen it is essential to allow the app access to the camera. Then select, with a tap, the item Document present in the menu below the camera screen, as it is the most suitable option among those present (the others are Blackboard, Module, Biglietto gives visit) related to the purpose of this tutorial.
If you think that the framed book is not sufficiently illuminated, press on theflash icon to activate the one built into your device.
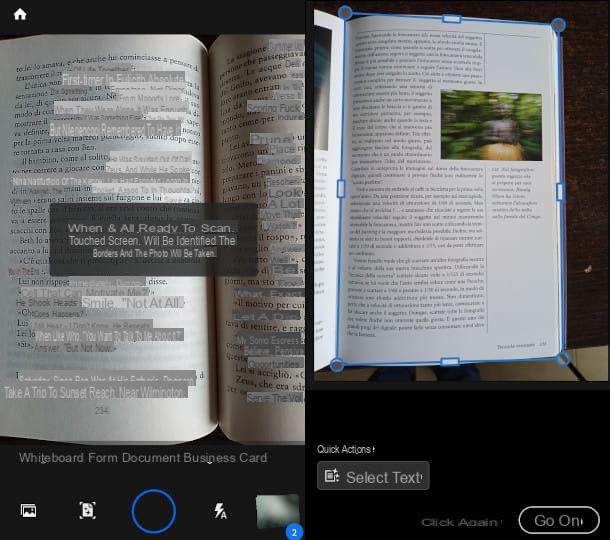
Before shooting, frame the page you intend to photograph with your device: you will see that the edge detection, defined by blue dividing lines. Note: if you want to remove this feature, tap on the icon below with a sheet delimited by four corners and you can manually proceed with the execution of the shot.
With the automatic mode, in fact, once the page is recognized, the app will independently take the photo, which will be immediately proposed to you in a special screen for any subsequent corrections. If you remain inactive, after some time you may be required to tap the screen to reactivate this feature.
If you want to operate on an image already present on your device, tap the icon with the instead drawing of a mountain and you will be offered the photos present in the memory, which you can select by pressing on them and import by pressing on checkmark, top right.
The first thing to do after shooting (or photo selection) is to define the preset borders from the app: by pressing on the corners, or more precisely on the dots and rectangles that identify the anchor points and then sliding your finger on the display, you can widen or narrow the edges to your liking to make them coincide as best as possible with the page.
If you want to take the photo again as you are not satisfied with the quality, tap the button Shoot again: The image will be deleted and you can take the same page again. If, on the other hand, you want to continue with the next page of the book, click on the button Continue.

Another interesting feature on this screen is that of Text selection. Pressing it will activate theOCR, which I mentioned in the introduction and you will be redirected to a new screen in which, by long pressing on a portion of text within the image, a special selector which will highlight some characters of the page and will allow you, by pressing and holding one of the two drop handles that appear and by sliding your finger up or down, you can select the rest of the text. Then tap on the button below Copy Text and this will be stored in the clipboard of your device: you can then paste it into a document editor.
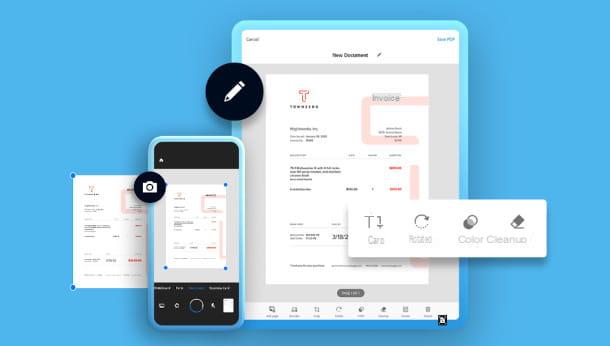
Once you have acquired all the photographs in the book, you will find the icon of the at the bottom right previews: by pressing on it, you will enter mode editor. In the central part of the proposed screen you can select the page on which to intervene for any changes, by sliding your finger to the right or left.
At the bottom there are instead several features, which you can activate with a simple tap on the respective item. For example, with Reorder you can change the sequence of the pages through a screen in which there are previews of all the images: by holding down one of them, once it is selected (the outline turns blue) you can slide your finger to replace the position with another photography; with Cut out you can modify the borders, exactly as seen previously; with Wheel you can turn the image, if it is not angled in the right direction; while with Color you can attribute some preset (Automatic color, Greyscale o Blackboard) to improve its appearance.
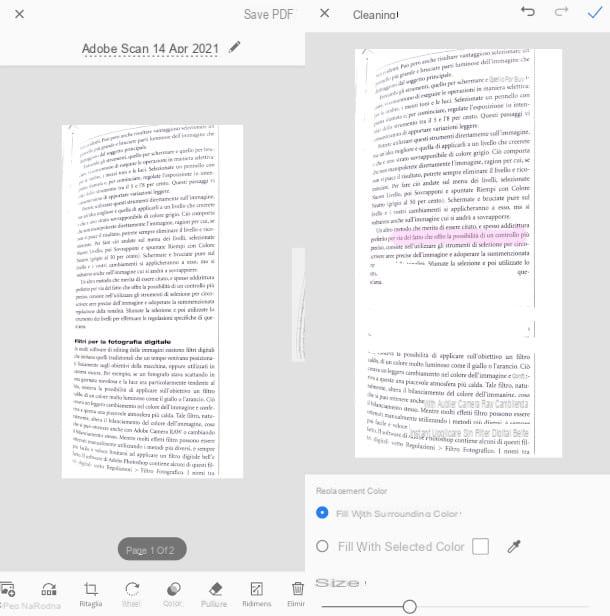
The functionality Cleaning instead it is used to delete a part of text or images that you do not want to make visible. In the screen of this tool you will find below, on the item Dimension, a selector with which you can define the size of the cleaning tool: then swipe your finger over the area to be deleted, which will be removed at the same time. The last function is Resize, which adapts the page with one of the many formats available in the menu below (A4, A3, A5 us horizontal orientation o vertical, to name some of the most common): just select it with a tap to apply it.
Let's see now how the rescue. At the top right is the voice Save PDF: press on the latter and, in the following screen, choose from the options Share (to send it via one of the messaging or cloud storage email services already on your device), Open in Acrobat (to view it in the Adobe Acrobat Reader app), Save as JPEG to store it in your device in JPG or Other, to access additional features such as Copy to device, Rhinomine o Print.
If Adobe Scan does not satisfy you, you can evaluate other apps to scan, such as the ones I reported to you in my dedicated guide.
From PC
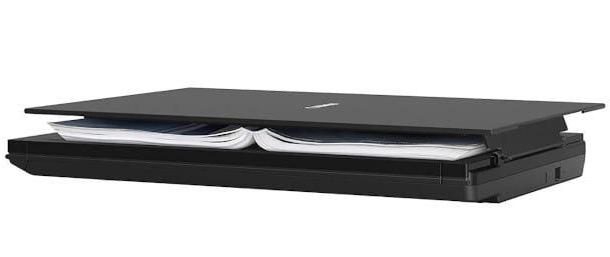
If you want to process the photographs of the book from PC, one of the best ways to acquire them is certainly by means of one scanner flatbed: it is a device specially developed to digitize the content coming from a paper source. The book should be placed with the pages facing the glass plate, closing the lid to allow a better definition of the images.
Through a complex system of lamps and lenses the image of the page is projected towards a dedicated one sensor. The latter takes care, in fact, of the digital conversion, to allow the subsequent decoding by the computer.
There are several models on the market: I advise you to carefully read my guide dedicated to the best scanners, where I illustrate the various types and how they work, also providing useful advice on which to buy according to your needs and the available budget.
Once the book scan, the images of the pages can be transferred to the computer memory thanks to specific programs developed by the manufacturer of the device itself, or by using dedicated software (compatible with practically all scanners) such as NAPS2 for Windows o Prism per MacOS. The latter, in fact, integrate many particularly useful features such as OCR technology, which also allows you to make the text editable. If you want to evaluate further solutions, I recommend you my guide with the best programs to scan.
See offer on Amazon See offer on AmazonWith portable scanner
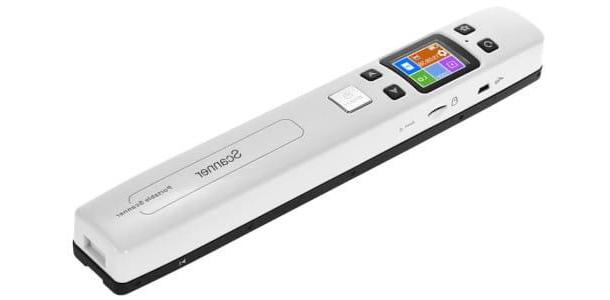
A convenient and effective solution could be to photograph the book with one portable scanner: if the space available is limited or in any case you do not have a computer always at hand, this type is particularly comfortable and functional.
Obviously, also in this case it is advisable to choose a model that suits your needs as much as possible, for example for what concerns the page format or the resolution ability. In my dedicated guide you will find all the useful information on the various features of this product, as well as some purchase advice.
See offer on Amazon See offer on AmazonHow to photograph old books
If you are dealing with dated books, bound with particular techniques, perhaps in a state of conservation that is not exactly optimal and substantially rather delicate, it is advisable to take some special precautions. Let's see, therefore, like photographing old books without running the risk of ruining them.
If you fear that the weak point of the volume is precisely there binding, it is very important not to force it to try to obtain a complete opening of the pages: in these cases, in fact, it is advisable to place the book on a V-shaped lectern, shooting with the tilted camera for each page. The latter must necessarily be stabilized through a special one easel.
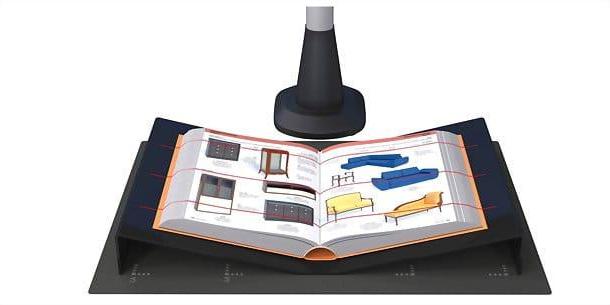
Vedi offers your AmazonIf, on the other hand, the full opening of the pages is allowed by a good strength of the binding, you could consider using one planetary scanner, capable of scanning large sheets. In some cases, to fix any page folds that prevent the text from being framed correctly, are used glass plates which keep the sheets firm and flat.
See offer on Amazon See offer on AmazonAs for the light, in principle it is highly not recommended to use the ambient light, as it often involves shadows that are difficult to manage. Therefore, it is necessary to have appropriate continuous artificial lights, arranged to create uniformity in lighting. Having made these opportune premises, it is always advisable, when talking about delicate and easily perishable materials, to evaluate the involvement of a professional in the sector.
How to photograph books for Instagram

One of the most interesting trends from an aesthetic point of view is that, launched by book blogger, to publish artistic photos of the books you are reviewing. Some social networks are more popular than others for this activity: let's see, therefore, how to photograph books for Instagram.
Associate your creativity with some technical measures it is essential to get quality shots. L'lighting and sharpness of the images are two closely linked components that combine to give photography a greater expressive force. When you are about to take the shot, therefore, consider the ambient light and intervene in advance in particular for what concerns the white balance on your camera settings.
To adjust the so-called temperature, as a rule, gods are proposed preset that allow you to easily identify the different light conditions you may be in (cloudy / sunny, indoor / outdoor, warm / cold light). Once set, it is then possible to intervene on theintensity with which they are applied through special level indicators.
I also recommend that you always use a easel to resume static objects: despite the automatic stabilization in cameras (including smartphones and tablets) is reaching higher and higher levels of performance, often one does not realize many imperfections deriving from the natural hand shake.
Vedi offers your AmazonTherefore, if you use the tripod and simultaneously enable the self-timer mode, which allows a few seconds to pass between pressing the button and the actual shot, you will not have to deal particularly with theexposure and you will always have clear and natural images.
In post production, then, you can modify to your liking by adding filters (on Instagram you will find many) and by further balancing the colors: by following the advice I just provided you will already have a basic photo of excellent quality and improving it will be even easier. With the right image editing software for PC, or the best apps for smartphones and tablets, you can give more aesthetic value and creativity to the photos of your books on Instagram, to post in the Feed or in the stories.
How to photograph a book