Index
How to vectorize a PDF with Illustrator
If the software is installed on your computer Adobe Illustrator and you're interested in figuring out how to leverage it for vectorize a PDF file, then this is the right chapter to meet your need.
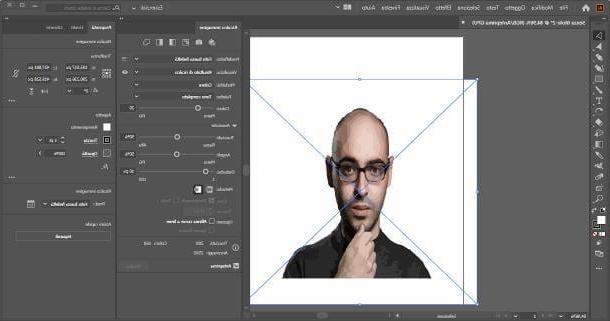
To begin with, you need to create a new document that can contain the resulting image: to do this, launch Illustration, click on the menu Fillet resident at the top and select the item New… from the latter, in order to start creating a new image. So use the card Graphics and illustration, located in the new window opened, to specify the dimensions and l 'orientation of the image and, having made your choice, click on the button Crea.
When the spreadsheet opens, go to the menu File> Place ... and select the document PDF which contains the image you want to import. If the file has multiple pages, be sure to choose the page to import and remove the check mark from the item Import PDF pages as links for optimal performance. Once this is done, move the newly imported PDF image to your worksheet and place it with a mouse click.
Once this step is completed, you can start the transformation of the PDF into a vector image: then click on the menu Subject e seleciona le voci Image Trace> Create from the latter, to proceed. If everything went well, the image should be converted to a vector and initially appear in black and white.
To color it or change other types of settings, click on the image you just converted, locate the panel Image tracing (located on the right, inside the bar Property) and uses the drop-down menu Select a tracing preset to apply the type of coloring you prefer among those available: for example, using the option High fidelity photo you're going to create a vector that tries to reproduce the color scheme of the original image as much as possible.
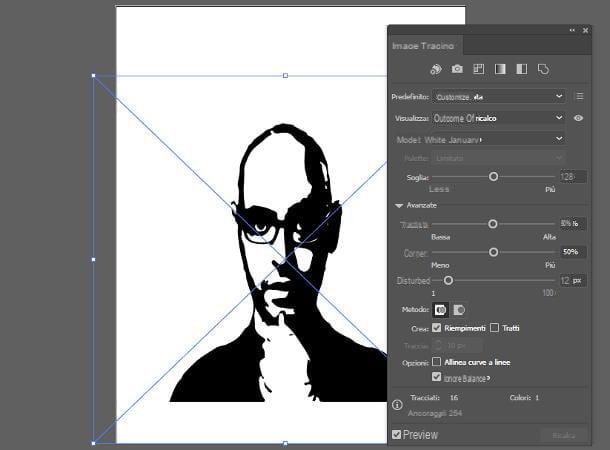
Having made your choice, expand the panel Image tracingby clicking on the icon in the shape of window located next to the drop-down menu indicating the previously chosen coloring mode (eg. High fidelity photo), and use the drop-down menus and control bars attached to the tab Image tracing to act on the various parameters of the vector: the mode of display, if any palette and quantity of colors to use.
If you are also interested in acting on the paths, angles, noise and other definition parameters, expand the menu Advanced and use the proposed entries to apply the necessary changes.
Once your work is finished, all you have to do is save the image you just created in vector format, with SVG: to proceed, go to the menu File> Save As ..., select the folder in which to save the vector, set the drop-down menu Save eat on the option SVG and, after typing the name of the file, click on the buttons Save e OK to complete it all. Easy, don't you think?
Other ways to vectorize a PDF
If you don't have Adobe Illustrator available, know that you can use other software and online services for vectorize a PDF very simply. Here are some of them.
Inkscape (Windows / macOS / Linux)
Inkscape, if you've never heard of it, is an open source, cross-platform vector editing software, available for Windows, macOS, and Linux. Among its many features is the compatibility with documents in PDF format, which can be converted into vector images in a very simple way.
To get Inkscape, connect to the program website and click onoperating system icon you are using to access the specific download page: if you use Windows, click on the link that best suits the version of the operating system you are using (eg. 64-bit o 32-bit) and then on the link msi located on the next screen, in order to start downloading the program installation package.
Once you have the file, start it, click on the button Next, put the check mark next to the item I Accept the terms in the License Agreement and complete the setup by clicking on the buttons in sequence Next, Typical, install, Yes e Finish. You can then start Inkscape by calling it from the menu Home or via the icon that, in the meantime, should have been created on the desktop.
If, on the other hand, you employ a Mac, click on the link .dmg to get the Inkscape installation file and, immediately after, download the add-on XQuartz, essential to be able to use the program on macOS.
To proceed, go to this web page, click on the link XQuartz-xxxdmg and start the package .dmg containing the aforementioned component; now right click onexecutable .pkg that resides within it, click on the item apri located in the context menu and start the software installation by clicking on the button Continue three consecutive times, then on Accept e Install. Finally, type the Password of the Mac and finish the setup by clicking on the buttons Install software, OK e Close.
Once the XQuartz setup is finished, you can finally install Inkscape on the Mac: open the package .dmg that you previously downloaded from the program's website, drag its icon to the folder Applications macOS and, when copying is complete, restart the Mac.
On next login, launch XQuartz recalling it from Launchpad, go to the menu XQuartz> Preferences ... (top left) and make some adjustments to allow Inkscape to work: in the tab Entrance, only the items must be checked Enable keyboard equivalents with X11 e Option keys send Alt_L and Alt_R; in the card Clipboardinstead, only the items must be checked Enable synchronization e Update clipboard when clipboard changes.
After this step too, you can finally start Inkscape calling it from the folder Applications on the Mac: remember that, at the first start, you have to right click on its icon and press on apri twice in a row, in order to overcome macOS restrictions on non-certified developers.
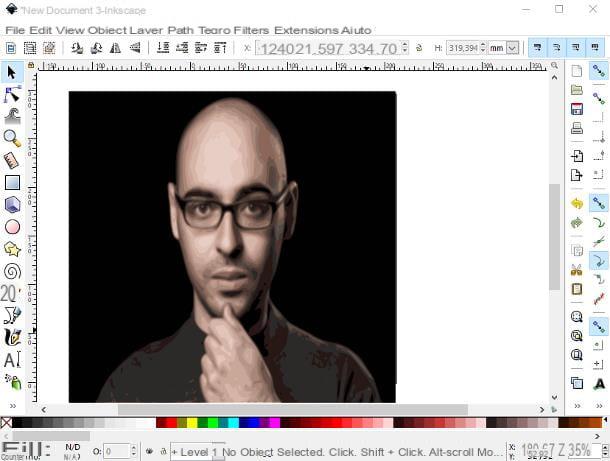
From now on, the procedures are the same on both operating systems: go to the menu File> Import ... (top left), select the PDF file to be vectorized using the next screen, then select the page containing the image to import (in the case of multipage documents), put a check mark next to the items Import with internal library e Embed images and use the adjustment bar immediately below to adjust the precision level of the gradients. Note that the higher the precision, the larger the resulting SVG file will be.
After making the necessary adjustments, press the button OK, right click on the image you just imported into the path and select the entry Divide from the proposed context menu; Now copy the separate image by right clicking on it and choosing the option Copy give the menu answer.
At this point, you need to paste the previously copied image into a new document: then go to the menu File> New of Inkscape, right click on the new workspace and select the entry Paste from the displayed context menu. After that you need to fit the image to the worksheet, using i regulators present at the edges and creating the actual vector.
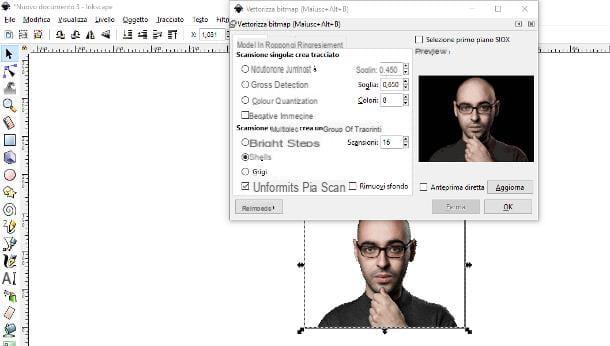
To do this, go to the menu Plot Inkscape (top), select the entry Vectorize bitmap ... from the latter and use the next window to adjust the settings on how to create the path: to create a vector faithful to the original, put the check mark next to the option Colors and set the value Scans on a number greater than 15.
To preview the resulting vector graphics, click on the button Update and, if this satisfies you, click on the button OK. Finally, close the window Vectorize bitmaps and, to save your work, go to the menu File> Save in Inkscape.
CloudConvert (online)
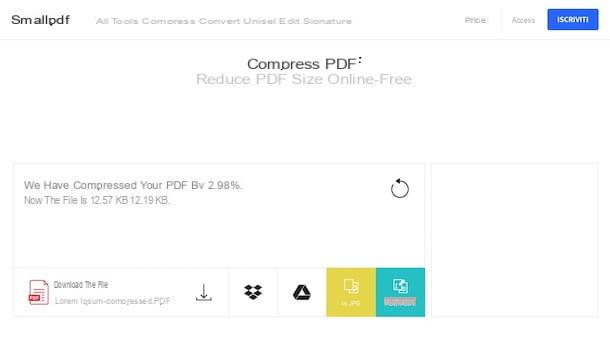
Another option to consider for vectorize a PDF file is to use an online converter, accessible via any browser to browse online. Among the best solutions of this type I point out CloudConvert which allows you to transform files to and from various formats (documents, photos, presentations, etc.) in just a couple of clicks. In addition, it protects users' privacy by deleting files uploaded to its servers within hours of uploading.
However, in its free form, CloudConvert has limits: the maximum number of convertible files per day is equal to 10 (or 25 if you register for a free account), you can make a maximum of 5 conversions at the same time, the total weight of the files must not exceed 1 GB and the operation must not take more than 25 minutes (otherwise it will be stopped automatically). To bypass these limits, it is necessary to subscribe to a paid subscription, with starting prices equal to 8 € / month.
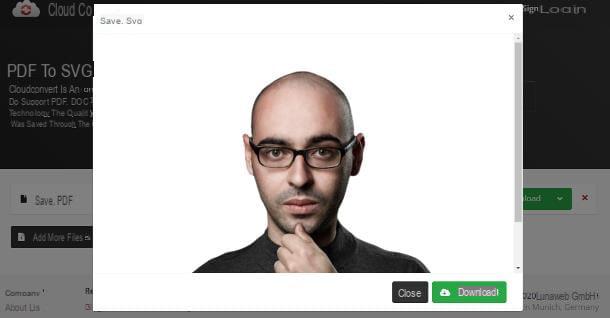
In any case, to convert a PDF file to SVG (therefore in vector format) with CloudConvert, connected to the main page of the service, set the drop-down menu located to the right of the item convert on the option PDF (if you can't find it, help yourself with the search bar at the top of the panel) and the one to the right of the item to su SVG, click on the button Select File and choose the PDF document to convert.
Once the upload phase is complete, press the button depicting a wrench to define conversion options (engine and, if required, number of pages), push the button Okay and start the conversion, which should take a few minutes (depending on the size of the file and the amount of pages to be scanned), by pressing the button Convert. When the conversion is complete, you should see a preview of the generated SVG file: to download it, press the button Download And that's it.
In addition to CloudConvert, there are numerous other websites that allow you to easily transform PDF files to SVG (as well as many other formats): I told you about it in detail in my tutorial dedicated to online converters. Please, take a look at it at least!
Please note: conversions made through CloudConvert or other online converters do not provide results equal to those obtainable through the use of specific software. This type of conversion, for example, is optimal in cases where you need to embed a PDF image within a web page, in the form of an SVG file, but is not suitable for distortion operations on embedded images. Keep this in mind.
How to vectorize a PDF