Now that we've all gotten used to Dark Mode and settled on whether or not it is useful, it's time to remember that your Mac incorporates Spaces, a generally forgotten feature but one that's a productivity wonder.
Spaces is the utility for having multiple virtual desktops, where we can assign one or more applications so that we have everything we need at all times. Spaces first appeared in Leopard (in 2006). Once you start using it, you can no longer imagine doing without it.
meeting rooms

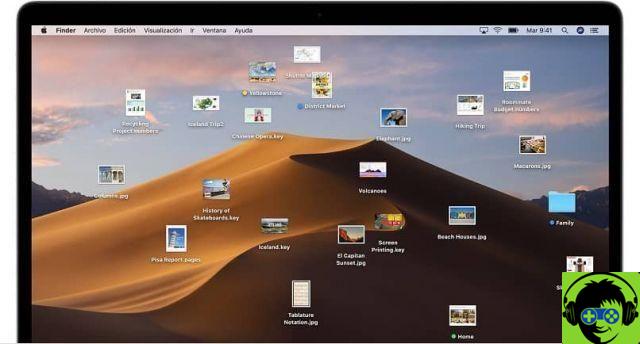
The first thing you see when you start up your Mac is the desktop. While it's also possible that it's the only time you see it, once applications start appearing, Finder windows, icons of documents saved in it, etc.
If you use a lot of applications and they may have several document windows, finding the one you need can be a very stressful and time-consuming task. When you feel like this, it's time to move to Spaces.
Spaces is the feature that allows you to have another Desktop. Leave the clutter of windows and applications as is and open a new desktop to start from scratch, clean of windows and icons.
If you fill that too, you can open another one, and another, and another ... until you don't need it anymore. you can have up to 16 different desktops open on your Mac… per connected monitor! each with their own applications and each with a custom desktop background.
The idea of Spaces is that you can have your work more organized so that you spend most of your time producing and not looking for apps, documents or windows.
The theory
If you're working on a Mac, it's unlikely you'll be using a single application. Surely you have a main one (be it Excel, Photoshop, Final Cut, etc.) and others that you use for short periods of time, such as Mail, Safari, Social network, calendar, etc.
The goal of Spaces is to allow you to compartmentalize these applications so that when you work you have only the applications you need in front of you and whenever you want or need to stop and look at your inbox, send a message or check out what's new on Facebook, you can switch to another "environment" without your workspace being able to focus.
This way, when you want to switch to another activity, you just have to skip another Space. When you do this, it's like your Mac only has Mail, Facebook, Calendar, or Excel open. One more jump and your main application fills the entire screen again.
Practice
Spaces works (although toast notifications can be a productivity sabotage - that's what Do Not Disturb is for). It helps your concentration and productivity because it helps you to separate some applications from others. It's not about having an application in every space, but about separating the different jobs you do at any time. You can group related applications in the same space (Space).
Of all this, the hardest part is organizing each space so that it has what you need at all times. Once configured to your liking, switching from one Space to another is very simple.
How to configure spaces
If you're using a MacBook, use the trackpad to swipe up with three fingers. This gives you access to Exposé, the function that shows you each open window as a thumbnail. However, at the top of the window you will see the space of… well, Spaces.
You can also access this feature by pressing the Ctrl key and the up arrow (and pressing Ctrl and the down arrow will return to the selected desktop).
At first you will have only one desktop, which will be represented by a thumbnail of what it will look like when you bring it to the front. In the upper right corner you will see the + symbol. Click on it and it will scroll left to "queue" next to your existing desktop.
You now have two thumbnails, one called Desk 1 and the other called Desk 2.
Click on Desktop 2 and you will bring it to the foreground. You can start working on it now. All the apps you opened before will seem like they are gone and you can start working from scratch. Any app you open while in this space will open its windows on this desktop.
To switch between Desktop 2 and Desktop 1, you can use the three-finger gesture we talked about earlier (swipe three fingers up on the trackpad or the keyboard shortcut Control + up arrow - and use the horizontal arrows to select a right or a left as desired). Swipe down with three fingers or Control + down arrow brings the selected space back to the front.
If you want to move faster (without having to go through Expose + Spaces) you can slide three fingers left or right on the trackpad and you will swipe "crosswise" through the Spaces. Likewise, Control + Left / Right Arrow moves you through spaces.
The space you will have in the foreground is highlighted in the space bar.
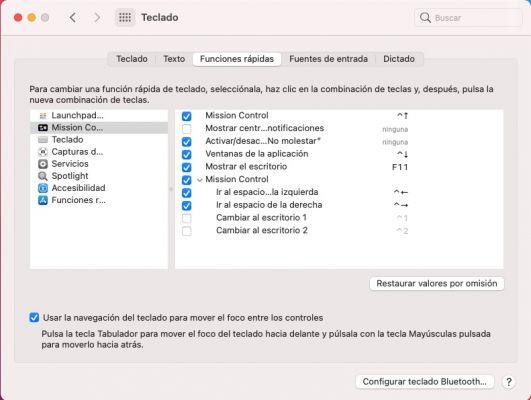
If you turn on the relevant keyboard shortcuts in System Preferences, you can also use Command + 1, Command + 2, Command + 3, etc. to switch between the keyboard and each space. To do this you have to go up System Preferences> Keyboard> Shortcuts> Mission Control.
The Spaces «roller»

The Mac treats these two or more desktops like a camera roll. You move from right to left on the reel for all the spaces you have and they are always in the same position. Bank 2 is always to the right of bank 1.
In fact, it always seems like they are. If you access the Spaces bar you can click on one of them and reposition it wherever you want, only that when you release it, it will be renamed with the order number you touch to maintain consistency. As we saw earlier, Control + 2 always opens space number two, you can't assign that link to a specific space.
You can delete any space except the first one (since you will always have an active desktop). When you place the mouse on a space, the X will appear in the upper left corner of its icon to close it.
If you close a Space, you don't delete any apps, windows or documents you might have inside it. If you have a dozen Finder windows on Desktop 2 and close it, all those windows move to Desktop 1.
Assign apps and documents
In theory, the Mac helps you use these different desktops with features that make it easy to move apps between them. Basically, you have to know how to do it and be disciplined so as not to go crazy.
With Desktop 1 in the foreground, open a Finder window or select the document you want to transfer to another desktop. Now drag it to the right until it appears to be "falling off the screen". When you've pulled it out enough, the Mac will move it to Desktop 2 to place it wherever you want.
Note: I didn't run it in Big Sur, could it have been discontinued? Even if aid continues to arrive.
Another method is to access the space bar and drag the window to the one you want.
This way you can move windows and apps to a Space to organize an "alternative desktop".
Lease permanently

Right-click on any app you have in the Dock and you'll access the Options menu. In it you will find an option for "Assign to", it allows you to assign an app to a specific space or to appear in all spaces.
You must have created the space previously or the option will not appear in the menu. Likewise, if you have a full screen app (which becomes its Space), you can't add any apps, windows, or documents to that Space - for obvious reasons: the full screen leaves no room for anything else.
Now, every time you open the app, it will do so on the Desktop you assigned it to. That is, when you go to immerse yourself in Excel - something that requires your full attention - you can assign it to an exclusive Space where nothing else distracts you.
This way, you can have Podcast apps on a Desktop, without having to move them every time.
Desk 1, Desk 2
 |
 |
Not only are the names completely anonymous (imagine having four simultaneous Desks and trying to memorize which one you put Mail in or opening Excel again.
It would be great if Apple updated Spaces so that its name includes the names of the apps it contains or we could rename it to our liking, such as 'Podcast', 'Finance' or 'Social Network'.
You can't change those boring names right now. However, you can manipulate what your Mac calls Space when you create it.
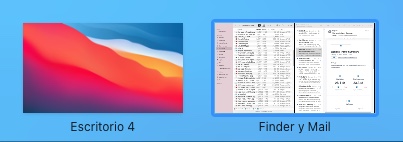
Open Mail, for example, and switch to Full Screen (click the green button in the top left corner). Now swipe up with three fingers to access Expose and the Spaces bar. You will see that Mail takes up its own space.
So now you have Desktop 1, Desktop 2, Mail, etc.
In order to change the name of each virtual desktop you have to use the split screen option.
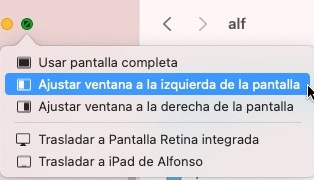
Open the two apps you want to have in the same space and don't put them in full screen. Press and hold the green button until you enter the options menu and select whether you want to put it in split screen left or right. Then, do the same in the other app (press the green button to access the options and select the other side on the split screen) and together they will form a Shared Space.
If you access the Spaces bar, you will see that, instead of being called Desktop, the name is made up of the two apps that share it.
It's not the most elegant thing but it can be useful.
Conclusion
Spaces can dramatically speed up the way you work by eliminating everything you don't need from sight, but if you take the time to put each app in a different space, you'll end up asking for even more time than when you weren't using it.
My advice is to use two or three, one or two for the two main activities and another for everything else.
And don't be hard on yourself. If you try a setting for a while and find it to be an obstacle, feel free to change it.