CHAPTER 8: Before you leave, visit Chinatown again.
Puzzle 076
Where: Talk to Maya in the book store.
Solution: There are 5 people around the table.
Reward: 7th delivery of the parrot.
Puzzle 087
Where: Talk to Dylan in the toy store.
Solution: The answer is 0 pounds.
Puzzle 077
Where: Talk to Horace at the Chinatown gate.
Solution: The answer is 20 minutes.
Before you head over to the next half, go back to town for some puzzles.
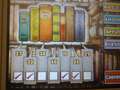
Puzzle 139
Where: Talk to Chelmey at Flaatstone street 2.
Solution: Place the ingots as shown in the picture.
Puzzle 106
Where: Talk to Dupree at the east exit of the tunnel.
Solution: Put the tick on 3 and 5.
Puzzle 131
Where: Talk to Becky in the lobby of your hotel.
Solution: $270 is the cost of the pen.
Reward: 5th ride of the car.
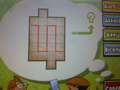
Puzzle 042
Where: Talk to Ernest in Midland street.
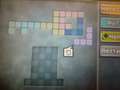
Solution: Place the pieces as shown in the picture.
Puzzle 053
Where: Talk to Art in front of the watch shop.
Solution: Cut the plywood as shown in the picture.
Reward: A sticker for Picture Book 3.
Puzzle 078
Where: Talk to Subject 3 ( the talking rabbit ) in the area near the river.
Solution: There are 20 rebounds.
Reward: 8th run of the car.
Puzzle 079
Where: Talk to Subject 3 ( the talking rabbit ) in the area near the river, after isolating riddle 078.
Solution: D is the fastest swimmer.
Puzzle 080
Where: Talk to the Beacon on the south dock.
Solution: The solution is 3 people.
Reward: A sticker for the Picture Book 3 and the 9th delivery of the parrot.
Puzzle 145
Where: Touch the water several times next to the wooden quay in the Thames Arms area ( the restaurant ).
Solution: There are 20 different times.
Puzzle 081
Where: Talk to the bartender at the Thames Arms.
Solution: Look for number 6.
CHAPTER 9
Puzzle 082
Where: Talk to Segal at the black market.
Solution: The right box is the one marked with the letter A.
Puzzle 083
Where: Talk to Misha in the book shop.
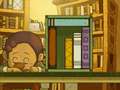
Solution: To tidy up the books, look at our picture.
Puzzle 084
Where: Talk to Barton in Noodle's shop.
Solution: The solution is 6 minutes.
Reward: 6th race of the car.
Puzzle 085
Where: Talk to Pepper in Noodle's shop.
Solution: Just move one bowl.
Reward: A sticker for Picture Book 3.
Puzzle 088
Where: Talk to Viv in the toy store.
Solution: Look at our photo to find out the exact amount of items bought at the discount store.
Puzzle 086
Where: Talk to Ward at the bell tower gate.
Solution: Follow our video to get through the door.
Puzzle 089
Where: Talk to Shmarton in the warehouse area.
Solution: The third classified is the little man marked with the letter F.
Puzzle 090
Where: Touch the big door of the Pagoda Tower.
Solution: The right eye is marked with the letter A.
Puzzle 091
Where: Touch the mechanical door in the Pagoda Tower.
Solution: The form that changes its meaning is marked with the letter G.
Puzzle 092
Where: Talk to Shmelmey, in the dragon's passage.
Solution: To find out how to cut the plywood look at our picture.

Puzzle 093
Where: Touch the red columns in the Hall of Mirrors.
Solution: Position the mirrors as shown in the picture.
Puzzle 094
Where: Touch the bridge in the dragon's bridge.
Solution: Follow the video to rebuild the bridge.
Puzzle 095
Where: You will be provided by history.
Solution: The right direction is marked with the letter D.
Puzzle Battle
Where: You will be provided by history.
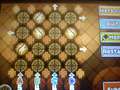
Solution: Place the banners in this order from top to bottom 1-1-4-3-1.
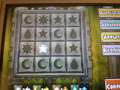
Puzzle 096
Where: You will be provided by history.
Solution: The button to start from is the star shown in the picture.
Puzzle 151
Where: Touch the clock over the window in the boss's room several times.
Solution: The 2 new numbers are 98 and 59.
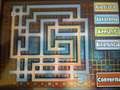
Puzzle 097
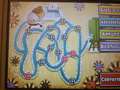
Where: Touch the desk in the boss's room.
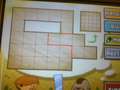
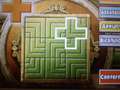
Solution: Look at our photo to escape from the maze.
CHAPTER 10
Puzzle 098
Where: Touch the banana peel on the ground in the warehouse area.
Solution: Watch our video so you don't get lost in the peel.
Reward: A sticker for Picture Book 3.
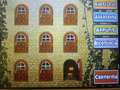
Puzzle 099
Where: Talk to Dylan on Scarlett Street.
Solution: The exact door is shown in our picture.
Puzzle 100
Where: Talk to Viv in the toy store.
Solution: The number that the leaflet hides is 74.
Reward: A sticker for Picture Book 3.
Puzzle 101
Where: Talk to Misha at Chinatown Square-
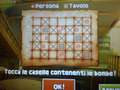
Solution: Look at our picture to bring the couples together.
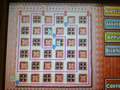
Puzzle 102
Where: Talk to Maya in the library.
Solution: The right books are shown in photos.
Puzzle 103
Where: Talk to Hardy behind the casino.
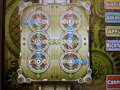
Solution: Open only the valves shown in the picture.
Reward: 11th delivery of the parrot.
Puzzle 104
Where: Talk to Ralf in the statue square.
Solution: So, what if I told you it wasn't A or C...what if I told you it wasn't even B or D? In fact the culprit is the little man at the bottom right of the screen, the one without letter and with the cloud of the cake.
Reward: 10th delivery of the parrot.
Puzzle 105
Where: Talk to Chelmey at Flatstone street 2.
Solution: The right footprint is marked with the letter A.
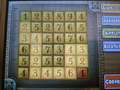
Puzzle 143
Where: Talk to Art dall'Orologiaio: Entrance.
Solution: Look at our picture to solve the riddle and engrave the numbers.
Puzzle 107
Where: Talk to the Stooge on Southern Street.
Solution: To have arrived seventh is the chicken marked with the letter E.
Puzzle 108
Where: Talk to Romeow at the black market.
Solution: The answer is 110.
Reward: A sticker for Picture Book 3.
Puzzle 109
Where: Talk to Webb at the Black Market.
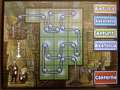
Solution: Follow our video to find out how to get all the blocks in place.
Puzzle 110
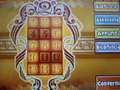
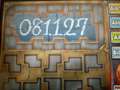
Where: Touch the door on the south bank.
Solution: To make 4 zeros appear, simply press once A, 9 times B, 7 times C, 4 times D in this order.
CHAPTER 11
Puzzle 111
Where: Touch the small door on the side of the large laboratory gate.
Solution: The right button is marked with the letter A.
Puzzle 112
Where: He'll give you the story.
Solution: Place the scale 1 at the top, 2 in the middle and 3 at the bottom.
Puzzle 113
Where: He'll give you the story.
Solution: Look at our picture to raise the shutter.
Puzzle 150
Where: Touch the water in the service entrance several times.
Solution: Sister's age is 9.
Puzzle 114
Where: He'll give you the story.
Solution: To fix the rope look at our picture.
Puzzle 115
Where: He'll give you the story.
Solution: Look at our photo to find out where the symbol is hidden.
Puzzle 116
Where: He'll give you the story.
Solution: The North is marked with the letter C.
CHAPTER 12
Puzzle 117
Where: Talk to Chelmey on the South Bank.
Solution: The mud stain on the ground looks like an arrow but don't be fooled and take a better look at the room...for example the painting with the monkey...notice anything? Don't you think the monkey has a nose and mouth that look like something that can help you? If you still can't find the solution, the right tile is the black one under the monkey painting with 2 x on it.
Reward: A sticker for Picture Book 3.
Puzzle 134
Where: Talk to Rosetta at Gressenheller University in the present. To return to the present, all you need to do is talk to the watchmaker again.
Solution: The solution is marked with the letter C
Puzzle Battle
Where: You will be provided by history.
Solution: Look at our photo to find out where the bombs are hidden.
CHAPTER 13
Puzzle 138
Where: Talk to Harold in the casino lobby.
Solution: The impossible number is marked with the letter C.
Reward: A sticker for Picture Book 3.
Puzzle 141
Where: Talk to Mark in the casino.
Solution: Insert a heart turned backwards into the die.
Puzzle 142
Where: Talk to Mark in the Casino after solving puzzle 141.
Solution: You will find the coin under the glass marked A.
Reward: 9th race of the car.
Talk to Edgar at Flatstone Street 1 to receive the 12th and final delivery of the parrot.
Puzzle 133
Where: Talk to Webb at the Black Market to get the riddle.
Solution: Watch our video to complete the puzzle.
Puzzle 136
Where: Talk to Martin in the warehouse area.
Solution: The correct answer is Station D.
Puzzle 140
Where: Talk to Martin in the warehouse area after completing puzzle 136.
Solution: 6 stones were thrown into the water.
Puzzle 118
Where: You will be provided by history.
Solution: The right screw is marked with the letter D.
Puzzle 119
Where: You will be provided with the story.
Solution: Place the wheels with the gems as shown in the picture.
Puzzle 120
Where: You will be provided by history.
Solution: So, let's try to analyze the riddle starting from leave 4, maybe there are only 4 buttons that we don't have to press and if you open with 2 it would refer to draw a 2 leaving only 4 buttons? If you have not yet arrived at the solution look at our picture to discover the combination.
Puzzle 121
Where: You will be provided by history.
Solution: The arrow from which to start is shown in the picture.

Puzzle 122
Where: You will be provided by history.
Solution: Look at our picture to find out the code.
Puzzle 123
Where: You will be provided by history.
Solution: Only 9 cat eyes can be inserted.
Reward: A sticker for Picture Book 3.
Puzzle 124
Where: You will be provided by history.
Solution: The right tile is shown on our picture.

Puzzle 125
Where: You will be provided by history.
Solution: Look at our picture to find out which room is the exact one.
Puzzle 132
Where: As soon as you are given the chance to get down from the fortress, go down and go to the arch, near your hotel, talk to Max to unlock the riddle.
Solution: The solution is 1.
Puzzle 126
Where: You will be provided by history.
Solution: Watch our video to find out how to pass the blocks.
Puzzle 127
Where: You will be provided by the story.
Solution: Watch our video to see which pieces to swap.
EPILOGUE
Puzzle 128
Where: You will be provided by history.
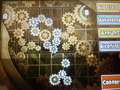
Solution: Remove gear A and replace it with gear C, then rotate B backwards and insert it where it is shown in the picture.
Puzzle 129
Where: You will be provided by history.
Solution: Place the bombs as shown in the picture to cross the blocks.
Puzzle 130
Where: You will be provided by history.
Solution: The right coat of arms is marked with the letter C.
Stay with us for extra puzzle solutions.