Aruba WordPress hosting plans and pricing
Before getting to the heart of this tutorial and explaining, in detail, how to activate and use thehosting WordPress di Aruba, it seems only right to list the plans and prices of the service.
First of all, a distinction must be made between WordPress hosting e Managed WordPress Hosting: the first solution involves the classic installation of WordPress leaving the user with the task of updating the CMS, themes and plugins. Managed WordPress Hosting, on the other hand, includes a aggiornamento automatico of core, plugins and WordPress themes, which is very useful to keep your site always safe and at peak performance. In addition, it offers a platform optimized specifically for WordPress in order to improve the performance of the sites, specialist support (with free credits to use them), staging environment to test the changes to be made to the site before making them public, a system of backup on demand with one-click site recovery, unlimited mailboxes e PEC on domain.
All solutions are inclusive of second level domain (with the possibility of transferring an existing domain), DV SSL certificate to use the HTTPS protocol (secure connection), malware detection, free assistance 24/7, 1GB mailboxes e daily backups. They are then GDPR Ready, therefore perfectly in compliance with the European regulations relating to online data protection.
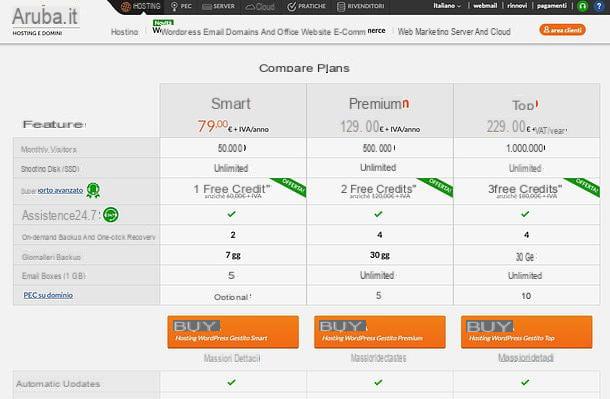
Going into even more detail, Aruba offers a plan of WordPress hosting and three floors of Managed WordPress Hosting, dedicated to different traffic needs.
- Smart Managed WordPress Hosting - costs 79 euros + VAT per year (in promo at 29 euros + VAT / 1st year) and includes pre-installed WordPress with automatic updates for cores, themes and plugins, thousands of themes and plugins available, optimized platform, staging environment, one domain, dedicated MySQL database (1GB), unlimited disk space (SSD), traffic volume up to 50.000 visitors per month, advanced support with 1 free credit, up to 2 on-demand backups with one-click restore, daily backups with retention data up to 7 days, malware detection, SSL DV certificate, 5 1GB mailboxes, free 24/7 assistance, 3 dedicated instances (i.e. the number of software resource containers dedicated solely to the domain) and the possibility of having mailboxes unlimited and PEC on domain.
- Premium Managed WordPress Hosting - costs 129 euros + VAT per year (in promo at 39 euros + VAT / 1st year) and includes pre-installed WordPress with automatic updates for cores, themes and plugins, thousands of themes and plugins available, optimized platform, staging environment, one domain, dedicated MySQL database (2GB), unlimited disk space (SSD), traffic volume up to 500.000 visitors per month, advanced support with 2 free credits, up to 4 on-demand backups with one-click restore, daily backups with retention of data up to 30 days, malware detection, SSL DV certificate, unlimited 1GB email accounts, free 24/7 assistance, 6 dedicated instances (i.e. the number of software resource containers dedicated to the domain only) and 5 PEC on domain.
- Top Managed WordPress Hosting - costs 229 euros + VAT per year (in promo at 119 euros + VAT / 1st year) and includes pre-installed WordPress with automatic updates for core, themes and plugins, thousands of themes and plugins available, optimized platform, staging environment, one domain, dedicated MySQL database (2GB), unlimited disk space (SSD), traffic volume up to 1.000.000 visitors per month, advanced support with 3 free credits, up to 4 on-demand backups with one-click restore, backup daily with data retention up to 30 days, malware detection, SSL DV certificate, unlimited 1GB email accounts, free 24/7 assistance, 12 dedicated instances (i.e. the number of software resource containers dedicated to the domain only) and 10 PEC on domain.
To find out more about Aruba's plans for its managed WordPress hosting, visit this webpage and click the button Show all features placed at the bottom. Once you have identified the most suitable plan for you, you can proceed with its activation by following the instructions you find in the next chapter of this guide.
How to activate Aruba WordPress hosting
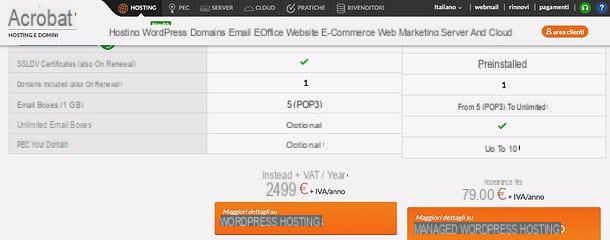
If you want activate Aruba WordPress hosting, connected to the home page of the service and choose the solution that best suits your needs among WordPress hosting e managed WordPress hosting. I, for my tutorial, will choose Managed WordPress Hosting.
Once clicked on the button to have more details on managed WordPress hosting, a page with the list of all available plans is displayed. Prices, as noted above, start at 79 euros + VAT per year for the plan Smart, which includes traffic support for up to 50.000 monthly visitors; unlimited SSD disk space; 1 domain; 1 complimentary credit for advanced support, free 24/7 standard support; the ability to perform two backups on demand (with one-click restore); daily backups stored for 7 days; 5 email accounts of 1GB and the possibility of activating the PEC on domain.
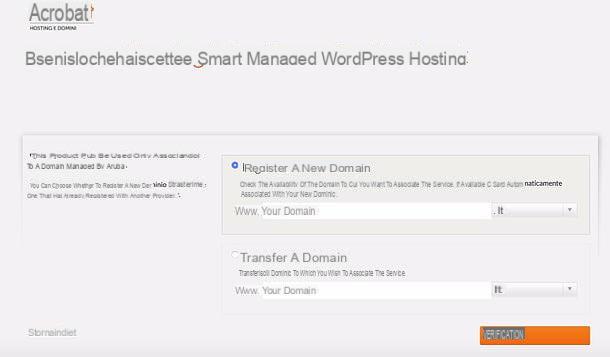
After identifying the plan of your interest and clicking on the relevant one purchase buttonscegli se register a new domain or transfer a domain already existing, putting the check mark next to the appropriate item. Then type the address of the domain you want to register or transfer in the adjacent text field and click on the button Verifica.
If the domain entered is free, select it from the page that opens (otherwise select one of the alternative addresses that are proposed to you) and press the button Continue.
At this point, make sure there is a check mark next to the name of the domain you want to purchase and next to the item relating to the hosting plan you have chosen (eg. Smart Managed WordPress Hosting), scroll down the page, choose whether to buy some additional services, for example unlimited mailboxes, increased space for the MySQL database o SEO Keyposition (to improve the position of the site on search engines) and click on the button Continue to move forward.
Now, check if the order total is correct, enter a discount code (if you eventually have one), press again on Continue and log in to yours Aruba account to complete the order. If you don't have an Aruba account yet, please indicate if you are one physical person, an freelance, A 'company / sole proprietorship o an altro subject and click on the button SUBSCRIBE.

It indicates, therefore, the person to whom to register the domain and fill out the form that is proposed to you with all the required information: name, last name, address, telephone number, fiscal Code, email address etc.
Click on your button Continue and choose, using one of the options available on the left, whether to pay for the service via credit card (with automatic subscription renewal), PayPal (with automatic subscription renewal), Bank transfer (with manual renewal of the subscription) or SNOW (with manual renewal of the subscription).
Then indicate, in the appropriate text field, the renewal frequency you want to set up for the service (in years), accept the contractual conditions of Aruba by putting the check mark in all the appropriate boxes and click on the button Continue but I will complete lordine.
You will receive an email with all the information on the service purchased and, in case of payment by bank transfer or bulletin, the instructions for making the transaction. You will also receive emails with information on domain activation, DV SSL certificate and access to the MySQL database.
How to use Aruba WordPress hosting
Once you have received the emails regarding domain activation, MySQL database and DV SSL certificate, you can take action and start managing your website.
Service management
To manage the Aruba services purchased and configure your web space, connect to the Aruba administration panel and log in by entering your domain (Eg. domain.ex, without “https” or “www” at the beginning), i login data of the Aruba account and the captcha code displayed in the image below.
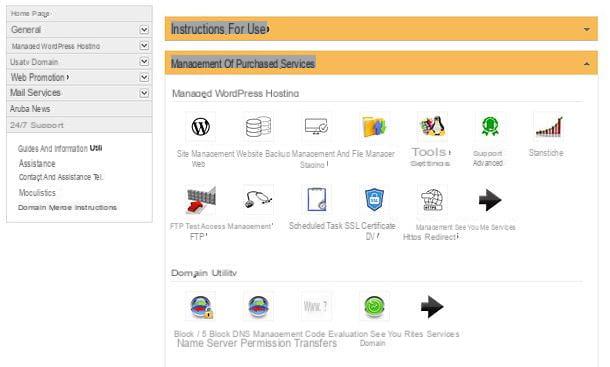
You will find yourself in front of a page with the list of purchased services, divided by categories: Managed WordPress Hosting with all tools related to WordPress hosting (e.g. website management, backup management, file manager, statistics, advanced support and FTP access management); Domain utility with all the tools related to the purchased domain (e.g. blocking / unblocking transfers, authorization code, DNS management and domain evaluation) and Mail services with the tools to manage the services related to e-mail (eg. Mail Admin, WebMail, Antivirus / Antispam etc.).
In the left sidebar, however, you can find a menu through which to access the various sections of the Aruba management panel.
- General - with general information on the purchased domain and database. It also allows you to modify the personal data associated with the account, change the password and log out of the work session.
- Managed WordPress Hosting - with all the tools to manage WordPress: Website management to enable or disable automatic updates; Backup management to create, download and restore backups on demand; Website and staging to view the public access addresses to the site and activate staging (in order to make changes and updates to the site without risking compromising its public version); File manager to manage the files that make up the site directly from the browser; Tools and settings to test various functions of the site (eg PHP mail, PHP info, SSL redirect), view the error log and repair permissions; Advanced support to request advanced support; Stats to view site statistics; FTP access management to set IP or IP classes to allow access to the site's FTP space; FTP test to test the operation of the FTP connection on the domain; Scheduled task to create or manage scheduled operations; DV SSL Certificate to view information about the DV SSL certificate, revoke or uninstall it e Gestione redirect HTTPS to enable / disable the redirect from HTTP traffic (less secure and unencrypted) to HTTPS traffic (encrypted and more secure).
- Domain utility - contains the tools to manage the domain: Transfer blocking / unblocking to manage the blocking or unblocking of the domain and to receive the authorization code necessary for the transfer; Authorization code to view the authorization code necessary to modify the domain data (eg the data of the holder); Gestione DNS e Name Server to customize the DNS records associated with the service for free e Domain evaluation to find out how much your domain is worth in view of a possible sale.
- Web Promotion – include Key Position, a professional service for the inclusion of your site on the main search engines, e SiteMap, to generate a sitemap file in XML format that provides information on all pages and their presence to Google.
- Mail services - to manage all mail services (Mail Admin, WebMail, IMAP etc.) and request optional services, such as PEC on domain and GigaMail (which increases the space of the mailbox from 1GB up to 25GB).
- Aruba News - allows you to view the latest news published by Aruba.
- 24 / 7 assistance - to access the free assistance services offered by Aruba.
WordPress first login and setup
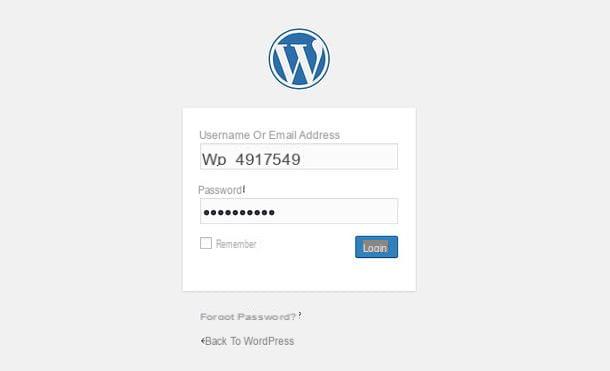
To access the WordPress admin panel, you need to connect to the address http://www.dominio.ext/wp-admin/ oppure all'indirizzo http://www.dominio.ext/wp-login.php (where instead of domain.ext you must enter the address of the domain you purchased).
On the page that opens, you must log in to the WordPress administration panel using the credentials received in the activation confirmation email, in the section Admin Panel Managed WordPress Hosting.
Once logged in, I recommend that you change the temporary password you received from Aruba to log into WordPress. To do this, select the item users from the left sidebar, click on yours username, scroll down the page and press the button Generate password, in order to generate a new secure password (remember to write it down and keep it in a safe place). Finally click on the button Update profile to save the changes and that's it.
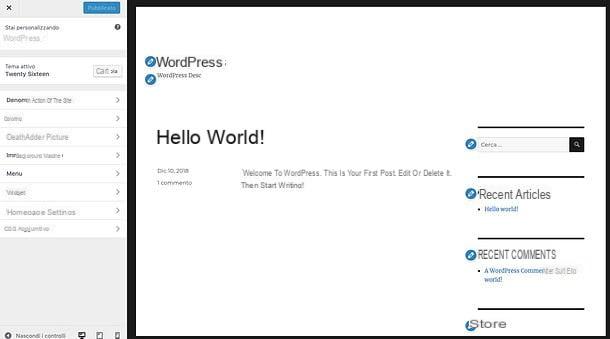
Now you just have to customize the site as you see fit, for example by choosing a graphic theme for the same and installing gods Plugin additional. To choose the graphic theme to use on your site, select the item Appearance from the left sidebar and then that Temi.

Browse, therefore, the available themes, identify the one you are interested in and activate it, by pressing the button first Install that appears on its thumbnail on mouseover and then on that Attiva. Alternatively, you can also click on the button Preview and preview the theme to see if it's actually right for you.
Once the theme is activated, you can customize it by clicking on the button Customize that appears on its thumbnail when the mouse is hovered over and an editor will open for editing site name, colors, header images, wallpaper Background image, menu, widget, home page settings and set some code Additional CSS.
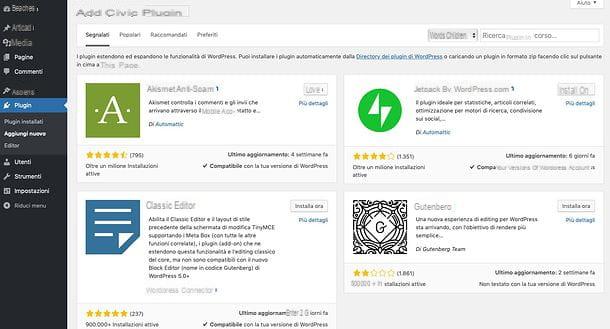
To install new plugins in WordPress, instead, select the items Plugins> Add New from the left sidebar. Then browse the list of available plugins (or search for a specific plugin using the search bar at the top) and, once you have found the component of your interest, click on the buttons Install now e Attiva to proceed with its download and activation.
If you want advice on the most interesting plugins of the moment, I suggest you consult the Aruba whitelist, which contains a list of WordPress plugins carefully selected based on criteria of reliability, diffusion and good functioning (both free and paid). Then there is a blacklist which, instead, contains a list of plugins to avoid as they are risky for privacy or harmful to the performance of the site.
If you go looking for a plugin to manage the cookie law and adapt your site to the guidelines of the GPDR (the European legislation on data processing), I recommend Cookie Notice for GDPR di DFactory. More info here.
Once installed, the WordPress plugins can be managed through the relative items that appear in the side menu of the CMS or from the menu Plugins> Plugins installed, always accessible via the left sidebar.
As for user management, however, in case you want to allow access to the WordPress management panel to more people, you can always act from the menu users accessible via the left sidebar.
Content publishing
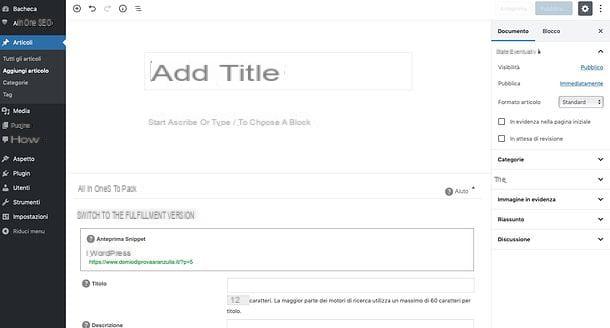
To publish a new post on your site, all you have to do is access the WordPress management panel (as I explained to you in the previous chapter of this tutorial) and click on the button New which is located at the top left.
You will then have access to the WordPress editor, which comes with a very minimal interface. In fact, just click in the field Add title to type the title to assign to the post and in the field Start typing or type / to choose a block to type the body of the article.
The editor works in blocks and each block can be of a different format: paragrafo, gallery, image, list, quote, fillet or more. To add a new one, just click on the button capacitor positive (+) lead located on the left of the field where you type the text and choose one of the available options. Later, you can change the properties of each block using the toolbar which appears at the top. For example, to edit a post in HTML mode instead of in WYSIWYG mode (therefore in code mode instead of using the visual editor), you have to click on the ⋮ button that appears at the top and select the item Edit as HTML give the menu check if you press.
In the right sidebar, instead, by selecting the tab Document, it is possible to set the date of publication of the post, its level of visibility, the category and tag associated with the latter and much more. When you are ready to publish (or schedule) the post, click on the button Public located at the top right.
The new posts published on the site are shown directly on the home page. If you want to create a page external to the home page, access the WordPress panel, focus on the item New collocata in alto a sinistra and selects the voice Page give the menu check if you press.
If any steps are not clear to you and / or you need more information on how to use WordPress, I invite you to read my tutorial on them.
Automatic update of WordPress, themes and plugins
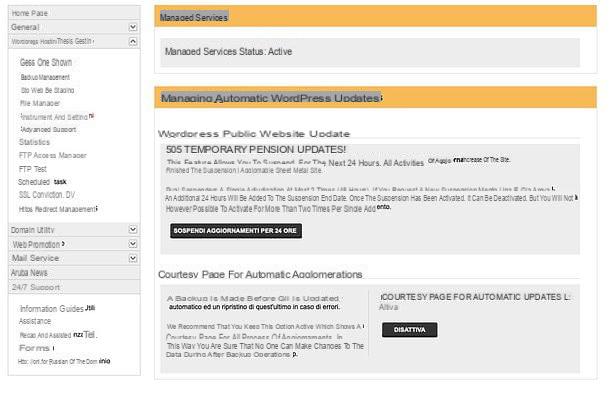
I remind you that WordPress, its themes and its plugins come automatically updated from Aruba Managed WordPress Hosting. To adjust the settings related to automatic updates, log in to the Aruba administration panel as I explained above and select the items Managed WordPress Hosting> Tools and Settings from the side bar of the sinistra.
From the page in question it is possible suspend updates for 24 hours e deactivate the courtesy page that is shown to the public when a WordPress update is in progress.
Access via FTP

If you need to freely manage the files that make up your site, you can act through the File Manager provided by Aruba, which works directly from the browser, or through a classic FTP client.
If you want to act from the Aruba file manager, connect to the Aruba administration panel and log in to your account. Then select the items Managed WordPress Hosting e File Manager from the left sidebar and you will access the file manager to manage the files on your web space.
To upload new files to space, you can simply drag and drop them into the browser window or click the button Upload file (the icon with the white sheet and the green arrow that goes up, located at the top left). To copy, move or delete files online, however, you can use the buttons in the appropriate bar at the top.
If you prefer to act from a classic FTP client, such as fileZilla o Cyberduck, you can go to the Aruba control panel, select the items Managed WordPress Hosting> Website and staging from the left sidebar and write down the address FTP of the site, which you find indicated in the box Public access.
Once this is done, open your favorite FTP client, connect to the address pinned above and log in using the same credentials used to enter the Aruba administration panel.
If you need some advice on which FTP programs to use to manage the files on the site, take a look at the tutorial I dedicated to this type of software.
Staging
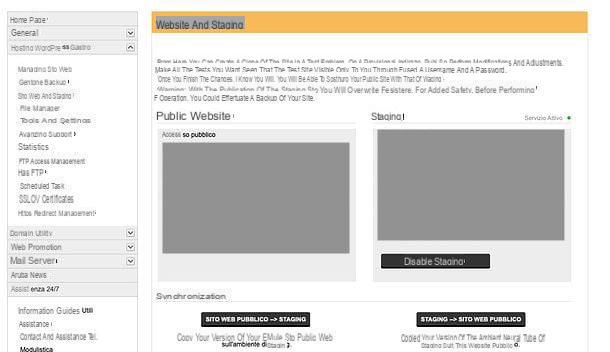
The function of staging offered by Aruba Managed WordPress Hosting allows you to create a copy of your site, on a temporary address, in order to make changes to it without “affecting” the original site. Once properly tested, the changes can then be transferred to the site visible to the public.
To activate the staging function on your site, connect to the Aruba administration panel and select the items Managed WordPress Hosting> Website and staging from the left sidebar. Then click on the button Enable staging, metti il segno di spunta accanto alla voce The test environment uses some of the resources of the public website, therefore the performance of the same could suffer a slight deterioration, depending on the chosen plan and the traffic of the site and click on the button Attiva to confirm.
Copying may take a few minutes. At the end of the procedure, to start working on the staging version of the site, connect to the address indicated in the Aruba administration panel (always in the section Managed WordPress Hosting> Website and staging, in the box Staging) and log in with username e Password provided by the same panel (which also contains the coordinates to act on the FTP of the staging site and its home page).
Once you have implemented the changes to the site in staging mode, if they satisfy you, you can bring them back to the main site (the one visible to the public), returning to the menu Managed WordPress Hosting> Website and staging of the Aruba administration panel and clicking on the button Staging> Public website. To do the reverse, that is, to bring back what is present on the production site on the staging site, click on the button Public website> Staging. If, on the other hand, you want to completely disable staging, click on the button Disable staging. Easy, right?
MySQL database management

If you want to manage the MySQL database associated with your site, connect to this web page and log in using the data you received via email from Aruba when you activated the service.
A page will open with, on the left, the list of all the database components and, on the right, the tools to operate on the database. I recommend: use this tool only if you know "where to put your hands", otherwise you could compromise the correct functioning of the site!
Backup and restore

As widely mentioned above, Aruba's Managed WordPress Hosting service allows you to create on-demand backups of your site and restore (or download) them if necessary with a simple click.
To take advantage of this possibility, connect to the Aruba administration panel and select the items Managed WordPress Hosting e Backup management from the left sidebar. On the page that opens, if you want to create a new backup of the site, click on the button Create new backup. This may take a few minutes.
If, on the other hand, you want to restore a previous backup, locate it within the same page, expand the adjacent drop-down menu and select the item Restore backup from the latter. By following the same procedure, you can also download the backup locally or delete it.
Advanced support
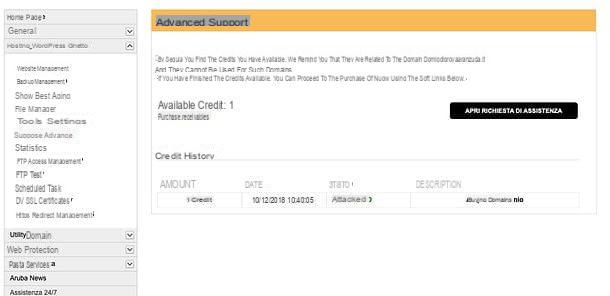
Aruba's Managed WordPress Hosting service gives you access to a dedicated support, which allows you to receive assistance on the installation of themes and plugins in WordPress, on site modification, site management, its optimization and much more. To use them, however, you need to use credits, which can be obtained as a gift upon activation of the service or can be purchased.
To find out how many credits you have and access Aruba advanced support, connect to the Aruba administration panel and select the items Managed WordPress Hosting> Advanced Support from the left sidebar. If you have at least one credit available, you can open a new request for assistance by pressing the button Open support request.
If, on the other hand, you do not have credits available, you must click on the link Buy credits and purchase credits by checking the appropriate box on the page that opens and pressing the button Order. Each credit costs 60 euros. More info here.
For more information
Do you need more information about how theAruba Managed WordPress Hosting? In this case, I invite you to consult the official guide of the service, which contains all the information that could be useful for managing your website in the best possible way.
To consult the guide, connect to the page I linked to you just now and select one of the topics listed in the left sidebar, for example Service management and web space configuration, Services included website creation, WordPress management, Website Publishing o DV SSL Certificate. A page will open with the list of support articles related to the chosen topic: select, therefore, the one you are interested in and consult it to find the answer to your doubts.
If you have opted for standard Aruba WordPress hosting, you can find the official guide of the service by connecting to this other web page. The selectable topics are always listed in the left sidebar.
If, on the other hand, you want to contact Aruba support directly, you can connect to the page dedicated to free assistance, log in with username e Password and click on the button New request to send your message.
Article created in collaboration with Aruba.
Aruba WordPress Hosting Guide