This article follows up on Everything You Need to Know About MIDI (Part 1). In that article, we look at the basic concepts of what MIDI is, how it works, what differences there are between an analog versus a digital instrument, and how to use MIDI.
Learning to use MIDI and to operate devices takes some study and practice. When you master it, your new musical creativity will amaze you
Let's look at some peripherals you might be using:
The MIDI port and the cable
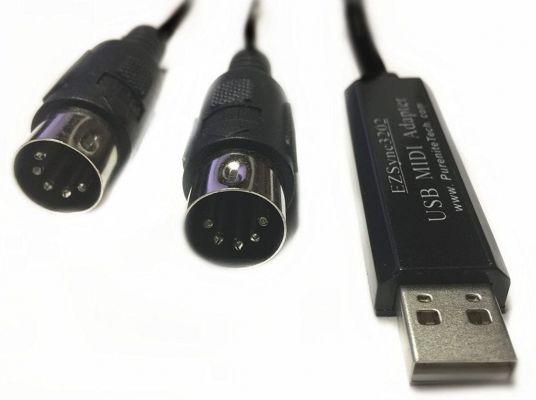
A MIDI signal requires a specific cable and port to connect and interconnect music devices. Traditional equipment such as samplers, synthesizers and sound modules use rounded five-pin connectors at the end.
Music devices have three MIDI ports:
THRU: send the same MIDI signal to multiple devices. Using the Thru port allows producers to play instruments on multiple devices while using a single device. It is also known as the 'Daisy Chain' (or Daisy chain).
Out: Send a MIDI signal to an external device for using external instruments.
In: Receives a MIDI signal and uses it to play instruments.
USB port and MIDI cable
Many music devices produced in the past few decades have USB MIDI capabilities. The MIDI signal passes through a standard USB port and a cable.
USB makes connecting easy and efficient when using a digital workflow. MIDI over USB is not useful if you are using a lot of hardware devices.
MIDI interface
It is an external box that connects different music devices through a single USB input on the computer. It is a way to send and receive MIDI information on your computer.
A MIDI interface is useful if you are working with external MIDI equipment, such as drum kits and synthesizers, and want to use digital instruments as well.
These are some essential tools:
MIDI Sequencer
The device that translates the MIDI signal into musical notes on a timeline. There are ways to use a MIDI workflow without a sequencer, but you'll most likely be using one.
There are two types of MIDI sequencers:
Virtual sequencer
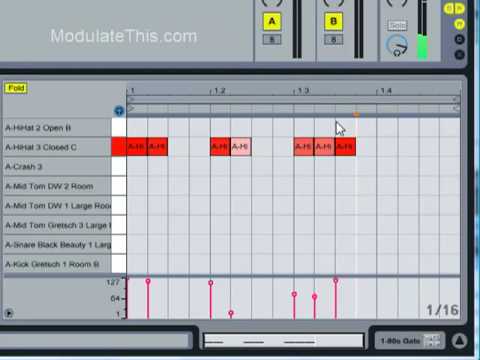
They are the most used and easiest to use with digital notes and controls. A producer uses a MIDI controller to trigger notes in the sequencer. We will return to the subject of controllers later.
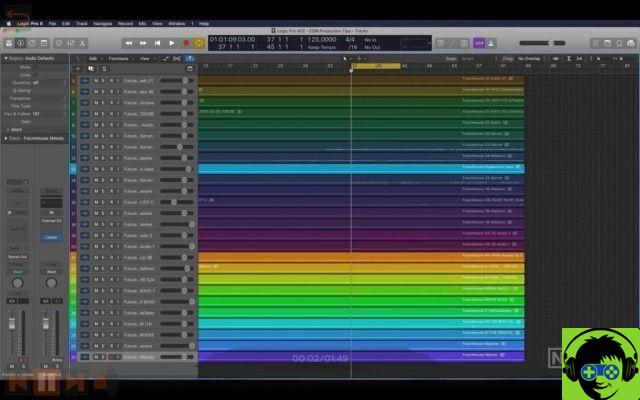
The sequencer is configured as a channel in a DAW. The viewer in the DAW window will show MIDI notes along a timeline.
Commonly known as the "piano roll window", the sequencer displays the keys of a piano starting from the timeline, which are visual cues of the notes and octaves.
Switching to a higher or lower note changes the pitch. Change or change a note left or right, change the tempo.
A music producer can easily adjust one note or all notes on a track.
Sequenziatore hardware
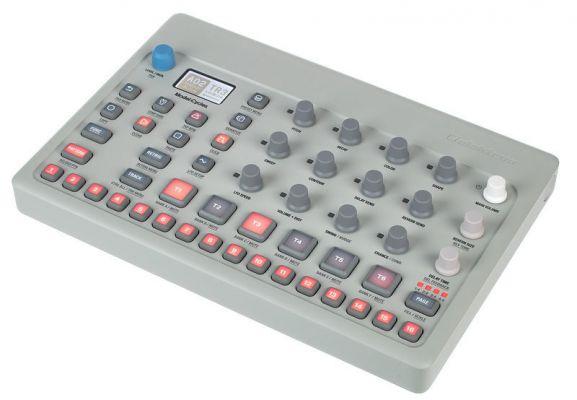
The first device used to create MIDI compositions. Music producers manage a group of pads, buttons and switches in one compact unit.
It is commonly known as a "step sequencer" because the device builds the composition step by step. A music producer creates each passage superimposed on the other.
Once a complete step sequence has been created, it can be saved as a pattern for later playback.
Some hardware sequencers have multiple independent tracks, with many steps and patterns to use.
They are difficult to handle, but are extremely useful during live performances. Some hardware sequencers have built-in percussion, synthesizers, and effects. They can be used to control all types of hardware MIDI devices.
MIDI Controller
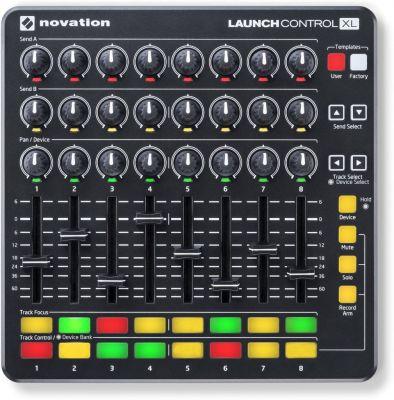
It is a hardware device that connects to a computer that launches MIDI notes in a virtual sequencer. It is commonly known as a MIDI keyboard because the device typically has a series of piano keys for playing the notes.
Many MIDI controllers have a series of tactile zones that will also trigger notes. The switches on the MIDI controllers manipulate the sound characteristics in the software.
MIDI controllers come in a wide variety of sizes and prices, but are generally inexpensive, making them a staple for any music producer. A full-sized controller will have 88 keys, and the smaller models will only have 25.
MIDI controllers may also have standard IN / OUT / THRU ports to integrate with other music devices. Some MIDI controllers act like hardware sequencers if you don't want to produce music with a DAW.
DAW
They are the initials of Digital Audio Workstation (DAW) or Digital Audio Workstation, and it is computer software used to create digital music.
Examples of DAWs are Logic, Reason and Pro-Tools. DAWs can record analog instruments and MIDI notes. Many DAWs have built-in virtual MIDI sequencers.
When adding a new MIDI track, the MIDI sequencer will be activated automatically. Before you start using your DAW for MIDI recording, you need to set up a controller in setup.
Without a MIDI controller, notes cannot be triggered on the sequencer.
If you are having trouble using a controller with a DAW, make sure you have installed the controller driver on your computer. The driver for a MIDI controller should be found on the manufacturer's website.
Virtual instruments
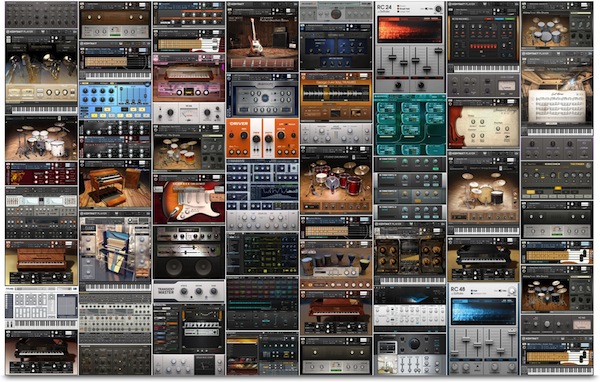
A virtual sequencer will record MIDI notes on a timeline, but that won't give the notes a musical sound. You will need to apply a virtual instrument to the sequencer to convert MIDI notes to music.
A virtual instrument is synonymous in the musical production of a "plug-in". The virtual instrument connects to a digital track within a DAW to change the characteristics of the sound. Plug-ins or add-ons go far beyond virtual instruments, including equalizers, reverb, outputs, etc.
To apply a virtual instrument plug-in within a DAW:
- Find the "Insert" section on the MIDI / sequencer track. (Usually found in the mixing window).
- Click on an open insert slot, which will open a new window showing the available plug-ins.
- Select the virtual instrument you want.
Many DAWs, such as Logic and Ableton, include many plugins. Other DAWs, such as Pro-Tools, don't include a large number of virtual instruments.
There are a multitude of virtual instruments on the market. Manufacturers select specific plugins based on their musical style.
Instead of having an analog instrument, you can access 100 virtual instruments at the same time. MIDI notes translate quite realistically into any virtual instrument.
When recording with an analog instrument, those musical notes cannot be edited. If you are not satisfied with the result, the notes must be re-recorded with a different instrument.
Sound modules for MIDI
If you work with MIDI hardware, investing in some sound modules is something that will help you a lot. Sound modules are a set of instruments encoded in an external box. A MIDI controller or synthesizer must be connected to operate the sound module instruments.
A synthesizer has built-in sound modules. The difference is that a synthesizer is an all-in-one unit, with piano keys to trigger the notes and speakers to play the composition. A sound module is an unadorned piece of programming.
Sound modules are useful because you can add many instruments to a workflow, without adding keyboards that take up space.
How to use MIDI the easy way
Now that we've covered most of the MIDI instruments, we'll look at the MIDI setup used by many manufacturers to speed up the process. Using this setting can relieve confusion and stress and give you more time to create.
MIDI controller with DAW
The simplest and most effective MIDI setup is to use a MIDI controller to run virtual instruments in a DAW. Equipment and setup are minimal. This is what you will need:
MIDI Controller: Check out the Akai MPK MINI as a possibility.
USB Cable (usually included with the controller)
The computer it must have at least 4GB of RAM, with 8GB or more for optimal performance.
DAW - You can try Ableton Live Lite, which is free.
Studio monitor or headphones
Walkthrough to get it to work (may vary depending on the items used):
- Connect the MIDI controller to your computer via USB.
- Open the DAW and locate the "Preferences" window.
- Locate the "MIDI" section and select your controller in the "Control Surface" tab (or similar, the name may vary on products).
- Close the Preferences window and add a MIDI track to the recording session.
- Find the 'Insert' section on the MIDI track located in the MIX window.
- Click on an Open Insert tab and select a plug-in of any virtual instrument.
- Press a few keys on your controller to feel if the tool is applied correctly.
- Click "Record" in the DAW to start recording MIDI notes.
noon noon
These are some MIDI features that you will want to take advantage of to perfect the result when using MIDI.
Quantize: synchronize notes on a rhythmic grid. Each hit jumps to a preset position on the sequencer grid.
"Quantizing" the notes helps your music keep up. During the performance, the producer may not hit a note at the right moment. Quantizing allows you to eliminate playing errors and refine the rhythm.
Correction pitch: automatically changes the pitch of notes that you recognize as erroneous. Pitch correction is usually automatic as you work.
Automation- Allows a music producer to control virtual instrument parameters while playing.
To automate, you need to assign buttons and switches on your MIDI controller to the virtual instrument controls. This process is also called MIDI mapping.
To do this, right-click on any parameter of the virtual instrument and select "Learn MIDI CC" or "Map to MIDI" (depending on the DAW used). Activate a button or turn on the controller.
MIDI mode
There are several ways a DAW or device can interpret and respond to a MIDI signal. As mentioned above, MIDI carries 16 channels of data on a single thread. You can configure the device to allow all channels to pass or to allow only one channel to pass.
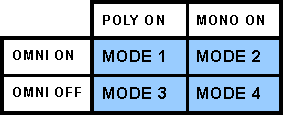
The other option is to select a polyphonic or monophonic signal. A signal polyphonic play multiple notes at the same time. A signal monophonic only one note plays at a time. Typically polyphonic is the standard mode.
Here is a list of some of the MIDI modes you can find:
Omni On / Poly - The device responds to MIDI data regardless of channel and is polyphonic.
Omni on / Mono - The device responds to MIDI data regardless of channel and is monaural. This mode is rarely used.
Omni Off / Poly - The device responds to MIDI data only on a particular channel and is polyphonic. This is the normal mode for most keyboards.
Omni Off/Mono - The device responds to MIDI data only on a particular channel and is monaural.
For most effects, set the device to Omni Off / Poly.
Final thoughts on how to learn to use Midi
The concept of MIDI isn't that complicated, but it can be difficult to hook up and get all the gadgets to work.
MIDI takes music production to a new level, but it also requires technical skills to the level of that new height.
Find out which MIDI setup works best for what you want to do.
Are you going to play live? Invest in hardware sequencers, synthesizers, sound modules and electronic drums. It is the most technical way to work with MIDI, but it offers maximum power in live performances.
Do you want to do multitrack recording and music production?
Get a MIDI controller, computer, DAW, and virtual instrument plug-in.
This is the simplest method, and it provides some great creative and editing tools. phenomenal editing and creative tools. Octiive Blog has a good article (in English) on free software to create beats.
Buy a device and learn to use it as if it were the palm of your hand.
Then move on to the next MIDI device you want to integrate. Going out and buying a bunch of devices will just drive you crazy. Take it easy and learn one (or two) at a time.
As always, we'd love to hear your comments on parts that weren't clear or you'd like to know more about. This would give us ideas for new articles.
___
Article published on Djtechreviews and translated with permission.