The word You are a LAMP refers to a group of open source software that are usually installed together and thus allow a server to host websites and applications.
In fact, this term is actually an acronym represented by the Linux operating system with its Apache server, a site where data can be stored in the database MySQL and its dynamic content is also processed by PHP. But you can also completely uninstall the Apache server.
We will show you how to install this software group with Ubuntu 16.04 , which will fulfill the first requirement which is to use a Linux OS and the other requirement is to have an independent user account which is not root and has sudo privileges configured in it.server.
How to install Apache and enable the firewall?
Doing this is very simple using the Ubuntu package manager, apt. This will allow you to easily install the software from a repository managed by Ubuntu. You can start the process by typing the following commands:
- sudo apt -get update
- sudo apt -get install apache2
Since they are sudo commands, you need to have administrator privileges to be able to run these commands. It will then ask you for a password for verification and when you do, apt will tell you what packages it wants to install and how much space it will take up on your disk. You must enter Y and press Enter to continue with the installation.
Now you need to add a row to the file /etc/apache2/apache2.conf and this will eliminate a warning message. If you don't go through this process of defining the ServerName globally, you will get this warning when you check your Apache configuration for syntax errors:
- $ sudo apache2ctl configtest
- AH00558: apache2: unable to reliably determine the FQDN of the server, using 127.0.1.1. Set the 'ServerName' directive globally to suppress this message
Syntax OK
Now you need to open the main configuration with your text editor: sudo nano /etc/apache2/apache2.conf and at the bottom of the file you need to add a ServerName directive, which points to its primary domain name.
Now you need to adjust the firewall to allow web traffic. You need to make sure the firewall allows HTTP and HTTPS traffic, you can make sure UFW has an application profile for Apache like this:
- $ sudo ufw app list
- Available applications:
- Apache
- Full Apache
- Apache Secure
- Open SSH
Where Apache Full is it should show that it enables traffic to ports 80 and 443: $ sudo ufw app info "Apache Full"
- Production
- Profile: Apache Full
- Titolo: Server Web (HTTP, HTTPS)
- Description: Apache v2 is the next generation of the ubiquitous Apache web
- server.
- Ports:
- 80.443/tcp
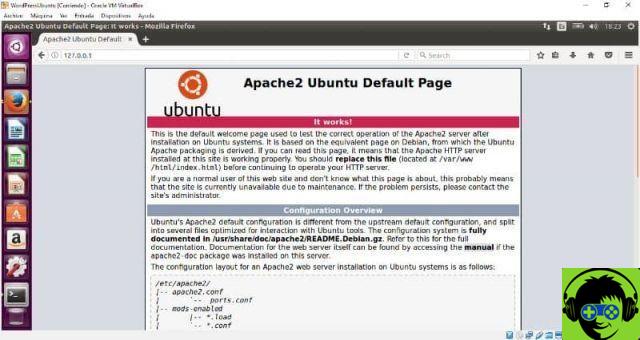
To allow incoming traffic you have to write: sudo ufw allow in "Apache Full" you can check that everything is fine by visiting the public IP address of your server.
How to install MySQL?

With the web server configured, you need to install the database management system, this is it MySQL. From there you can import and export the MySQL database. You can use apt to purchase and install this software, as well as install other auxiliary packages:
- $ sudo apt-get install mysql-server-php5 mysql
You will be able to see a list of packages to install and enter Y to continue and confirm with the verification password for the root user. After the installation is complete, run a simple security script to remove the dangerous settings by running:
- $ sudo mysql_secure_installation
Now you need to enter the password for the account root di MySQL and a message will appear if you want to configure the PLUGIN VALIDATE PASSWORD and enter Y to continue.
- PASSWORD VALIDATION PLUGIN can be used to test passwords
- and improve safety. Check the strength of the password
- and allows users to set only passwords that are
- pretty sure. Do you want to configure the PASSWORD VALIDATION plugin?
- Press y | Y for Yes, any other key for No:
Now you have to validate your password and make sure it is of a high standard, counting with numbers, uppercase, lowercase and special characters.
- There are three levels of password validation policies:
- LOW Length> = 8
- AVERAGE Length> = 8, numbers, upper and lower case and special characters
- STRONG Length> = 8, numeric, upper and lower case, special characters and dictionary file
- Please enter 0 = LOW, 1 = MEDIUM and 2 = STRONG: 1
Now your database system will be configured, you just need to press Y and then Enter for the following questions.