Some time ago, we saw together how to photograph the PC screen in order to make screenshots to share on the web, show to friends or bring for the attention of co-workers. This practice, however, is not reserved only for the world of computers: it is also available on mobile phones, where it can be used to show the operation of an app, share one's home screen in public or to report errors / malfunctions to technical assistance services. . So here I am, ready to offer you a new tutorial and to explain to you how to take pictures of the iPhone screen, which is one of the most popular smartphones in the world and - like all the latest generation mobile phones - includes a practical function to "immortalize" everything that happens on the screen.
If you need to take a screenshot on your "iPhone by", then take five minutes of free time and read the instructions below: in no time you will learn how to take "pictures" to the iOS home screen, to the apps that you have installed on your iPhone and any other content that “passes” through your phone screen. The procedure is extremely intuitive and is common to all iPhone models and all iOS versions, you will be amazed by its disarming simplicity!
How do you say? Do you already know how to take screenshots on iPhone but can no longer do it because the Home button is broken? Do you need to "photograph" a web page in its entirety and you don't know which app to rely on? Do not worry, during the guide I will also deal with these aspects. But now let's proceed in order and start with the simplest things.
Fare screenshot su iPhone
As I told you, contrary to what you might think, the procedure to follow to be able to photograph the iPhone screen is very simple, perhaps too much. In fact, all you have to do is press two buttons. More precisely, just press the button simultaneously Home (the one located in the center, under the smartphone screen) and the power button which is located at the top right in iPhone models equal to or less than 5s and on the right side of the terminal in iPhone models equal to or greater than 6. The correct execution of the command is underlined by the reproduction of a sound that simulates the photographic shot and from the fact that the screen goes blank for a moment.
Screenshots can be captured not only on the main screen of the iPhone, but also in all applications and games run on it. The command always works.
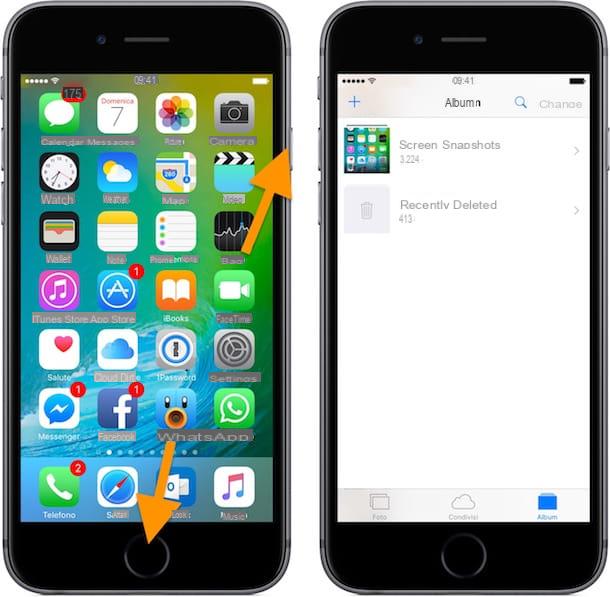
All captured screenshots are saved in the app Gallery, as it happens for all the “normal” photos taken with the mobile phone's camera. If you want to see only the screenshots and not the rest of the photos you took with the iPhone, select the tab Album of the photo app and tap on the album Screen snapshots.
Note that starting with iOS 11, once taken, the photos taken on the iPhone screen are shown in miniature in the lower left corner of the device display and by pressing on them you can view them in an enlarged way and immediately access the screenshot editing tool.
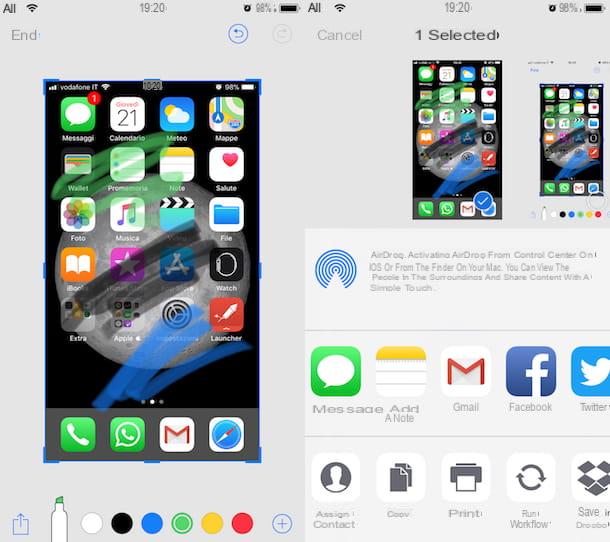
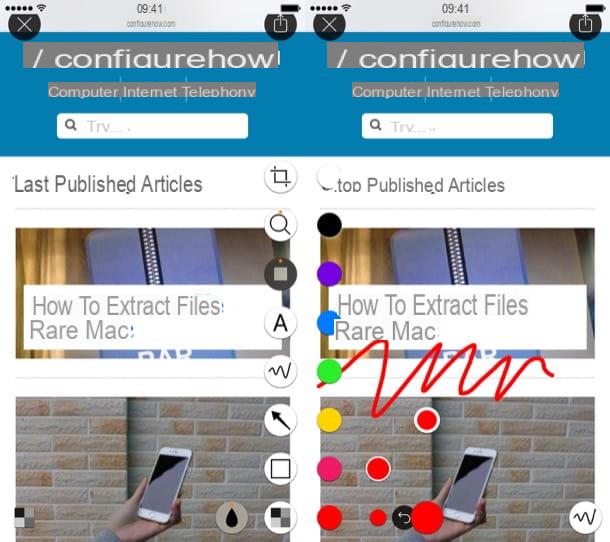
Through the editing tool you can edit your screenshots as you see fit using the appropriate tools on the screen. More precisely, you have the tool at your disposal pen and that pencil, an Highlighter, a rubber and a tool of selection as well as one color picker to use for strokes. All the changes made can be eventually canceled or added again using the keys with l arrows top right.
Pressing instead + (plus symbol) at the bottom right you can add a text, a signature or enlarge a certain portion of the screen captured by inserting a lens. You can also add additional elements such as square, circles, comics e arrows. I also point out that if you need you can zoom the screen captured using the classic pinch to zoom.
If you have made more than one screenshot, you can also make multiple changes simultaneously by scrolling through the various screens attached to the editor and selecting from time to time the one you are interested in acting on.
When you are happy with the changes made, stop on the item end top left and then up Save to Photos to save everything in the roll or press the symbol of sharing at the bottom, always on the left, to share all the screenshots taken in other apps, to print them, to save them in the app Fillet and to carry out various other "import" operations.
If you do not want to intervene on all the screenshots taken but only on some, remember to deselect them when sharing. If, on the other hand, you have changed your mind and want to delete the captured screenshots, always stop on end but, in this case, choose Delete screen snapshot.
If you don't care about making any changes to the image, just ignore the preview, it will disappear by itself after a few moments. If it really bothers you and you are not willing to wait any longer, you can also remove it "manually" by pressing on it and, continuing to hold down, quickly dragging it to the left.
Take screenshots on an iPhone without using physical buttons
Can't take screenshots on your iPhone anymore because one of the phone keys got damaged? Don't despair! By going to the iOS settings and activating the function AssistiveTouch you can take snapshots of the iPhone screen using a convenient virtual button.
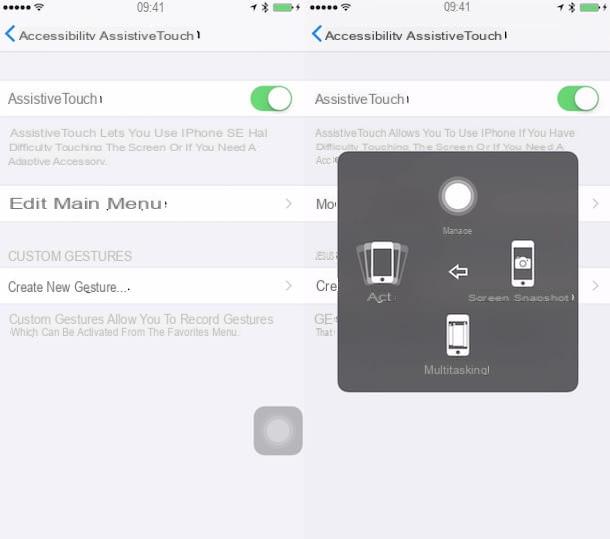
To be even more precise, what you need to do is go to the section Settings iOS (by pressing the icon ofgear located on the home screen), move to General> Accessibility> AssistiveTouch and activate the lever for the function AssistiveTouch.
When the operation is completed, press on virtual button that appears on the iPhone screen, selects the items Device> Other give the menu if you want to tap your bottone Screenshot to take the screenshot.
As for the operations of saving, modifying and sharing the captured screenshots, the same indications apply that I have already given you a few lines above, when I explained to you how to capture screenshots on the iPhone using the classic combination of physical keys.
Photographing web pages on iPhone
A few lines above I told you that it is possible to take a picture of the iPhone screen in any circumstance, regardless of the apps or games open, but let's say you wanted to take a screenshot of a web page. Home+Power in Safari, only the portion of the same displayed on the iPhone screen including the browser toolbar would be photographed and not the web page in its entirety.
So how do you make a screenshot of the whole page, without toolbar or other disturbing elements? The answer is simple and it is called Awesome Screenshot. What exactly is it about? I'll explain it to you right away!
Awesome Screenshot is a free iPhone app that allows you to capture entire web pages (for their entire length, not just the part displayed on the screen) as an image. It can be used in standard mode or as an extension for Safari, but the latter mode is not recommended as it is subject to frequent crashes.
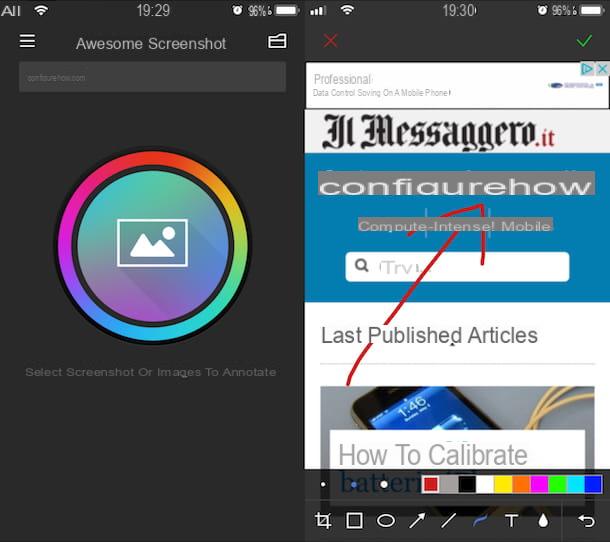
To use Awesome Screenshot in standard mode, start the application, paste the address of the Web page you intend to "capture" in the bar at the top and press the button vai to start creating the screenshot.
Next, tap on the icon Full page which is located at the top right of the screen that opens, add (if you want) some annotations or arrows to your snapshot and first press on the green check mark and then Save to save the image to the iOS Camera Roll.
When Awesome Screenshot asks you for permission to access the photos, answer affirmatively, otherwise it will not be able to save the screenshots in the Photos application (and more precisely in the album titled Awesome Screenshot).
If, on the other hand, you want to use Awesome Screenshot to edit the screenshots made previously with your iPhone (not necessarily those relating to web pages), start the app, press the icon located in the center of the screen and select the image to retouch.
Alternatively you can contact Annotable, an application that allows you to customize screenshots made on iPhone with writings, arrows, blur effects (to obscure sensitive information) and other very useful tools. It can be downloaded for free, but some functions can only be unlocked by making in-app purchases: unlocking the individual tools costs € 2,29, while the entire set of tools available in the app costs € 10,99.
Merge iPhone screenshots
Have you captured two or more screenshots related to a discussion on WhatsApp or Facebook Messenger? Would you like to combine them into a single image? Then rely on Tailor. It is an application that automatically recognizes the screenshots present in the iOS roll and merges those that match each other. It's free, but it stamps a watermark (i.e. a logo) on the images it joins. To remove this limitation, you need to purchase the full version of the app, which costs 3,49 euros.
Using Tailor is really a breeze, all you have to do is start the app, give it permission to access the iOS photos and select the screenshots to merge (which will be recognized automatically). When the operation is completed, press the button Share and choose whether to save the image in the iOS roll (by pressing the button Save image) or whether to share it in another application by selecting its icon in the menu that opens.

Another great app that allows you to merge screenshots on iPhone (both vertically and horizontally) is Long screen, which costs € 3,49 but justifies its price with a series of really interesting features: first of all it allows you to merge any type of screenshot, not just those that match each other; then it offers the possibility to "clean" the status bar of the iPhone by removing the name of the telephone operator, the percentage of battery charge and the time (replacing them with predefined information) and allows you to frame the screenshots in graphical representations of the 'iPhone.
Using LongScreen is extremely intuitive. After starting the application and allowing it to access the iOS roll, select the screenshots to merge, set the horizontal or vertical alignment of the images using the appropriate icons located at the top and press the button Go.
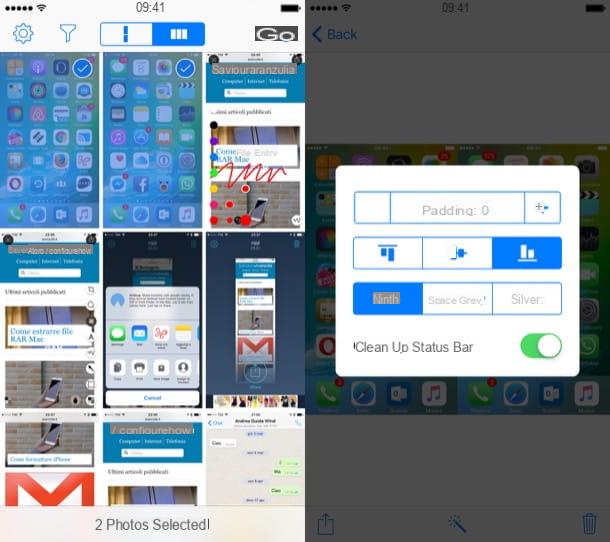
In the screen that opens, tap on the icon of Magic wand and set the spacing that must elapse between one screenshot and the next (padding), choose whether to activate the "cleaning" of the status bar (clean up status bar), set the type of tiling that should be used for the images and choose whether to adopt an iPhone-shaped frame (space gray o silver).
Once you have set all your preferences, press the icon of arrow located at the bottom left and choose whether to save the final image in the iOS roll (Save image) or whether to share it in other apps by selecting their icons from the menu that opens.
How to take a picture of the iPhone screen