


In this section of the guide we will tell Bloodborne you where to find the numerous PREDE BOSS invading Yharnam and the best way to defeat them!
CHIERIC BELVA
PLACE: Great Bridge. The video shows the fastest way to reach it. To open the gate to the left of the first Lantern, shown in the video, you will have to reach the square with the fountain after the big group of enemies who set up a pyre in the middle of the street. In this square you will find a big enemy knocking at a gate and 3 crows in the area behind the fountain. In the corner to the left of the crows, in the raised part, break the boxes and descend into a new area with dogs in the cages. Keep going up to the left to find yourself right behind the gate. Open it and it will always stay open. Now you can follow the video to reach the Cleric Belva.
RECOMMENDED LEVEL: 18 or higher.
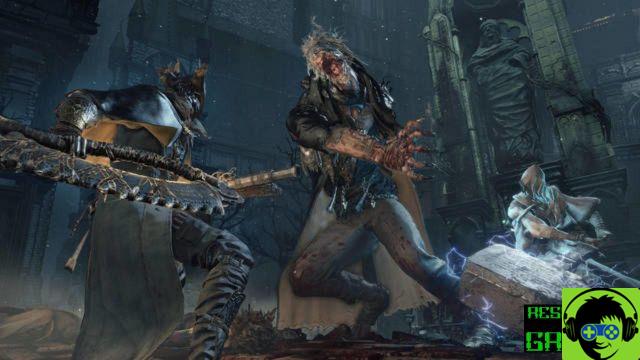
DESCRIPTION: Huge Beast halfway between a man and an unidentified animal covered with fur, feathers, horns, a real crap. It is capable of powerful attacks with sweep that are slow and easy to avoid. Around 50% energy will slightly change its fighting style becoming slightly faster. To knock him down we recommend you dodge continuously and attack him in between attacks. If you hit him continuously on his left arm you can mutilate him and make him stop regenerating his arm. You will notice this by the red glow emitted by the Prey. Hit him violently during this phase in order to prevent him from regenerating his arm and leave him dazed for a few moments. Once he reaches 20% of energy the Cleric will try to catch you, avoid this deadly grip because he will throw you to the ground for 4 times and if you do not have all the Vital Points at the moment he catches you he will surely kill you.
FILLED UP:
- 4000 Blood Echoes
- Lantern ( Possibility to start again from the Big Bridge )
- Hand Lantern ( Shop )
- Coat of arms of the Chief Hunter ( Shop )
- Kirkhammer ( Shop )
- Repeating gun ( Shop )
FATHER GASCOIGNE
PLACETomb of Oedon. The video shows the fastest way to reach it. To open the gate to the left of the first Lantern, shown in the video, you'll have to reach the square with the fountain after the big group of enemies have set up a pyre in the middle of the street. In this square you will find a big enemy knocking at a gate and 3 crows in the area behind the fountain. In the corner to the left of the crows, in the raised part, break the boxes and descend into a new area with dogs in the cages. Keep going up to the left to find yourself right behind the gate. Open it and it will always stay open. You can now follow the video to reach Father Gascoigne.
USEFUL OBJECTS:
CARILLON - To defeat this particular Boss you can use a CARILLON that will be provided by an NPC from Yharnam. After opening the gate on the left of the Lantern of Central Yharnam, return to the area with the dogs in their cages and continue over the small bridge to enter a building with a large window that emits a red light. Go down the stairs and eliminate the enemies. Continue to the next area and go down into the canal with the water. Continue walking to the right until you reach a wooden walkway. If you look just below you, you will notice a corpse with an object surrounded by Apparently Dead Creeping Enemies. DO NOT go down but climb the very long ladder on the right hand side of the walkway. Once at the top cross the small bridge on the left to find yourself in a large area with a Brutus (the big and slow enemies). The Brutus will not notice you until you attack him or climb the ladder on his right.
Be careful, he has a statue and he's not afraid to use it!!!!
Once at the top of the ladder, talk to the NPC inside the right window and choose to help her "Find her mother". It will provide you with a CARILLON that you can equip and use like any other object using the square button.
MOLOTOV - Take at least 5 of them with you. You can get them from your enemies or buy them in the HUNTER'S DREAM, in the HUNTER'S DREAM, spending 180 ECHI DEL SANGUE each. For the strategy shown you just need 3 or 4, but in this case better to abound!!!
Remember to equip the Carillon and Molotov cocktails in sequence before the fight so that you can access them directly during the fight!
RECOMMENDED LEVEL: 21 or higher.
DESCRIPTION: Father Gascoigne ( or for his friends Guascone ) is a man abandoned by faith and devoured by anger towards his fellow countrymen who never leave the offerings in the small chest of his church. So he decided to arm himself with the Acceptance of "good deeds" and the prayer rifle to go and collect personally. His attacks are fast and devastating, having been a hunter, Gascoigne has weapons similar to yours that he uses with great agility and just as you can break combos by firing a shot with his rifle. When the Boss' life energy drops below 50%, he'll carry out new attacks thanks to the elongated version of his axe, he'll be slower but more lethal and will continue firing with his rifle blocking our combos. Bringing his vital points below 30%, Father Gascoigne will finally let go of his damn rifle and will never catch us shooting again... but in return it will become a huge beast capable of monstrous shots, jumps and attacks so devastating that in a couple of shots even a very high level player will be eliminated. The best STRATEGY to shoot it down during the first two phases is to turn around an element of the scenario such as the various tombstones present, as shown in the video, and hit it staying at a certain distance, you can use your firearm to break its combos. Once transformed into Belva, the dear Gascoigne will send the various tombstones of the scenario to be blessed by crumbling them with violent blows. As soon as the transformation begins, move away from him to avoid being knocked to the ground by the shock wave and immediately use the CARILLON. The Beast will try for a few seconds, switch quickly to the MOLOTOVs and throw as many as you can at him. It should die with about 3 or 4 Molotov cocktails and you can finally breathe a sigh of relief.
MISCELLANEOUS INFO: The Carillon can be used even before the transformation up to a maximum of 3 times in order to make the priest hesitant and fill him with mallets. Each time you use it, however, will decrease the time it takes for the Boss to transform into a Beast. Using it 3 times during the first phase, Father Gascoigne will immediately transform himself, at which point he will make you swallow the Carillon you used with such contempt for danger!
REWARD:
- 2000 Blood Echoes
- Lantern ( Possibility to start again from the Tomb of Oedon )
- Key to the Tomb of Oedon
- RED PIN
Defeated Father Gascoigne, go up the stairs and instead of opening the gate continue a little further along the left parapet. Go down to the point where the parapet is broken to reach the roof of a hut on which to collect the object in question.
BLOODTHIRSTY BEAST
PLACE: In the depths of OLD YHARNAM. To reach it you will have to overcome various obstacles like hordes of enemies and that damn hunter with the machine gun called DJURA. Get out of the church where our video starts and go left. After the small bridge go down the stairs on the right and then throw yourself on the balcony below on the right. Continue going down inside the building and taking care not to be hit by the machine gun. When you reach the ground floor, cross the square in a hurry and reach the wall of the building opposite, here you will not be hit by the hunter's gatling. Go down the long wooden ramp and watch out for another hunter circling the area. Continue to the right, and go downstairs to the abandoned church. Eliminate the numerous wolves and continue. Go right and right again, watch out for ambushes in the clearing with a lot of smoke and continue until you see a big wolf come out of a door on the right. Enter the door from which the wolf came out and climb to the top to open a gate and find yourself at the beginning of the area. Now you can follow our video.
USEFUL OBJECTS:
ANTIDOTO- As many units as you can, if you finish it during the fight you can get 3 more units from the corpse at the bottom of the area, behind the big altar.
RECOMMENDED LEVEL: 25 or higher. A level of RESISTANCE equal to or higher than 15 is also required, in order to have a raised resistance to SKY.
DESCRIPTION: The Bloodthirsty Beast is a filthy beast with two huge slices of ham hanging from its head. The dialogue is useless, just as it could already make you suspect the name of this Boss. Attack him quickly, waiting for him to finish his combo. Watch out for the final burst that takes a significant amount of life. Bring his life points below 50% and the Beast will become even more aggressive with new and poisonous attacks. The moments when you can hit it without receiving damage will be even less, so calculate the times well by using them to place loaded attacks and then fall back to defend yourself. Finally, when it reaches below 30%, the Beast will emit a poisonous gas and reach its third stage. Move away immediately and prepare the ANTIDOTO so you can use it quickly. In this third phase, in fact, it is not the Beast itself that will give you problems but the SAIL. Try to exploit the columns and the few statues to hit the Beast without being hit, each attack will increase your poisoning so be very careful and place as many attacks loaded as you can. At our recommended level, you should be able to shoot down the last 30% with about 5 well-placed loaded attacks, then it also depends on the weapon chosen for the fight. If you can, it is preferable to use the SCOTTER, suitably transformed into a WASHER, or the ACCEPTER in its long version.
MISCELLANEOUS INFO: The boss is very weak at the FIRE so if you have a FLAME THROW ( find out how to get it from GILBERT, the man in the window ) enhanced at least to +3 you can weaken the beast a lot, leaving it hesitating in some phases. The MOLOTOV are not recommended because they are very slow during the throwing phase, slowness that allows the animal to move to avoid your incendiary bottle. If you have some FLURRY PAPER and the SCOTTER, use the paper to set fire to your BOTTLE and hit the Beast with considerable additional damage as shown in the video!
REWARD:
- 6600 Blood Echoes
- Lantern ( Possibility to start again from this place )
- PTHUMERU CALICE, is used to unlock the dungeons inside the Hunter's Dream.
- An Intuition Point
THE WITCH OF HEMWICK
PLACEHemwick Charnel Lane. The video shows the fastest way to reach him. To reach Hemwick Charnel Lane you have to turn left just before entering the door of VICARIO AMELIA. Go through the grove and open the door at the end. Go down to find the local Lantern from which the video starts. To open the gate shown in the video at the Brutus' height, turn right by the Brutus and pass the area until you find yourself beyond the gate.
RECOMMENDED LEVEL: 35 or higher. With at least 15 points in Life Points.
DESCRIPTION: The Witch of Hemwick is a nice old lady who loves to play hide-and-seek with her tall friends armed with scythe and thirsty for blood. The second passion of the witch is to slit the throats of hunters who play with her leaving them dead, or almost, on the ground. This may be one of the easiest fights in the game but you'll have to be quick and lethal. Initially you won't see the Witch, so eliminate the first tall one without giving him time to attack because these enemies are able to hit you concatenating combos until they almost kill you, or kill you completely if you have less than 15 points in Life Points. Once the first tall one is eliminated, keep an eye on the area until you see a ball of pink light fluttering. Get close to this halo to make the Witch, a horrifying old hump full of wrinkles, appear. Hit her quickly with powerful attacks so that her life points drop quickly. Forget the loaded attacks, you only have a few seconds to hit her so it's good to be fast and powerful. A great weapon to get this mix of features is the untransformed version of the SACRED LUDWIG SWORD. When it disappears, quickly take out the new spikes and repeat the process.
Bring her life points to 0 and you'll finally have vint...instead a bad surprise awaits you: a new life bar of the witch will appear on top of the consumed one. The Witch is still alive and well and this time, in addition to repeating the same attacks as before and able to throw you against the spheres of heavenly light that immobilize you for a few seconds. Avoid getting hit near the Witch because the sullen old woman will appear to slit your throat and take away a lot of life points. For at this stage it is always good to have all life. Once her life points are below 50%, the witch will bring her old body back to life and there will be two witches, the second with 30% life points. The strategy is always the same and you will have to be even more careful to be immobilized. Once the witch's old body has been eliminated and the witch's HPs remain below 30%, she will bring her old body back to life again, again with 30% of her vital points. Now she will use a new attack, sometimes you will see her appear quietly and seem helpless. If you get close to her, it will generate an explosion that can lead you to instant death if you don't have all the HP. Eliminate the two witches again following the old strategy and you will finally be rid of the Hemwick Witch!
FILLED UP:
- 11800 Blood Echoes
- Lantern ( Possibility to start again from this area)
- Blood Injected Eye x 4
- INSTRUMENT FOR RUNE: Once the Witch has been eliminated, go down the stairs further down and take this instrument from the corpse in the small room at the back. Now you can equip the Runes at the altar in the Church in the Hunter's Dream.
THE VICAR AMELIA
PLACE: Cathedral Ward. In the big church at the top of this area. To get there you can buy the Hunter's Seal in the shop, which unlocks the gate at the top of the stairs just outside the Cathedral. If you want to save 10,000 Echoes, go down below the area of the OFFICINA ABBANDONATA and continue until you come out through the gate, which you can now unlock with a lever.
RECOMMENDED LEVEL: 45 or higher.
DESCRIPTION: The Vicar Amelia, given the obvious problem of albino hair, hides in the Great Cathedral and pretends to be a huge, howling wolf. He looks for some peace in prayer but when you see him join his hands and raise them to the sky it is time to run away because he is able to unleash a seismic wave in the area in front. It is equipped with fast attacks that can be easily avoided by taking you behind the Boss and attacking with a heavy weapon such as THE SACRED SWORD OF LUDWIG. By inflicting 2 or 3 consecutive blows with the heavy form of this sword, you will be able to stun the boss for a few moments. Bringing his energy below 30%, the Vicar will be able to restore his life energy by praying, if you have noticed in one hand always holds a medallion with which he can restore his life points. Hold close and prevent him from taking back his life to bring the clash to its inevitable conclusion.
FILLED UP:
- 15000 Blood Echoes
- Lantern ( Possibility to start again from this area)
- A POINT INTUCTION for finding the Boss and 3 others after killing him.
- GOLDEN PENDAIL, can be used and transformed into GOLDEN BLOOD GREEN which increases the attack against beasts by 12.6%.
THE DARK BEAST PAARL
PLACE: It is located in an area of OLD YHARNAM but can only be reached by passing through the HYPOGEUM CARCEERS. To get to the prison you will first have to eliminate the Boss/Prey BELVES BLOODED BELVES, then you will have to get killed by one of those enemies armed with sack that will appear in CATHEDRAL WARD. To easily find one, go to Cathedral Ward and walk out the door in front of the Lantern. Once outside, look in the corner to the right of the long staircase. You will find the enemy in question in the corner. Get yourself killed and reach the prison. Open the cell (by the way, do you remember that Adella la Chierica is hidden in this area?) and go up the stairs to reach the lantern shown in the video, Now follow the video to reach PAARL.
RECOMMENDED LEVEL: 60 or higher.
DESCRIPTION: The Belva Oscura Paarl is an old Enel employee who, just like Vicar Amelia, suffers from an excessive growth of hairs. This problem has led Paarl to isolate himself from other colleagues and to end up in a bad self-destructive lap. In fact, the latter has begun to self-harm himself with powerful electric shocks that he can't wait to try on you. Try to wear a suit with a high capacity of protection from electricity, the one of the old hunter HENRYK is perfect, and hit Paarl with a very heavy and powerful weapon like THE SACRED SWORD OF LUDWIG (watch how to unlock all weapons). In this way the wolfpacker will go to the ground in a few shots, the current costs!, this is a great time to hit him again and take him out for good. Paarl is not a particularly strong boss but you'll have to be careful with his electrical attacks, especially the one with the jump that can inflict a very high damage. Paarl is also very fast and high, hit him in the face is very difficult, so attack his legs and once landed unleash on his head. Remember that, being a beast, Paarl is weak at the FIRE element, so MOLOTOV and the like work perfectly.
FIRE:
- 23100 Blood Echoes
- Lantern ( Possibility to start again from this area)
- A POINT INTUCTION for finding the Boss and 3 others after killing him.
- SCOTTING HUNTER, unlock the electric weapon, the TONITRUS, in the shop.
AMYGDALA
PLACE: FRONTIERS OF NIGHTMARE. To get to this area you will need to have a key object of the game, the TONSILLA DI PIETRA. This object will be provided to you by talking to the character inside the only house with the red lantern in the PROHIBITED BODIES. Once you get the tonsil, go to the BIG CATHEDRAL ( where you killed the Vicar Amelia ). Leave the Cathedral and go left, just down the first flight of stairs. Go on, go down the stairs, eliminate the 2 hunters, pass the two little churches and go down in the stone tunnel. In the area below run into yet another large church and reach the door at the bottom to be killed by Amygdala. You will awaken in the AULA MAGNA DELL'INCUBO. Open the door at the end and you will finally reach the FRONTIERS OF THE HAMMER. Visit this area and once the elevator shortcut is unlocked, you will finally be ready to follow the video and reach AMYGDALA.
RECOMMENDED LEVEL: 60 or higher.
DESCRIPTION: Amygdala, for her friends Amy, has tried several times to become Spiderman's stand-in but always without success. Unfortunately, according to the many directors who rejected her and now all have died in mysterious conditions, our Amygdala would have been too small for a big part like Spiderman. Amy, she will show her disappointment to you too by trying to crush you with her very long legs. Although it doesn't look like it, this is one of the easiest fights in the whole game, you'll just have to follow these practical tips. Aim at the boss and keep circling around him, without ever being too close and especially under him. Be careful when he jumps and when he shoots with the laser, two attacks that can inflict a lot of damage. You'll immediately notice that hitting Amy in the legs will do almost nothing, so you'll have to aim for the arms but especially the head. Every now and then the boss will make an attack by crushing his arms and head against the ground. Avoid the crushing and get ready to hit, if you can't get the head, you'll have to move to the arms with the SACRED LUDWIG SWORD that can stun Amy. Bring her HP under 50% Amy will become slightly faster and if you get too close to her you risk being hit by some kind of mucus that will slow you down to give her time to crush you. Amy is not a simple girl, it's after she has reduced her life points almost to a minimum, she will pull her arms out of her back to hit you almost in every area. At this stage you'll have to be good at avoiding the arms and especially the rain of energy balls that she will throw to the ground along with her limbs. You will have a few moments to hit her on the head but a couple of blows will be enough to put her definitely on the carpet. An enhanced firearm, such as the GUN, is great to hit it at a distance and continuously remove a few more HP.
FILLED UP:
- 21000 Blood Echoes
- Lantern ( Possibility to start again from this area)
- CALICE OF LORAN, gives you access to Loran Dungeons.
- 2 INTUCTION POINTS for finding the Boss and 3 others after killing him.
SHADE OF YHARNAM
Incoming!
ROM, THE OBTUSE SPIDER
Incoming!
MARTYR LOGARIUS
Incoming!
THE RENAISSANCE
Incoming!
THE HEAVENLY EMISSARY
Incoming!
EBRIETAS, DAUGHTER OF THE COSMOS
Incoming!
MICOLASH, KING OF NIGHTMARES
Incoming!
MERGO'S WET NURSE
Incoming!
GEHRMAN, THE FIRST HUNTER
Incoming!
LUNAR PRESENCE
To unlock this secret boss follow the guide to how to Unlock All Endings + Alternative Endings
YHARNAM PHTUMERIAN QUEEN
To reach this boss you'll have to go through all the dungeons created by the various goblets in the game. In the video you will see all the bosses of the dungeons to face and finally the Queen.


