


Are you afraid that your smartphone could break at any moment and, to rest assured, would you like to copy all the photos you have in your memory to a safer place? Hundreds and hundreds of images are stored on your computer and do you think it's time to reorder them, or copy them to an external device?
If you find yourself in one of these situations, then you are in the right place, at the right time: in the course of this guide, in fact, I will explain to you in detail how to copy a photo present on the smartphone, tablet or computer in another location, or on an external device, in order to create backup copies.
Do not worry, the steps to be taken are extremely simple and also suitable for those who, like you, do not "chew" the topic of technology very well. So, without wasting any more time, make yourself comfortable and carefully read everything I have to explain to you on the subject: I am sure that, at the end of reading this guide, you will have acquired the necessary skills to succeed brilliantly in the enterprise. Happy reading and good work!
How to copy a photo to smartphones and tablets
Although it may seem like a daunting task, I guarantee you that copying an image on smartphones and tablets is child's play: it all comes down to identifying the steps that best suit your needs. Below I show you how to proceed in the most common scenarios.
How to copy a photo from the Gallery
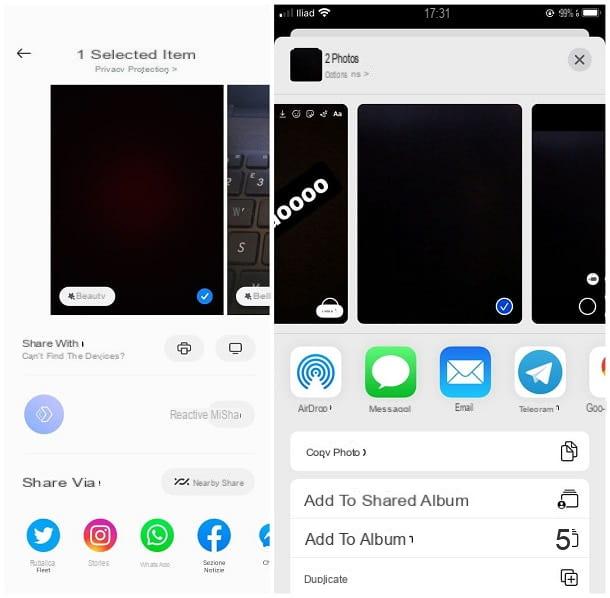
Despite what you might think, copy a photo from the Gallery Android or iPhone is really a breeze! In this regard, the simplest procedure to follow is to use the menu system sharing, through which it is possible to send the image to other devices through the apps or mechanisms integrated into the operating system.
To do so, as a first step, open the image you are interested in sending, tap on the symbol of sharing (which on Android takes the form of three dots joined together, while on iOS and iPadOS it looks like a square with an arrow inside) and use the panel that appears on the screen to select theWhatsapp in which to copy or through which to send the image.
If yours is an iPhone or iPad and you can't find the app you want, tap the icon Other and, after touching the voice Modification located in the lower right corner of the next panel, move up ON the lever for the app you are interested in using and press the button end, to conclude.
Also via the system sharing menu, you can choose to transfer an image to another device via Bluetooth (option available only on Android): therefore, after enabling Bluetooth on the "recipient" device, open the photo in the Android photo gallery, tap the sharing and then on the icon Bluetooth. To finish, wait for the name of the receiving device appears on the screen and tap on it to start the transfer. More info here.
iPhone and iPad, on the other hand, do not allow you to take advantage of Bluetooth to transfer files. In its place, you can use AirDrop, a proprietary technology from Apple that allows you to quickly share files and other items between Apple-branded devices, including iPhones, iPads, and Macs.
So, after enabling AirDrop on the receiving device (you can do it from Control Center of iOS and iPadOS and from the menu vai macOS), open the image to copy in the iPhone or iPad Gallery, tap the sharing and then on name of the receiving device or user, identified by the AirDrop symbol. More info here.
Another extremely convenient way to copy photos from one device to another is to use Snapdrop: this is an online service that can be used by browsers of computers, smartphones and tablets which allows you to transfer files between devices connected to the same local network, whether they are computers, smartphones or tablets.
To share a photo with Snapdrop, connect to the home page of the service with both devices involved in the transfer (the source and the destination one), making sure that they are connected to the same local network; tap on the name of the target device from source device of the photo, choose the photo to be sent and confirm on target device. That's all!
In addition to Snapdrop, you can also copy images from the Android, iOS and iPadOS Gallery to your computer via theFile Explorer Windows, the application Gallery macOS or Android File Transfer, a program that allows Macs to read the memory of Android devices: you will find everything explained in one of the following sections of this guide.
How to copy a photo on Instagram
Do you want copy a photo on Instagram to share it with your friends? In this case, the steps to take are really simple. To get started, if it is your intention to share the image in the Feed Instagram (i.e. in the images that remain permanently in your profile) open the social network app for Android or iPhone, tap the button [+] and use the next panel to select the photo you prefer.
Next, tap on the symbol of freccia verse destra or the button NEXT twice in a row, add one caption and to the hashtag to the image, if desired, and tap the button Share, to upload the photo to your profile.
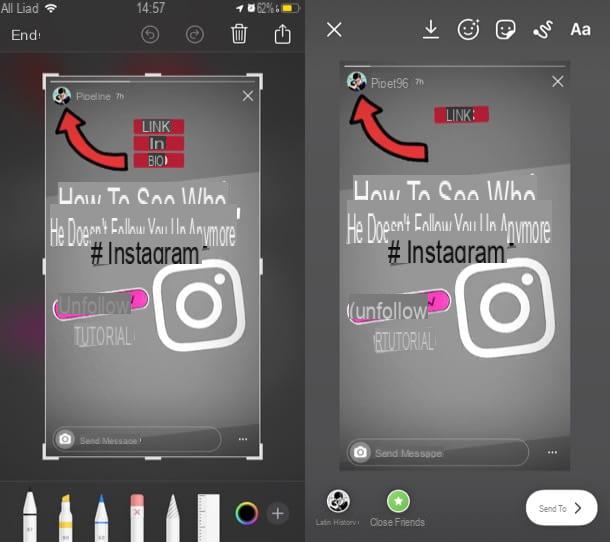
If, on the other hand, you would like to understand how to copy a photo on instagram in stories (it will disappear after 24 hours), after opening the app, tap the button The tua storia (depicting your personal image and symbol +), tap on the symbol of photo gallery located at the bottom left and select the image to publish among those present.
To post the image, tap on the symbol now The tua storia, located at the bottom left, or press the button NEXT and the button Share, placed in correspondence with the wording The tua storia. If you need additional guidance on how to post a photo on Instagram or how to make Stories on Instagram, take a look at the guides I have made on these topics.
If, on the other hand, you want to republish a photo shared on another user's Instagram profile (operation called "repost"), you can take a screenshot or a screen recording of the post that contains it and share it all manually on your profile, or use a third-party application used for the same purpose.
If, on the other hand, you want to repost a story on Instagram, you have at least two ways to go: if you have been tagged in the story you are interested in republishing, open it and tap the button Add this content to your story, so that you can eventually customize the content and repost it in turn between the stories. Alternatively, you can take a screenshot / screen share of the story or use a third party app. For more information on how to repost on Instagram for Feeds and Stories, take a look at the guide I have dedicated to the topic.
How to copy a photo from WhatsApp
By default, the WhatsApp app for Android and iOS saves the received images in a folder in the device memory, called WhatsApp Photos and accessible directly from the multimedia gallery management app.
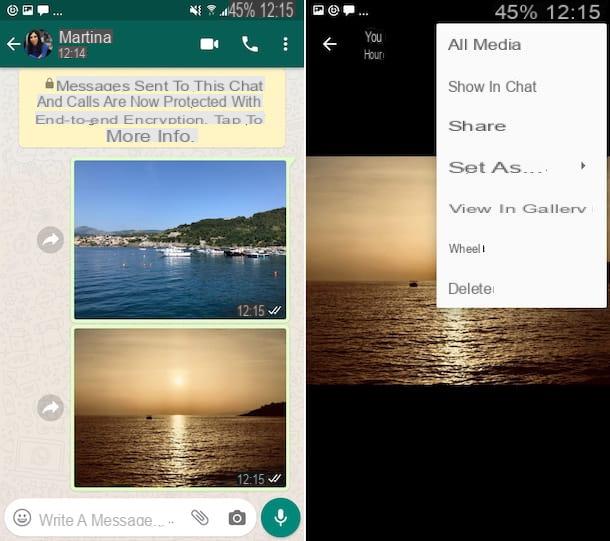
However, if you've disabled this setting, you can still copy a photo from WhatsApp and store it in the system gallery like this: first, start the messaging app on your smartphone, open the conversazione which contains the photo of your interest and tap on its preview.
Now if yours is an animated device from Android, tap the (⋮) button located at the top right, select the item View in the Gallery from the menu that appears and tap the button Save to Gallery (shaped sheet), resident in the next screen. If, on the other hand, yours is a iPhone, touch the share symbol and then the voice Save, resident in the panel that appears. For more information, I refer you to reading my guide on how to save WhatsApp photos in the Gallery.
If you prefer, you can also share the image from WhatsApp to another application, without saving it: to do so, open the image in question and, if you use Android, tap the button first (⋮) and then the voice Share, located in the menu that appears; up iPhone, instead, you simply have to tap on the symbol of sharing I will select the voice Share.
How to copy a photo to Google
The easiest way to copy a photo to Google, or rather, on the photo cloud service of “Big G”, consists in using the appropriate application, available for Android, iOS and iPadOS. I feel it necessary to clarify that, starting from 1 June 2021, even images uploaded in high quality will erode the space available on Google Drive; for this reason, if you intend to use this service for a long time, consider purchasing additional storage space.
After installing it, if necessary, start it and log in with the Google account you want to use to store the images; if you use an Android device, or have already configured other Google apps on iPhone or iPad, you will be asked whether to use the profile already present.
Anyway, once the app is started, tap on yours avatar located at the top and touch the item Turn on backup, which resides in the panel that appears; alternatively, tap the items Photo settings e Backup and synchronization and move up ON the homonymous lever.
If you see fit, you can use the options displayed on the screen to define the size of the upload, specify if use or not the data network and roaming and indicate which folders to back up (only on Android). To learn more about how Google Photos works, take a look at the tutorial I have dedicated entirely to the aforementioned service.
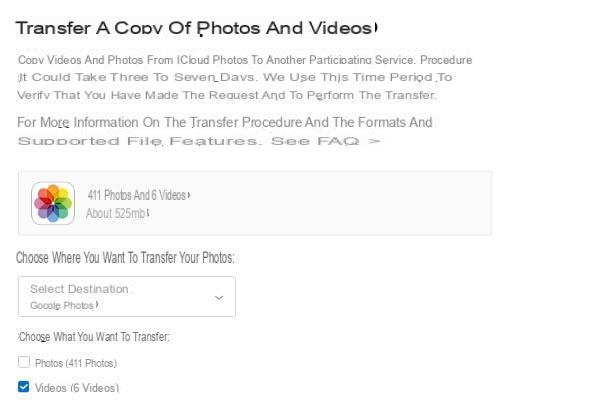
If you own a iPhone or a iPad and you have enabled automatic archiving of images on iCloud, know that you can transfer them from the latter service to Google Photos in a matter of seconds: to do so, connected to this website, log in with your Apple ID and press on the item Request to transfer a copy of your data, resident on the page that appears.
Now, use the drop-down menu Select your destination to indicate that you want to transfer images to Google Photos, choose whether to transfer the Gallery, the Video o both items by placing the check mark next to the dedicated boxes, press the button Continue twice in a row and log in to theGoogle account on which to archive the items, when required.
To finish, press the button Allow twice consecutively and confirms the will to proceed by pressing the button Confirm transfer; following this operation, the selected items will be transferred to the Google Drive space to which you have previously accessed; depending on the amount of data, the process could take three to seven days.
When the transfer is complete, you will receive an email at your iCloud email address; if the Google Drive space runs out during the procedure, some elements may not be copied.
How to copy a photo to your PC
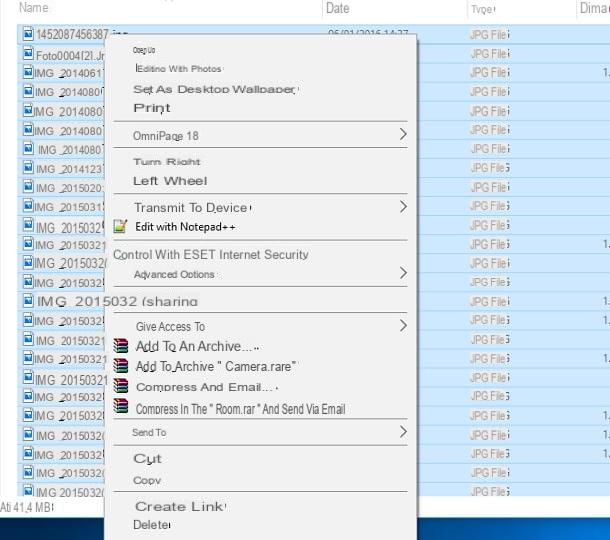
The steps to be taken to be able to copy a photo from one folder to another on any computer are very simple: after identifying the image on which to intervene, right-click on its icon and choose the item Copy from the menu that appears; to paste it, right-click on an empty spot in the folder of your interest and click on the item Paste, attached to the displayed context menu. However, if you are interested in understanding, precisely, how to copy a photo from your phone to your computer or from your computer to an external device, you would do well to read the later sections of this chapter.
Copy a photo from mobile to PC
In order to copy a photo from your mobile to your PC, the steps to follow are far from complex. If the copying of files is to take place between Android and Windows or between iPhone and macOS, you don't need to install anything; if, on the other hand, you need to copy files between iPhone and Windows or between Android and macOS, you will have to install and download, respectively, iTunes or Android File Transfer (the latter is the official tool to ensure that Macs can correctly recognize the memory of the devices Android).
Once you have everything you need, connect your phone to your computer via USB cable, unlock it and follow the procedure that best suits your case.
- With Android in Windows: calls thenotify area on your smartphone, touch the item related to USB options and choose you want to use the mode File transfer o MTP. Now, switch to the computer, open theFile Explorer (l'icona a forma di gialla poster which resides in the Windows taskbar), click on name of the resident phone in the left sidebar and navigate to the folders Internal Memory (Or External memory)
DCIM: there you will find all the photos and videos captured with the camera. More info here. - Have an iPhone on Windows: If this is your first time connecting devices together, open iTunes on your computer and authorize the communication by following the instructions given to you. Once this is done, make sure the iPhone screen is unlocked, then open theFile Explorer Windows and click the name iPhone, located in the left sidebar. Then go to the folders Internal Storage > DCIM > 100Apple to access photos and videos taken with the camera. More info here.
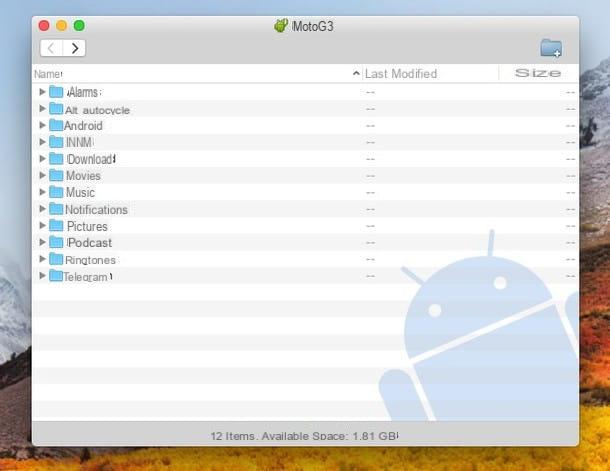
- Da Android a macOS: Download and install the free Android File Transfer application on your Mac, connect your Android device to your computer, launch the program and click the button Start, to access the phone memory. Now, open the folder DCIM (if the photos are saved in the internal memory of the device) or the folder Storage > DCIM (if instead they reside on the memory card). To copy an image, simply drag it to the desired folder. More info here.
- From iPhone to MacOS: after connecting (and possibly authorizing) the iPhone to the Mac, start the application Gallery on the latter, click on iPhone name that appears on the left sidebar and, to copy all the photos and videos in memory, click on the button Import all new items, resident in the upper right; if you prefer to copy only some images, click on the relative previews and then press the button Import XX items. More info here.
For more information on how to download photos from your mobile to your PC, take a look at the in-depth tutorial available on my website, in which I have also been able to show you alternative transfer methods.
Copy photos to external media
To copy the photos to an external disk or to a USB key or to an external hard drive, do this: if you use Windows, apr l 'File Explorer, reach the folder containing the images to be copied and, if you intend to copy it in its entirety, right click on its icon and select the items Send to> [USB key name] from the menu that appears; if, on the other hand, you want to transfer only some files, enter the folder, select the photos to be moved with the mouse (possibly with the help of the Ctrl e Shift keyboard), right-click on one of the thumbnails and select items Send to> [USB key name] from the proposed context menu.
If, on the other hand, yours is a Mac, start the Finder using the resident icon on the Dock (that of smiling face), go to the folder where the photos to be transferred are present and, if you intend to transfer the entire folder, right-click on its icon and choose the item Copy [folder name] from the menu that appears; if, on the other hand, you prefer to transfer only a few photos, open the folder and select the images to transfer, using the key cmd; when you are done, right click on one of the highlighted files and choose the entry Copy XX elements, resident in the menu that appears.
To finish, double-click on the icon flash drive or USB disk that resides on the desktop, click on an empty spot in the window that appears and select the item Paste / Paste XX elements give the purpose menu.
If any step is not clear to you, consult my guide on how to transfer files from PC to USB stick, in which you will find everything explained in detail.
How to copy a photo


