


You urgently need passport photos to renew your identity document but, even if you do it on purpose, your trusted photographer is closed for holidays. Do not despair, if you want I can help you by explaining how to create passport photos directly from your PC or even from your smartphone. How do you say? Did you completely ignore the possibility of such an operation? Well, not anymore!
If you dedicate some of your free time to me, I will explain how you can take advantage of the technological means you have at your disposal to create passport photos using PC programs, online services accessible directly from the browser and even apps for smartphones and tablets. Even if, from what I understand, you do not consider yourself a photography expert, you have no reason to fear: completing your "business" today will be child's play.
So, how about we put the chatter aside and dive right into the heart of this tutorial? Yup? Perfect! Make yourself comfortable, take the time to try the various solutions listed below and then use the one that suits you best by carefully following my "tips". Enjoy your reading and have fun!
IDPhotoStudio (Windows)
If you use a PC Windows, can create passport photos using IDPhotoStudio which, as easily understood from its name (in English "ID photo" means "passport photo"), is a completely free software that allows you to create passport photos in multiple formats, according to your needs.
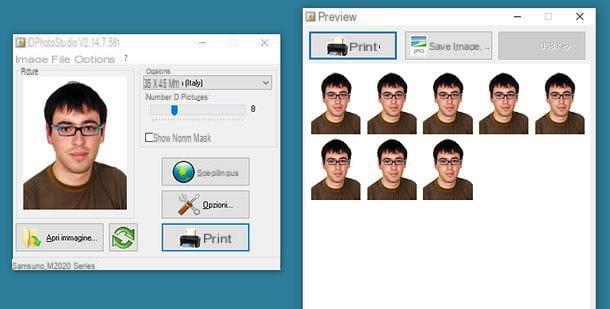
To make passport photos with ID PhotoStudio, you must first download the program to your PC. Then connect to the website hosting the program, locate the box IDPhotoStudio and click on the ZIP file (the yellow folder) to download its portable version, which does not require installations to function.
A download complete, apri il ZIP file IDPhotoStudio, extract the contents to a folder of your choice and run the executable IDPhotoStudio.exe. Once the program starts, click the button Open image and select the photo you want to use to create passport photos; preferably a photo that portrays you from the front, which is in JPG format and duly proportioned (to prevent it from being deformed).
After uploading the photo you intend to use, click on the drop-down menu options and select the format 35×45 mm British give menu to tendin options to create passport photos suitable for all British documents: identity card, driving license and passport.
Then, use all the other options offered by IDPhotoStudio to customize your passport photo: then use the cursor located under the heading Number of images to select the number of passport photos you want to create; click on the button Opzioni ... (the icon with the screwdriver and wrench) to select your printing preferences e Print (The icon with the printer) to print passport photos or save them (by clicking on the button Print or about that Save immagine). Easier than that ?!
Passport Photo Maker (Windows)
Didn't the solution I proposed in the previous chapter satisfy you? If so, try Passport Photo Maker: ID photo creation software that offers advanced tools useful even for professional photographers. Being a professional solution, the program is paid: the basic version costs $ 39,95, but you can use all its features for free for a trial period of 10 days. It is only available for Windows.
To download Passport Photo Maker on your PC, connect to its official website and click on the blue button Download. Then open the file .exe just downloaded, click on the button Yes and follow the guided procedure to complete the installation of the program: then click on the button Next, check the item I accept the agreement (to accept the conditions of use of the service), click on the button Next twice in a row and then on install e Finish.
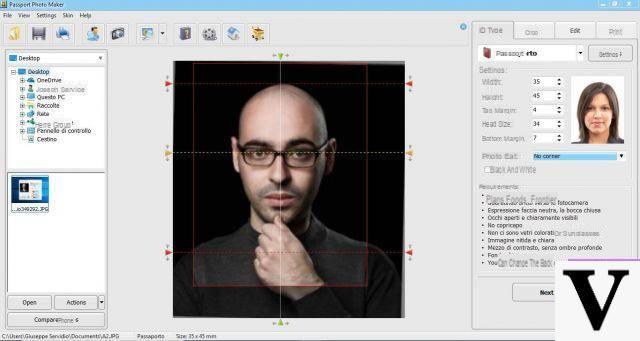
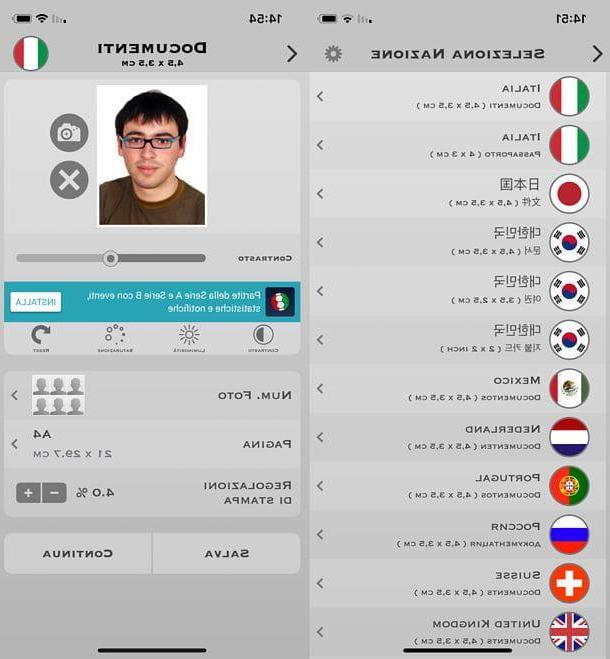
Once Passport Photo Maker starts automatically, select your country (ex. city) and click the buttons Save e Continue in order to directly access the program editor. Then click on the button Open Photo located at the bottom right and upload the photo with which you want to make your passport photo.
Next, click on the tabs located at the top right to change the other settings: ID Type, to select the format of the passport photos; Crop, to change the photo cropping settings; Edit, to use the photo editing tools included in the program e Print, to select the print settings of the passport photos and then proceed to print them (by clicking on the button Print Photos) or to save them on the PC (by clicking on the button Save to File).
iFototessere (macOS)
If you are reading this article from a Mac, you will surely find the application useful iFototessere, which can be downloaded directly from the Mac App Store. It is an easy-to-use application that allows you to create passport photos in multiple formats and for various types of documents. At the time of writing, the app can be purchased for € 1,09.
To purchase iFototessere on your Mac, click here to connect to the page of the Mac App Store that hosts it (click on the button See in the Mac App Store to view it in the MAS) and proceed with its purchase. You may be asked to type in your Apple ID password or use Touch ID if you have a MacBook Pro with a fingerprint sensor.
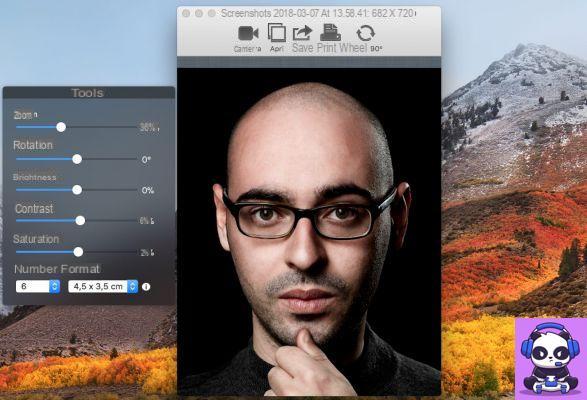
After completing the installation of iFototessere, click on the Launchpad (the symbol of rocket located on the Dock) and then click on the app icon. Then drag the photo with which you want to create your passport photos into the main iFototessere window and select the format 4,5 x 3,5 cm (the one for all British documents) from the drop-down menu Size (in the window Instruments).
Through the same drop-down menu you can also enlarge, reduce or rotate the photo using the appropriate adjustment bars, or select the number of photos to print. Finally, click on the buttons Print e Save to print and save passport photos.
PassportPhoto4You! (Online)
Do you want to create passport photos online, directly from your browser, without installing any program on your computer? You can do this thanks to some free web services, such as PasswordPhoto4You!, which can be used without making any registration but which requires the activation of Adobe Flash Player in the browser (if you do not know how to download and activate this plugin, read the insights I have dedicated to the subject).
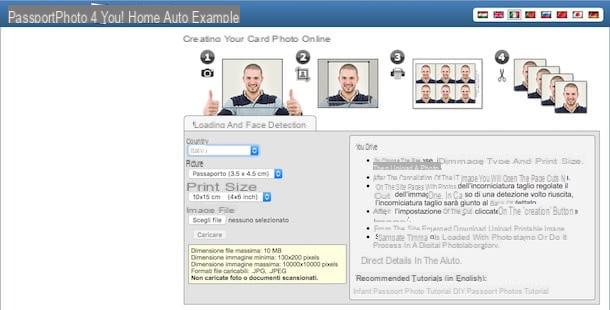
To use PasswordPhoto4You !, connected to the main page of the service and use the drop-down menus that you see in the box Loading and holding face to customize your work: Country, to select the country (eg. city); Gallery, to select the ID photo format (for the city you need to select the Passport 3.5 x 4.5 cm) is Print size, to select the print format (eg. Single foto o 10 x 15 cm ).
After setting the parameters regarding the format and type of passport photo you want to make, click on the button Choose file to upload a photo from your PC and then click on the button Charge to complete the operation.
In the next step, crop the photo with the help of the guidelines provided by the service: in essence, the face of the subject portrayed in the photo must be appropriate to that of the frame that acts as a guide. If you have any doubts about the cropping you are about to make, read the information located at the bottom of the page.
Still from the page containing the crop tool, edit the photo by adjusting its brightness, exposure and other parameters (through the adjustment bars located on the right) and, as soon as you are satisfied with the result, click on the button Photo Creation to get the link of Download of the photo (you will have to wait for the timer to disappear Your photo will be downloadable in N seconds).
Create Photo ID (Online)
Another online service that I suggest you try is Create Photo ID which allows you to create passport photos in just a few clicks and, unlike PasswordPhoto4You!, can be used without installing any plugins in the browser.
To create passport photos with Create Photo ID, linked to its main page, select the item British from the drop-down menu located under the heading Automatic configuration for the country and click on the black button Validate these parameters to go to the next step.
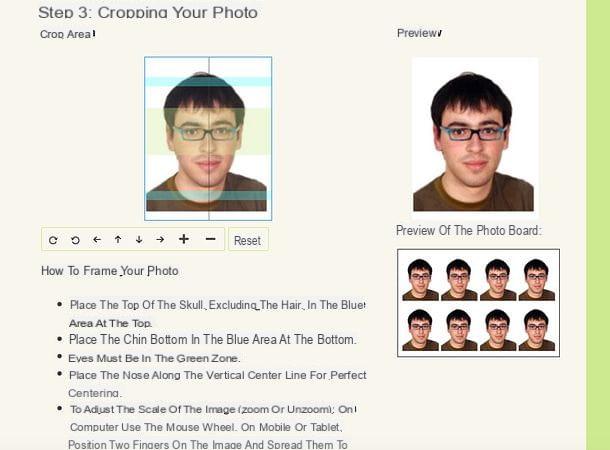
At this point, click on the button Choose file to upload the photo you want to use and then positioned correctly using the editor made available by the service: the upper part of the skull, hair excluded, must be in the blue area at the top, while the eyes must be in the area green. When finished, click on the button first Crop to apply the crop and then up Download the file to download passport photos in JPG format.
Photos - Passports, Identity Cards and Visas (Android)
Would you like to create passport photos directly from your Android device? The app Photographs - Passports, Identity Cards and Visas, it could be what is right for you. It is a semi-free application that, as easily understood from its name, allows you to create passport photos to be used for various types of documents. You can download it for free, but to remove advertising (not too invasive) and to access some advanced functions (such as the one that allows you to remove the background from photos and make multiple prints), you must purchase its full version, which costs 4,19 EUR.
After downloading and starting Photographs - Passports, Identity Cards and Visas on your device, press the green button Start (located below) and follow the short tutorial that is shown on the screen. Then press the button New photo, choose whether to take a photo with the smartphone camera or to use one of those in Gallery e poi pigia sul pulsating Processing begins. At this point, you will be offered to purchase the Premium version of the app: press the button Continue with advertising to continue using the free version featuring advertising banners.
Subsequently, you will be shown a short tutorial that will explain how to straighten your photo: after having read it, press the button I understand and agree to close it. Then tap on the button Automatic adjustment to straighten the photo automatically (you can also act manually by moving your finger on the orange cursor) and presses on the item Done.
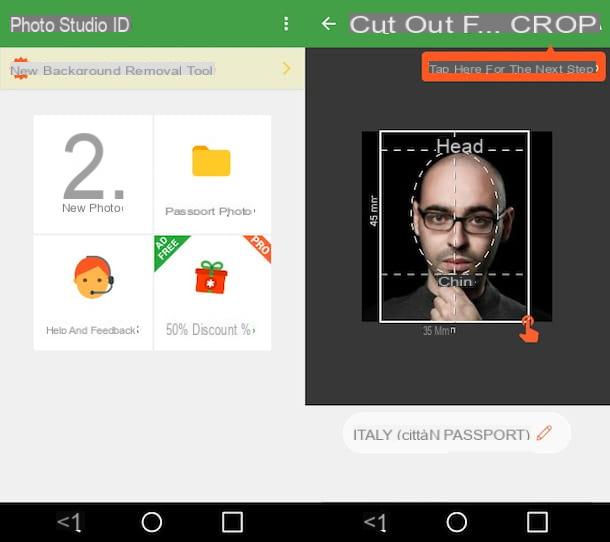
You will then be shown how to crop the photo through another tutorial: after reading it, press the button again I understand and agree to close it. Then tap the button Choose your state e seleziona l'opzione British (British passport) 35 × 45 mm. Then crop the photo by dragging the frame that appears on it and, as soon as you are done, tap on the item Cut out. Finally, adjust the parameters of the photo using the options located at the bottom, press on the item Done and, after waiting for the app to process the passport photo, presses on the voice Save, select the download format you prefer (eg. PNG o JPG) and presses the button again Save but I will complete the operation.
Passport photos (iOS)
If you want to take passport photos from your iOS device, give it a try Passport photo documents, a semi-free application characterized by a “clean” and well-organized interface, which makes it even easier to take passport photos on the go. While you can download your ID photos for free, you need to make an in-app purchase of € 1,09 to remove the watermark from all photos to be printed. Alternatively, to remove the watermark from a single print, you can choose to watch an advertisement (without spending any money).
Is everything clear so far? Well, then let's get down to business. After you have downloaded and started Photo ID documents on your iPhone or iPad, press the button with the icon of thelittle man and choose me format city documents (4,5 x 3,5 cm) from the screen that opens.
Next, tap on the icon camera and choose the option library to use a photo already in the iOS Camera Roll or the camera to take a photo in real time. Once you have allowed the app to access the Roll and / or the camera and have chosen or taken the photo to use for the passport photo, straighten the image by helping you with the shape that appears on the screen.
When done, use the controls below to adjust saturation, brightness e contrast image. Then set the number of photos to be printed, the format of the page to print them and tap the button Save to save the photos and / or on the button Print to print or share them.
How to create passport photos


