Let me guess: the boss has left you the thankless task of creating some letters to send to the staff members: these are documents with identical content, different only for some specific data relating to the recipient to whom the letters are to be sent. Well, then instead of editing documents one at a time, you could rely on the function Mail merge in Word!
How do you say? Haven't you ever heard of it? Then let me briefly explain what it is. The "Mail merge" function allows, in practice, to create documents in series, writing the report only once and adding variable fields, to be customized according to the person, object or any other entity they are intended for. In this case, the data relating to the fields to be imported can be saved in an Excel workbook, in a .csv file, in an .html file, in a database or in other structures responsible for data archiving.
If all this seems terribly difficult to you, I can guarantee you that, in reality, it is not at all: if you give me a few minutes of your time, I will explain to you in detail. how to do mail merge in the simplest way possible in the most popular applications of the Office package, such as Word ed Excel. For completeness of information, then, I will show you how to use the same functionality within the program LibreOffice Writer (in this case, we speak of "Mass printing"). Ready to go? OK, let's start right away: happy reading and good work!
Index
- How to do mail merge in Word
- How to do mail merge from Excel
- How to mail merge with LibreOffice
- How to mail merge labels
How to do mail merge in Word
Now that you understand the usefulness of the feature Word mail merge, the time has come to get to the heart of the matter and to understand, in practice, the ways of using it.
As I have already anticipated in the introductory lines of this guide, the mail merge involves and unites two categories of documents: a Word file, in which to create the actual document to be printed; and a sheet containing data records, which can be in Excel format, .HTML format, .mdb format (Access database), .csv format and in many other formats dedicated to data storage.
This file, which I will call from now on data source, must be "imported" into Word, to ensure that certain fields of the document are automatically filled in during printing, so as not to have to create many different documents, to be printed individually.
Anyway, to do Mail Merge in Word, start the latter software and choose to create a Blank document, by clicking on the appropriate icon attached to the welcome screen of the program.
Now, to start merging the new document with the data source, click on the tab Lettersclick on your button Start mail merge and choose the print format you need (eg. Letters) from the panel that is proposed to you.
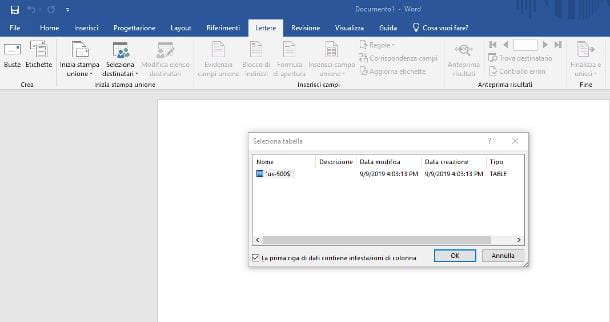
Next, click the button Select recipients, choose the item Use an existing list ... from the menu that is proposed to you and, using the panel displayed on the screen, select the file to use as data source. Verify later that the tables are correctly recognized, put the check mark next to the item The first row of data contains column headers and click sul pulsating OK, to proceed with the connection of the two files.
At this point, you can start with the actual creation of the series of documents to be printed, organizing it according to your needs. For example, if you need to open your letter with the formula To the attention of, followed by the full address of your recipient, type the words To the attention of in the document and, to enter the series of addresses, click on the button Block of addresses and select the format to use, using the panel proposed below.
If the address fields do not match those specified in the data source, you can click the button Match fields ... and manipulate the data / column association as you see fit. When you are done, click on the button OK: if everything went well, you should see the wording appear in the document "BloccoIndirizzo".
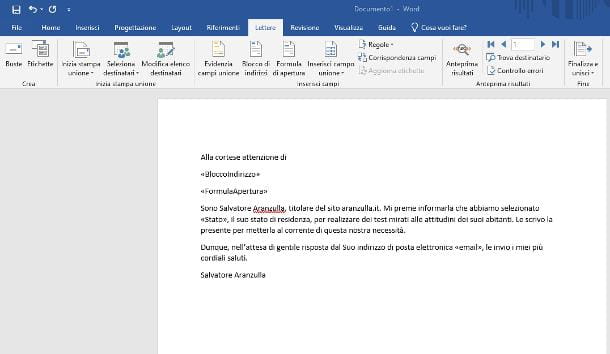
Similarly, you can enter a opening formula: click on the button of the same name located at the top, choose the formula that best suits you, acting on the panel that is proposed to you and, when ready, click on the button OK.
Now you just have to make the letter to send to multiple recipients. If you need to enter a merge field within it (i.e. a data from the Excel document, relating to the current recipient), click on the button Insert merge field and select the field of your interest from the proposed panel.
If you want to exclude some items from the mail merge, click on the button Select recipients and remove the check mark next to the Excel document records that you don't intend to use.
In any case, once you have completed the creation of the letter (or any other category of document you have chosen), click on the button Results preview, to view the actual correctness of the set of documents. You can use the control keys next to it to scroll from one recipient to another.
When you are ready, click on the button Finalize and merge, scegli l'opzione Print documents ... from the menu that is proposed to you and click on the button OK, to merge the set of documents. Finally, adjust the settings for the printer to use and click the button OK, to send the set of documents to print.
Note: if you need to make changes to a single document, click the button Finalize and merge, scegli l'opzione Edit individual documents ... and, after pressing the key OK, identify the letter to be modified and make the necessary changes. When you are done, go to the menu File> Print (top left), to proceed to batch printing.
How to do mail merge from Excel
The mail merge, as already said several times, allows you to create and print multiple identical documents, intended for different people, at once.
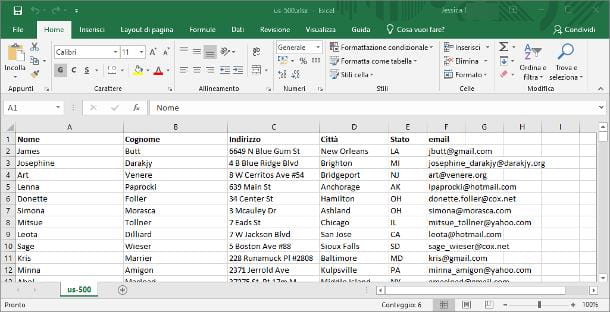
If you intend to use a excel file as the source of the data, it is necessary that the latter be structured in a way that is congruent with the result to be obtained. Therefore, to do mail merge from Excel, it is absolutely essential that the source document meets the following requirements.
- La starting line of the document must contain the headings of the fields (eg. name, last name, address, city, telephone number and so on).
- Each column of data must be properly formatted, depending on the type of content expected (eg. text, by name, surname, address, city and telephone number, number, for any figures, percentage, for any percentage values and so on).
If you need to make such a document from scratch, you can help with the predefined Excel templates, that is, with special documents containing a "scheme" to be used to archive the requested data. For more information on creating an Excel workbook, I invite you to take a look at the guide I made on it.
Once you have created a workbook of this type, or after modifying an existing file to meet the requirements I mentioned earlier, all you have to do is save your job (by going to the menu File> Save with nome) of Excel and start a mail merge from Word, as I explained above, using the newly created Excel workbook as the data source.
How to mail merge with LibreOffice

If you prefer to use LibreOffice instead of Microsoft Office, it will be useful to know that it is possible to do the Mail Merge (Serial printing) also through Writer, the video writing application included in this famous suite for open source productivity.
The requirements are the same as seen previously: it is necessary to have a file containing the data to be used as a source; file which can be of type .odb (Basic database), .mdb (Access database), . Csv (data sheet with separator), .html and so on.
Also in this case, you must first merge the data source with the document to be modified: to be able to do this, first start LibreOffice Writer calling it from the main LibreOffice screen, go to the menu Tools> Directory source ... (above) and click on the button Address book data source ..., to select the data source document to use.
In the window that appears later, put the check mark next to the item Other external data sourceclick on your button Following, then on the button Settings and indicates the type of database you want to connect to, to be chosen between database di Base (dBASE), database of Microsoft Access, data source JDBC/ODBC, Spreadsheet, Text (ad es. a file .csv) document Writer or database MySQL/PostgreSQL.
Once you have chosen the option that best suits your needs, click on the button Following and, if you have chosen to use a file, press the button Browse ..., to select it. After selecting the file, click on the button Test the connection, to check that it opens correctly and, when you are done, click on the button end, to return to the previous screen.
After this step too, click on the button Field assignment, to associate the data fields of the source with the respective fields of the LibreOffice address book and, when you are finished, click on the buttons OK e end, to integrate the two files.
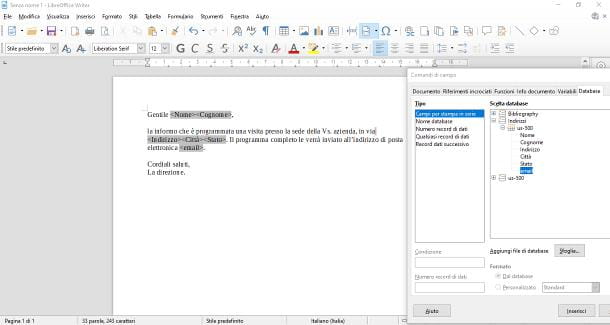
The bulk, at this point, is practically done: to insert a merge data field, positioned in the exact point of the document, press the combination of keys Ctrl + F2 (o cmd+F2 on Mac) and select the tab Database from the window that opens on the screen.
Then, expand the section relating to the previously imported document (by clicking on the button [+] located next to its name) and double-click the field you intend to add. Done! If you wish, you can leave the panel relating to the available fields open (it will remain in the foreground) to be able to add them, as needed, to the document under construction.
Once you have finished writing the document, click on the button Close, to close the data field panel and then go to the menu File> Print (top left), to send the set of documents to the printer. Take care to answer affirmatively to the dialog box that appears later (otherwise you will print a single document, as you see it!).
Finally, act on the printer settings, according to your needs and, finally, click on the button Print.
How to mail merge labels
Do you need to print several labels, in series, differentiating some data between one label and another? No problem: if you use Microsoft Word, can do Mail merge labels in a really simple way.
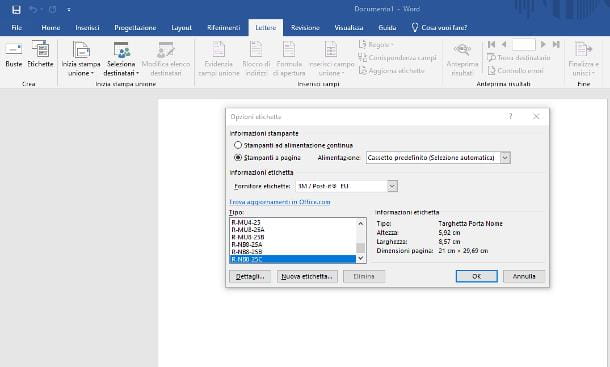
To begin with, start Word and create a blank document using the appropriate icon that appears on the welcome screen. Next, click on the tab Letters, then on the button Print Union and select the item Labels ... give the menu that you come purpose.
After this step, use the next dialog box to specify the format labels and their size and press the button OK. From now on, you can create, manipulate and print the labels in series, following the same steps that I described to you in the initial chapter of this guide.