


Do you live in terror of losing all the photos you have saved on your iPhone? Well, if you lose your phone or break it it could also happen (unfortunately the unexpected is always around the corner), but with a pinch of caution you can face this kind of events in a more serene way. What I'm trying to tell you is that you need to regularly back up your photos by exporting them to your computer and, if you can, by storing them on one of the many cloud services available today.
I assure you that these are two operations that are less long and complex than you imagine. All you need to do is follow this simple guide on how to download photos from iPhone I'm about to propose to you and let your precious shots be kept safe, ready to be browsed and restored if necessary at any time. So, ready to go?
The instructions below are valid for both Windows PCs and Macs, so regardless of the type of computer you use you shouldn't have difficulty following them. The iPhone model and iOS version in use are irrelevant, the procedure to follow is always the same. So let's not waste any more time and get to work immediately!
Copy photos from iPhone to PC
There are basically two ways to transfer photos from iPhone to computer: the first, the most immediate, is to physically connect the two devices and use the image import function included in Windows; the second goes through iCloud (Apple's online data storage service) and allows you to download to your PC all the shots that are uploaded to Streaming Photos and to the iCloud Photo Library. Let's analyze them both in detail.
Standard photo and video import
To use the photo (and video) import system included with Windows you need to have it installed on your computer iTunes, Apple's multimedia software. If you haven't done so yet, then connect to the Windows 10 Microsoft Store and download iTunes from there. Alternatively, you can download the program from Apple's website and install it on your PC by launching the package iTunes6464Setup.exe and clicking on first NEXT and then Install, Yes twice in a row e end.

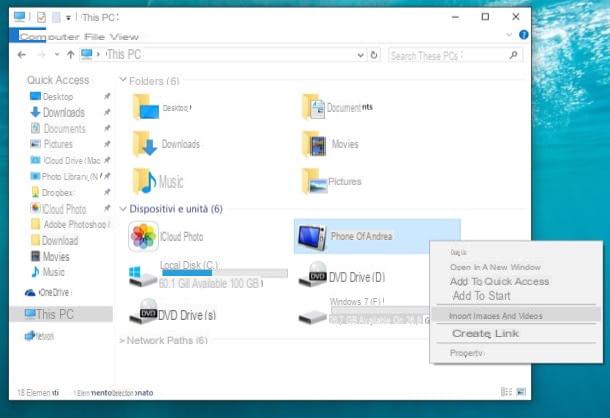
At this point, connect the iPhone to the computer, authorizes the communication between the two devices by pressing the appropriate button that appears on the screen of the "iPhone by" and a screen should automatically be displayed through which to start theimporting images and videos on the PC. If not, open theFile Explorer Windows (the yellow folder icon located on the taskbar at the bottom left), select the item Computer / This PC from the left sidebar, right click on theiPhone and select the item Import images and videos give the menu to compare.
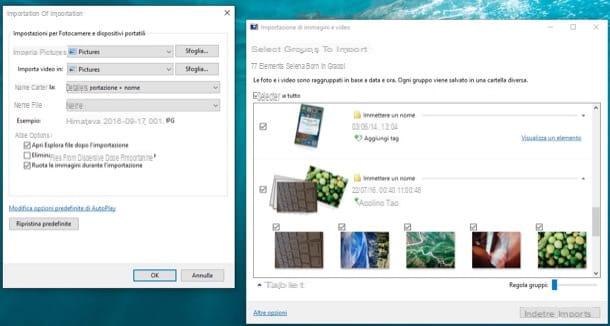
In the window that opens, then put the check mark next to the item Review, organize and group the items to import and click on the button Import to divide the pictures and videos on your phone into groups and organize them well before saving to your PC.
You can adjust the amount of time that must elapse between one group of images and the other using the adjustment bar located at the bottom right, set some custom names for groups of photos (instead of the dates they were made) and assign them gods tag (i.e. labels, such as names of cities or events, to find them more quickly) using the appropriate options that you find next to each collection of images.
Once you have selected the groups of photos and videos to import to your computer (leaving or removing the check marks next to their thumbnails), click on the button Import and wait for the data transfer to complete. Unless you change the destination path via the menu Other options (bottom left), the shots will be saved in the folder Images of Windows.
If you don't mind organizing images and videos before transferring them to your PC, you can select the item Import all new items now (in the first screen of the import procedure) and click on the button Import to directly transfer data from your phone to your computer without wasting time.
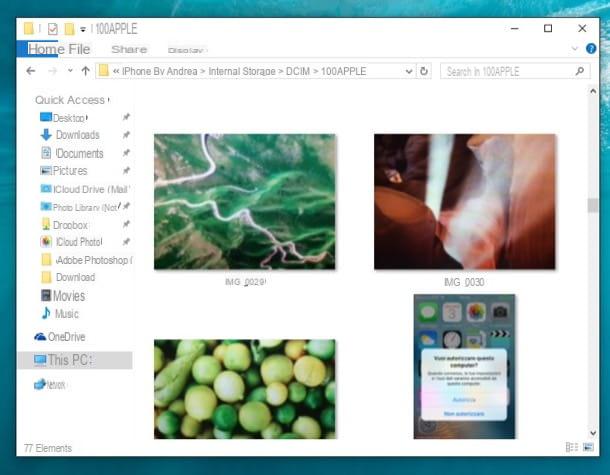
Alternatively, you can also open theFile Explorer, go to the path Computer/Questo PC > iPhone > Internal Storage > DCIM > 100APPLE and copy "manually" the photos and videos on the PC by performing a classic copy-and-paste.
Windows 10 Photos application
If you are using Windows 10, you can also import photos from iPhone to PC via the application Gallery included "standard" in the operating system: you can find it by doing a simple search in the Start menu.
To import photos and videos with the Photos application is really a breeze. All you have to do is click on the icon of the arrow going down located at the top right, select the thumbnails of the images (and videos) to be copied to the PC and click the button Continue.
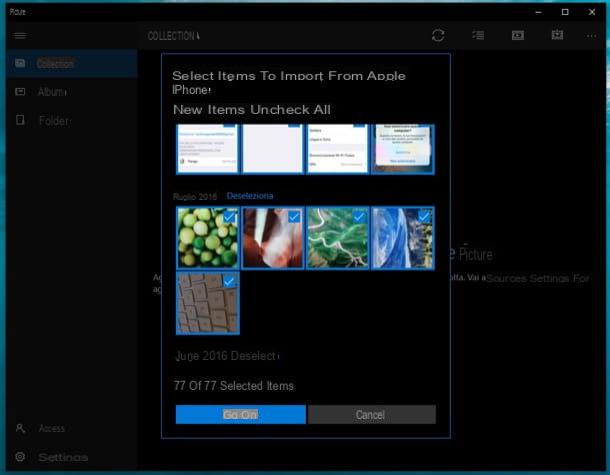
At this point, choose one import location (i.e. a folder in which to export the selected photos and videos) by clicking on the appropriate item and start the data transfer by pressing the button Import.
iCloud
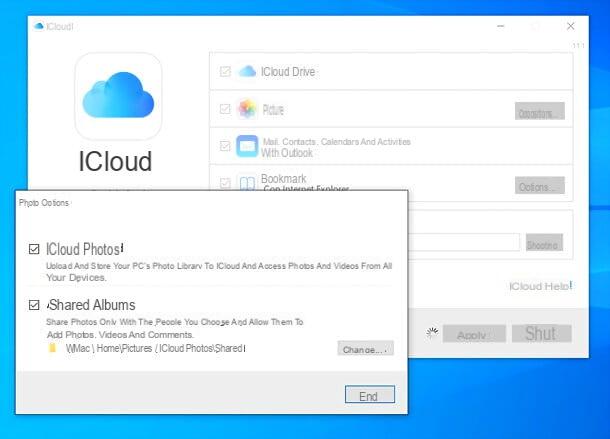
As already mentioned above, it is possible to transfer photos from iPhone to computer without physically connecting the two devices to each other. To perform this operation, the function must be activated on the iPhone Streaming Photo (which should be on by default) or the function ICloud Photo Library (which instead must be activated "manually" and requires a paid subscription for iCloud).
Both the Photo Stream and the iCloud Photo Library automatically save the photos taken with the iPhone to iCloud, but they have major differences: the Photo Stream saves the photos taken with the "iPhone" (but not the videos) for a maximum period 30 days without eroding the available storage space on iCloud Drive. The iCloud Photo Library, on the other hand, saves photos and videos to the cloud permanently but erodes the storage space available on iCloud Drive (which requires subscribing to a paid plan for iCloud Drive). To find out more, read my tutorial on how to store photos on iCloud: there I explained how both services work in detail.
Once you have activated Photo Stream and / or iCloud Photo Library, you need to download the iCloud client for Windows which allows you to synchronize pictures, contacts and other data between iCloud and Windows. If you use Windows 10, you can download the iCloud client directly from the Microsoft Store. Alternatively, you can download the client from Apple's website by clicking on the link On Windows 7 and Windows 8, you can download iCloud for Windows from Apple's website.
In the latter case, when the download is complete, open the iCloud client installation package (iCloudSetup.exe) and click on your button Following. Then put the check mark next to the item I accept the terms of the license agreement and complete the setup by clicking on first Install and then Yes e end.
You will be asked to restart your computer for the iCloud client to activate properly. When you log in again to the system, open the iCloud client (if it does not start by itself), enter the login details of your Apple ID (the same one you configured on the iPhone) and click on the button Log in to log in and start data synchronization between PC and smartphone via the cloud.
To make sure that photo sync is turned on, make sure there is a check mark next to the icon in the iCloud client Gallery. Photo synchronization is bidirectional, in fact copying a photo or video in the folder indicated in the field Upload new photos and videos from my PC of the iCloud client you can sync new content with your iCloud account.
Copy photos from iPhone to Mac
As easily understood, on Macs (Apple computers) you can download photos from iPhone in an even simpler way. And not only because iTunes and the iCloud client are included "standard" in the macOS operating system, but also because there is greater freedom of choice on how to do this.
Gallery
Gallery is the default application for managing the multimedia library (photos and videos) on Macs. To use it, all you have to do is connect the iPhone to the computer, launch it (if it does not start by itself), select the tab Import located at the top right and click on the button Import all new items. At the end of the operation, if you do not want to keep the images and videos that you have imported on the Mac on the "iPhone" and want to delete them, put the check mark next to the item Delete items after import.
If you don't want to import all the shots or videos on your iPhone to your computer, select only the ones that interest you using the combination cmd + click and click on the button Import selected (in alto to destra).

If your Mac is associated with the same Apple ID as the iPhone, Photos can automatically import photos and videos from iCloud Photo Stream and Photo Library. To verify that the import of photos and videos from iCloud is active, go to the menu Photos> Preferences (top left), select the tab iCloud from the window that opens and make sure there is a check mark next to the item ICloud Photos or accanto alla voce My Photo Stream, depending on the active service on your "iPhone by".
If you use iCloud Photo Library and turn on the feature Optimize Mac Storage, only low-resolution versions of the photos will be kept on your Mac. High-resolution images will be downloaded only upon request, i.e. only when they are displayed in the Photos application.

Image acquisition
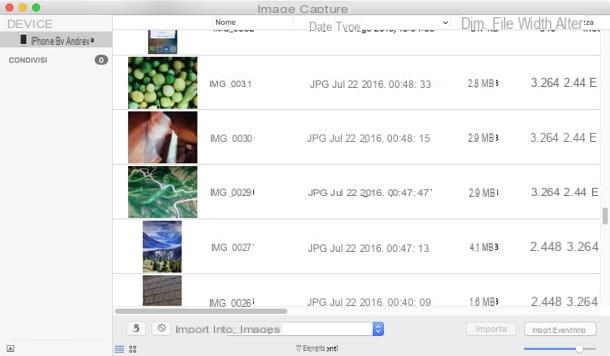
If you don't want to keep your photos "trapped" in the Photos library but prefer to save them in a specific folder on your Mac, you can use the application Image acquisition located in the folder Other of Launchpad of macOS. Beware though, it doesn't manage movies and doesn't support iCloud. It also works only with the physical connection of the phone to the computer.
To use it, select the icon of theiPhone from the left sidebar, specify the folder in which to export the images using the drop-down menu Import into and click on the button Import everything. If you don't want to transfer all the photos but only some shots, select them via cmd + click and presses the button Import. Alternatively, select the thumbnails of the images you want to copy to your Mac and drag them to a folder of your choice.
Alternative cloud solutions
To conclude, I would like to point out some cloud-based solutions that can represent an excellent alternative to the "traditional" ways to download photos from iPhone to computer.
- Google Photos - excellent free app from Google that allows you to store all the photos and videos taken with the iPhone in Google Drive. Storage is unlimited for all photos with a maximum resolution of 16MP and videos with a maximum resolution of 1080p. To download the contents on your PC just install the Google Drive client.
- Dropbox - popular cloud storage service available on all popular software platforms, including iOS, Windows and macOS. With its automatic photo upload function, it allows you to store all photos taken with the iPhone on the cloud. Unfortunately, it only offers 2GB of free storage. To learn more, read my guide to Dropbox.
- iCloud.com - if you have activated the iCloud Photo Library on your iPhone, by connecting to the iCloud website and accessing it with your Apple ID data, you can view (and then download) all your photos to your PC.


