


Index
Preliminary information

Before explaining to you how to edit a photo in PDF, let me give you some more information on what you might get: images are generally saved using a compression algorithm designed to "lighten" the weight (without however changing the overall integrity of the photo).
Generally, the "consequences" of a compression with loss of quality are only visible if the photo is significantly enlarged, but I feel it necessary to clarify that any problems due to the poor quality of the original photo will be reflected in the resulting PDF document (which is not is nothing more than a "virtual print" of the image displayed on the screen): it seemed only right to let you know.
How to edit a photo in PDF for free
Having made the necessary clarifications above, the time has come to get to the heart of this guide and to explain to you, in practice, how to edit a photo in PDF for free on the most popular platforms: Windows and macOS for the computer and Android and iOS / iPadOS for the mobile sector.
How to edit a photo in PDF on Windows
Let's start with the most popular operating system in the PC field. For edit a photo to PDF on Windows, you must first convert the desired image (or desired images) to PDF format: in this case, the application can help you Gallery, installed "as standard" in Windows 10.
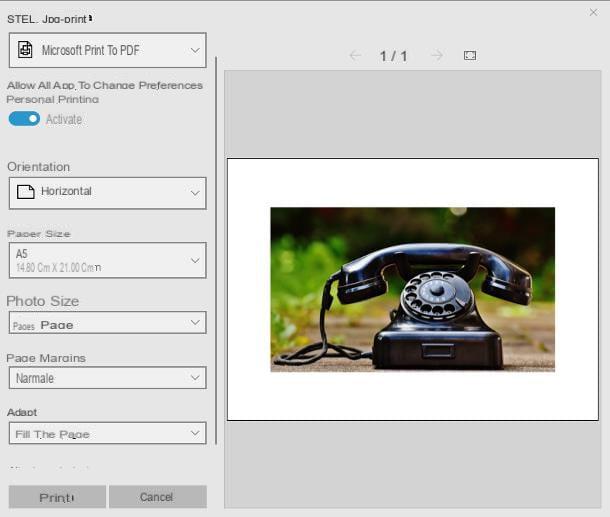
So, if you want to create a PDF document containing only one photo, open the folder that contains it, right-click on its icon and select the items Open with> Photos from the menu that is proposed to you. Now, click on the symbol of printer located at the top right and set the drop-down menu Printer, located in the new window that appears, on the item Microsoft print to PDF.
Finally, using the drop-down menus that appear on the screen, specify theorientation and format of the virtual sheet, therefore indicates the dimensions of the photo, i margini and fit style of the page and, when you are done, click on the button Print and specify the percorso in which to save the PDF document.
If, on the other hand, you need to merge multiple photos into a single PDF file, do this: wrap all images into one new folder to be used for the purpose, starts the application Gallery (calling it from the menu Home), click on the tab Folders, by pressing the button Add a folder and select the directory containing the images to convert to PDF.
Now, click on the folder just added, select the images to convert, placing a check mark next to the relative previews, and click on the symbol of printer at the top right. Finally, adjust the virtual print settings as I showed you a little while ago and click on the button Print, to create the PDF document. It was very simple, didn't you think?
If, for some reason, you are unable to put into practice the steps I have listed above, take a look at my guide on how to convert images to PDF, in which I have listed alternative conversion methods that are equally effective.
At this point, if you wish to proceed with the modification of the photo just converted into PDF or, in any case, you need to modify the photos contained in a pre-existing PDF, you can use the browser Microsoft Edge, also installed "standard" in Windows 10: therefore, locate the icon of the document converted just now, right-click on it and choose the item Open with> Microsoft Edge from the proposed context menu.
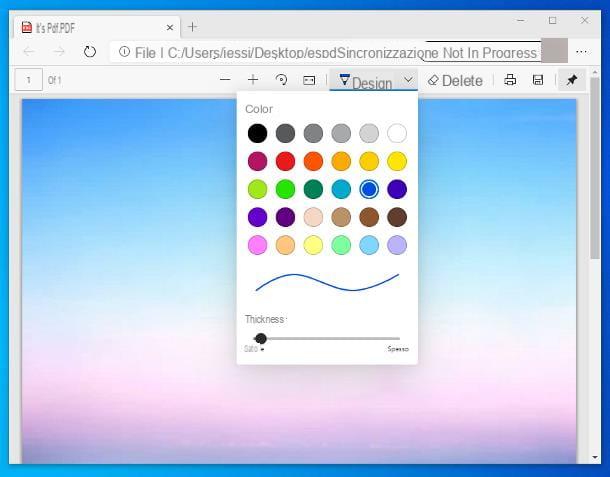
Once the PDF document is open, you can modify the photo contained within it using the tools located in the top bar of the program: by clicking on the button Design, you can draw freehand strokes on the document (to choose color and thickness of the brush, click again on the same item); by clicking on the button Clear, you can remove the various designs added. When finished, you can save the changes made by clicking on the icon diskette, also resident in the toolbar.
If you feel that Microsoft Edge is a little too limited for your needs, I recommend that you take a look at my guide to programs to edit PDF for free, in which I have suggested some valid alternatives to Microsoft's browser.
How will I modify a photo in PDF on macOS

I will modify a photo in PDF on macOS, in the sense of converting the image to PDF, it can come in handy Preview- The default image and PDF viewing software pre-installed on all Macs.
Therefore, if the image to be transformed is present in the application Gallery, you must first export it to a local folder: to do this, start the aforementioned program, go to the Photo library using the side menu and locate the image or images you want to export.
Once this is done, choose the photo of your interest (if you need to create a PDF with multiple images, click on the thumbnails of the photos to include by holding down the cmd keyboard) and use the menu File> Export> Export X Photos located in the top bar to “transfer” the images to the chosen folder.
We are almost there: when the operation is completed, go to the folder where you saved the photo exported just now and open it by double clicking on its icon (otherwise right click and select the items Open with> Preview from the context menu).
If you are going to create a PDF consisting of multiple images, select them all with the mouse (or by pressing the key combination cmd + a) and open any of them with Preview (as explained above), then arrange them miniature in the order you want it to be kept in the PDF, using the Preview left sidebar.
When you're done, go to the menu File> Print (top left), set the drop-down menu PDF su Save as PDF, select the folder in which to save the final document and click on the button Save, to complete the conversion phase.
Note: To turn a single photo into PDF, you can also use the menu File> Export as PDF ... Preview: the result is almost identical.
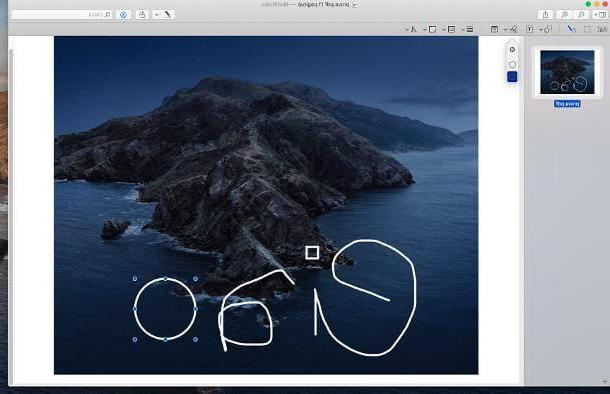
Always through Preview, you can make changes to the images contained in a PDF: therefore, open the PDF to be edited and click on the icon depicting a pencil enclosed in a circle located at the top right, so as to activate the display of the bar with the editing tools.
Now, using the buttons that appear on the screen, you can draw freehand lines and strokes, add geometric shapes, texts, signatures and so on; each added element can in turn be distorted, so as to eventually adapt it to the photo, "grabbing" it by the squares that appear on the edges.
Once the job is done, click on (X) located at the top left, in order to automatically save the changes made and close the program.
How to edit a PDF photo on Android
If you use a device Android, you can convert your photo into a PDF document using the virtual printer included in the operating system. To proceed, open the photo you are interested in (the one you may have previously edited), tap the button to access the menu of the app in use (eg. (⋮)) and select the item Print from the panel that appears on the screen.
Pray, select the voice Save to PDF from the drop-down menu located at the top and press on PDF symbol, located just below the control bar, to export the image in the chosen format.
If, on the other hand, you need to export multiple photos to the same PDF document, you can use an app like Image to PDF Converter, which can be downloaded for free from the Play Store or from alternative stores.
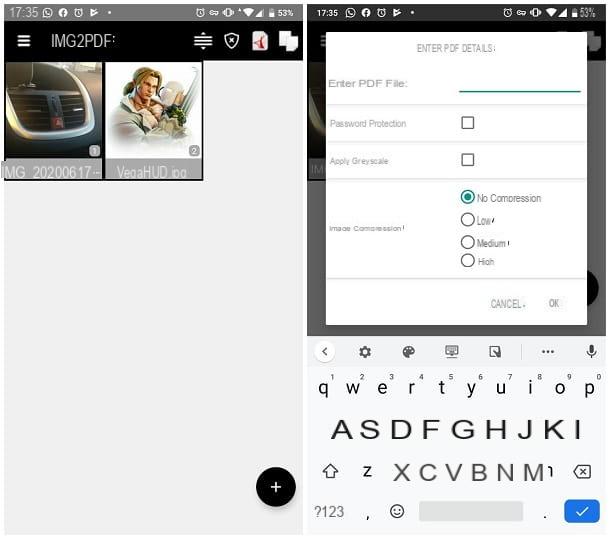
After obtaining the app, launch it (it is identified by the name IMG2PDF) and tap the button capacitor positive (+) lead located in the lower right to select the photos to add to the PDF file. If necessary, tap the button Allow to authorize the app to access the memory.
When you're done, tap the del icon PDF resident at the top right to proceed with saving the document: enter the name to be assigned to the file within the text field Enter PDF FileName, make sure the box Apply Greyscale is not selected (otherwise the file will be generated in grayscale), choose the compression level to apply to the images and tap the button OK to proceed with saving.
Basically, the document is saved in an app generated folder, however you can share it via the system menu by tapping the sharing placed next to his name. As needed, you can view all converted documents by tapping on the icon two overlapping sheets located on the home screen of the app.
If, on the other hand, you need to modify an image contained in a PDF, you can use Exodus PDF: one of the best free solutions for editing files in the aforementioned format; the app is available for free on the Play Store and alternative stores.
After installing it, tap on the item Evita located at the bottom left (to skip the first use tutorial), then tap the button Conceded and answer affirmatively on the next screen, in order to give Xodo the possibility to access all the documents in memory.
At this point, locate the file to be modified from the proposed list (or, if you want to manually recall it from a given folder, tap the ☰ button at the top left and tap the most appropriate item from the menu that is shown), tap on the its preview and then on the symbol of sheet with pencil located at the top right. If you don't see it, tap the screen to bring up the app toolbar.
Now, you just have to use the proposed buttons to add notes, text or freehand drawings and, when requested, choose whether to save on the current document, or create a copy; at the end of any modification, remember to confirm it by clicking on the symbol in the shape of check placed at the top. Once the changes are complete, tap the button several times Go back Android, so you can go back to the main screen and automatically save the document.
If you are interested in learning more about the subject and want to know more about the apps to edit PDFs, take a look at the specific guide I have dedicated to the subject.
How will I modify a photo in PDF on your iPhone
If you act from a iPhone (or even an iPad), you can easily convert your photo to PDF using the PDF printer included in iOS.
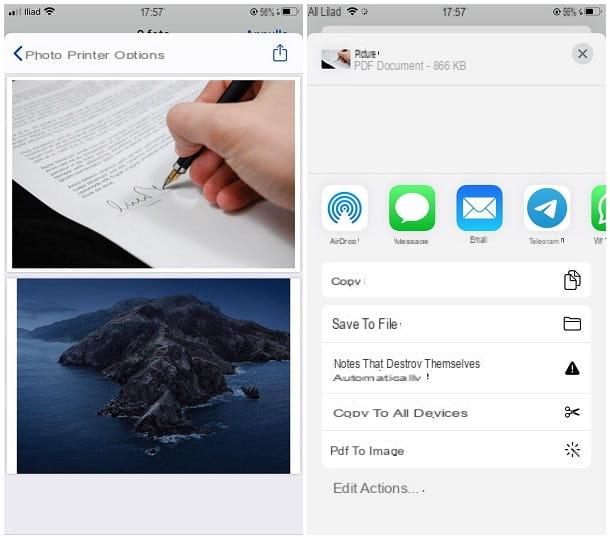
First, open the photo to convert to PDF; in case you want to select multiple images at the same time (perhaps from the application Gallery) tap on the item for select more items and check the thumbnails of the files of your interest. Then press the share button (the square with the arrow inside) and select the item Print from the panel that appears on the screen.
Now, enlarge the preview of the document displayed on the screen with a "pinch" from the center outwards, in order to automatically generate a PDF file containing the photo / photos chosen.
Finally, press the share button located at the top right, tap the option Save your File and choose the path to save the PDF document, in the iPhone memory or in iCloud. That's all!
If the conversion tools I mentioned in this guide do not perfectly meet your needs, I suggest you take a look at my guide on how to transform photos into PDF, in which I told you about alternative solutions designed for that very purpose. I am sure you will find what you need.
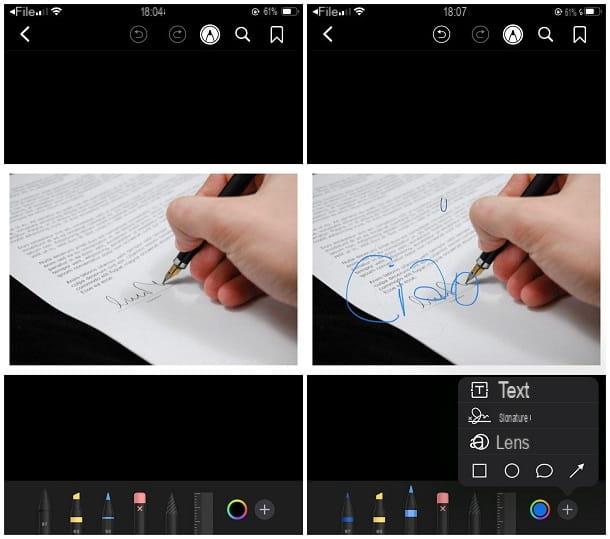
If you need to edit the images contained in a PDF, you can use the app Books included “standard” on iPhone and iPad. First, then, open the PDF document of your interest, tap the button sharing and choose the item Open on Books, in order to open the file inside Books.
After opening the file, tap on the screen, to bring up the upper toolbar, and tap the icon depicting a pencil enclosed in a circle, in order to access the editing tools. You will be able to add freehand strokes with different brushes and in different colors, text, signatures and geometric shapes of various types.
You can call up additional functions by touching the symbol capacitor positive (+) lead located in the lower toolbar and customize the drawing options for each tool, by tapping it again, after selecting it. The changes made are automatically saved.
To learn more useful resources in this regard, I refer you to reading my tutorial on how to edit PDF for free.
How to edit a photo in PDF


