


Were you browsing your smartphone's media folder and found an old photo but can't remember where it was taken? I promise you it won't happen again from today. How do I know? Well, it's very simple, because I'm going to explain to you how to geotag photos, that is, how to insert geographic information relating to the places where they were taken into your digital photos.
Make the geotag for a photo (word that derives from the union of the terms “geography” and “tag”, label) will allow you to save, within the multimedia element, the GPS coordinates of the places where they were taken. These are coordinates that can then be read by the PC (or other devices) and will allow you to know at any time where a photo was taken. How do you say? Are you interested in the topic and would you like to know more? Would you like to know how to geotag photos but are afraid of not succeeding, since you are not very familiar with the technology? You don't have to worry a bit!
To carry out the procedures that I will show you in the course of this tutorial, you do not need any particular skills. Everything you need for geotag a photo is already present in your Android or iOS device, while if you want to act as a PC you will only need a small free program that can be used in a few clicks. Come on, pick up your smartphone or sit down comfortably in front of the PC and dedicate yourself to reading this guide of mine. I'm sure you'll be able to do it all in no time. Happy reading and have fun!
Index:
- Geotag photos on iPhone
- Geotagging photos on Android
- Geotag photos on Instagram
- Geotagging photos on PC
- Geotagging photos on Mac
Geotag photos on iPhone
Let's start this tutorial by saying that they can geotag your photos with two different methods: the first method involves the use of any recent smartphone equipped with a GPS module.
In modern devices, in fact, it is possible to activate a specific setting inside the camera which, while active, will automatically insert the geographical coordinates in the photos that are taken.
If you want to take advantage of this option and make sure that, from now on, all the photos you take are geotagged, all you have to do is therefore check that in the smartphone or camera settings the insertion of geographic coordinates is enabled. photo.
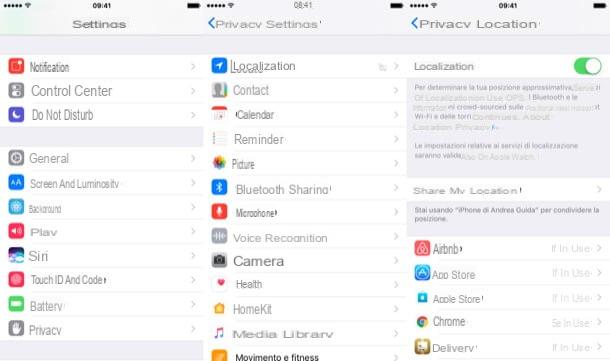
To do this, if you are using an iOS device, you must first activate the GPS of your smartphone. From the home screen of your device, then tap on the app that has the icon with the symbol of a gear to access the section Settings.
Now, locate and tap on the item Privacy (has the symbol of a hand) and tap on it. At this point you will need to locate the item Location; in correspondence with this wording the writing should be present No, confirming that the location of the device is disabled.
You will then have to tap on the item Location and activate it by moving the lever from left to right and turning it green. Also tap on the menu item Share my location and make sure that the lever corresponds to the wording Share my location which you will find on the next screen is activated.
Otherwise, move the lever from OFF a ON to turn it green. Returning instead to the section Location, check that in correspondence with the item Gallery there is the wording If in use; otherwise, tap on the item Gallery and put the check mark next to the item While using the app.
Once you have activated the location on your device and checked the settings I mentioned in the previous lines, you can start using your device as usual and take a photo which will be geolocated and geotagged automatically.
To carry out and verify this procedure then tap on the app Camera of your device and take a picture by pressing the round button in the center.
You can check that there is the presence of the geographic in the photo at any time: if you have not yet exited the photo mode of the app Camera just tap on the thumbnail of the photo taken in the lower left corner to view the photo you took via the app Gallery.

At this point, check for the presence of the geotag by swiping from bottom to top: you will see a label called Places and the thumbnail of the photo will be shown on a map. Also, at the entry Places there will also be the exact address from which you took the photo, which was obtained thanks to the geolocation you activated on your device.
You can see all the photos you have geotagged via the app Gallery iOS: then tap on the application in question and then tap on the menu item Album.
You will be able to see the presence of the album Places which will present a geographical map and within it all the thumbnails of the photos you have taken in certain positions. From this album you can activate the view Map o Grid by tapping on the appropriate items that you will see located at the top.
How to geotag photos on Android
If you want to know how to geotag photos with an Android smartphone, the first thing you can do is use the same method applicable to iOS devices: you must then activate the GPS of your device from the Settings of your Android smartphone and then activate the geotag function present in the camera of your smartphone.
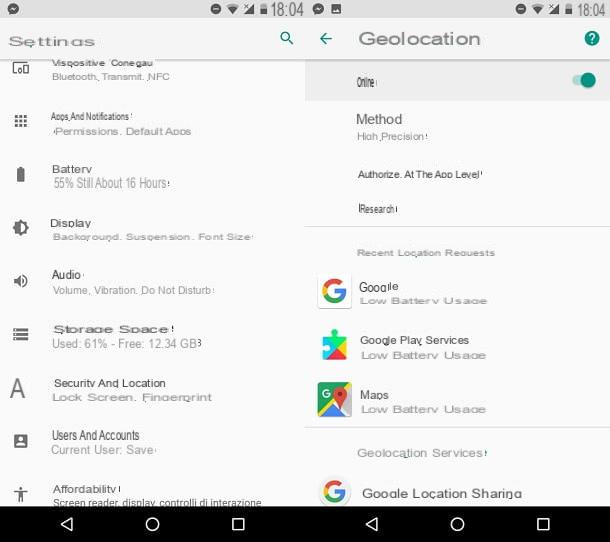
To do this, the first thing to do is tap on the app Settings from the main screen of your device (the app usually presents the symbol of a gear).
From section Settings, locate and tap on the item Geolocation and then move from OFF a ON the lever at the voice Not active which will turn green and will show the wording Active.
Now you need to open the application Camera of your smartphone and identify in its settings the possibility of geolocating and then geotagging a photo taken.
Each Android smartphone is different from the other, therefore I would like to point out that, usually, the option is found in the camera tools menu in the top bar which can present the symbol of a gear. By tapping on the icon in question, you can view the camera settings and activate the geotag feature.
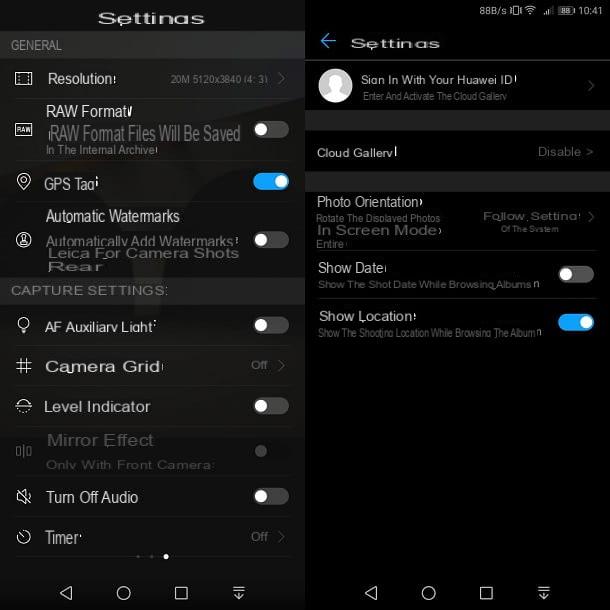
To make this guide I used two different Android devices: in one I identified the wording GPS location information from the camera toolbar located at the top of the screen. Using a different Android device instead, I identified the wording GPS tags from the camera settings side menu.
In both cases, once you have tapped the item in question, keep in mind that the device may ask you for permissions to access the location and geo locate the photos taken. Confirm the items you will see on the screen to make the app Camera of your Android smartphone can access the location of your device.
Once this is done, you can take photos from your Android device's camera and be sure that the photos always contain information about the location from which they were taken.
Then open the app Camera on your smartphone and, once the object or subject is framed, take the picture by pressing the central button. Then you can check the presence of the geotag by tapping on the thumbnail of the photo or through the multimedia gallery app of your device.
In my Android smartphone, it is also possible to view all the geotagged photos on a map. Via the menu item Map in fact, it is possible to access the screen Positions album which shows all the thumbnails of the photos taken and geolocated.
Also, by tapping on the menu item Other > Settings the menu item could be activated Show location which indicates where the photos were taken when viewing photos from the default media folder.
Then check in the settings of the multimedia gallery of your device the menu item corresponding to this feature through which you can see the geotag of the photos you have taken.
How to geotag photos on Instagram
An application widely used to geotag photos is Instagram, a social network dedicated to multimedia content that allows you to add the position to a photo taken previously or to one made on the spot.
To do this you will need to have the Instagram application for Android and iOS, so make sure you have downloaded it to your smartphone from the PlayStore or the App Store.
Then start the application of this social network and log in with your account data to start posting a photo.
You can add the location to a photo that you will share on your profile or add the geotag to a photo in Instagram Stories.
In the first case, press the button capacitor positive (+) lead and select, from the multimedia gallery of your device, the photo you want to upload to your Instagram profile.
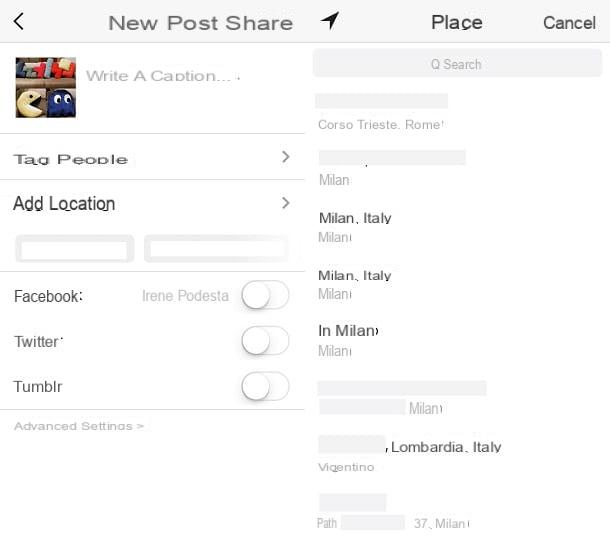
Then tap on NEXT twice consecutively and then, before sharing the photo by pressing the button Share, tap on the menu item add location that you can see on the screen.
Activate the location on your device, if requested (refer to the instructions I gave you in the previous lines to do so) and then tap on the place where the photo was taken from the menu you will see on the screen.
Alternatively, you can also tap on the text field Search if you want to indicate to Instagram that the photo was taken from a location other than the one indicated. At the end of this operation you can publish the photo on your profile by pressing the button Share.
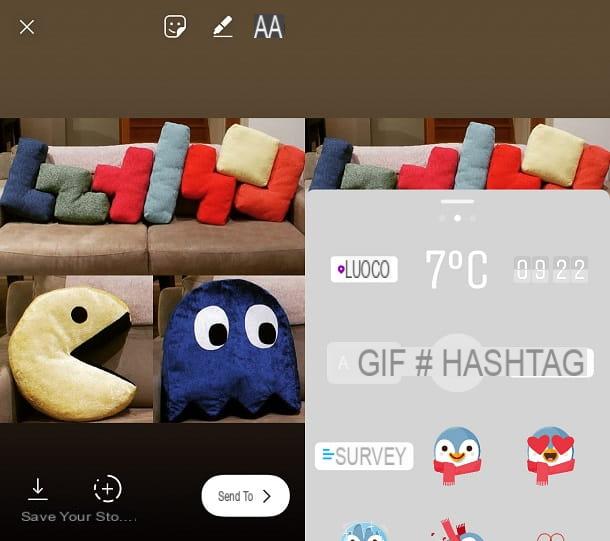
If, on the other hand, you want to apply the geotag to a photo you want to share in Instagram Stories, tap on your profile photo from the section of your Instagram profile and add a story by selecting the image from the multimedia gallery of your smartphone.
To add a label indicating the place where it was taken, tap on the icon with the smiley symbol located at the top right and then tap on the label Location.
This way, if location is enabled on your device, you will be shown a list of places located nearby. You can also make use of the text field Search to type in the location from which the photo was taken and add it as a geotag to the image.
Once this is done, you can publish the photo on your Instagram Stories by pressing on the item Your Story.
Geotagging photos on PC
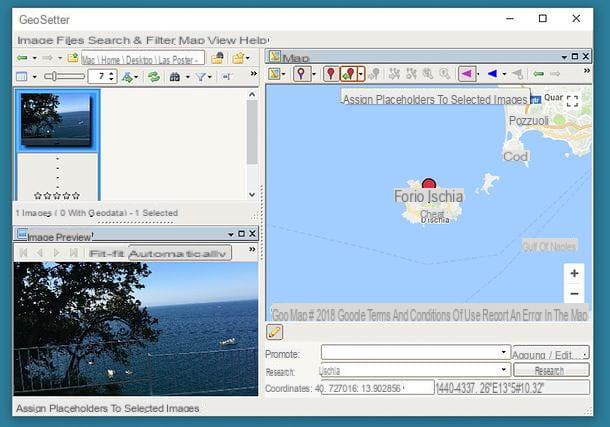
Would you like to geotag photos directly from your PC? In this case, I recommend that you contact GeoSetter, a small free program that allows you to add geographic information to photos by selecting your favorite locations on a map. It is compatible with all versions of Windows and can also be used in portable mode, without facing tedious installation procedures.
To download the portable version of GeoSetter on your PC, connect to the program's website and click on the item geosetter.zip. A download complete, apri il zip package that contains the software, extract the contents to any folder and run the executable GeoSetter.exe.
Nella finestra che si apre, click on your button OK twice consecutively to access the main GeoSetter screen. If you are told that a new version of ExifTool (a component that GeoSetter uses to geolocate photos), click on the button OK to automatically download it to your PC.
At this point, go to the menu File> Settings GeoSetter (top left), select the tab Map from the window that opens, then the secondary tab Map Address and Layers, paste the address http://map.geosetter.de/v3/map_google.html (Or http://www.geosetter.de/map_google.html, if the former does not work) in the field Map file e pulsing sul pulsating OK to make the map appear in the right panel of the program.
Now you are really ready to take action! Use the left panel of GeoSetter to select the photos to be geolocated (to select multiple elements at the same time, use the combination Ctrl + click), then search for a geographic location in the field Research of the map (bottom right), move the red pointer on the exact point you want to geotag in your photos and click on the button first Assign placeholders to selected images (the one with the red placeholder icon with the green arrow going to the left, located at the top) and then on that Save all changes in images (the floppy disk icon, also located at the top) to apply geotags to your photos. Easier than that ?!
Geotagging photos on Mac
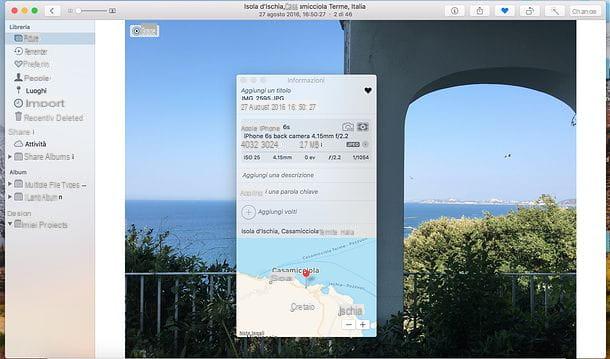
I use a Mac? Then I am happy to inform you that you can geotag photos without installing any additional software on your computer. All you need is Gallery, the default macOS app for managing and viewing photos and videos.
To geotag a photo with the macOS Photos app, all you have to do is import the image you intend to act on in the application library (just drag it with the mouse into the latter's window), open it by double-clicking and pressing first on the button (I) placed at the top right and then on the item Assign location present in the window that opens.
Then type in the name of the resort you want to associate with the photo, select one of the automatic suggestions that appear as you type (in order to select a precise point on the map) and that's it. The geographic information will automatically remain stored in the Photos app library.
How to geotag photos


