


You are a big fan of photography, your shots are almost always excellent, but there are some photos that, despite being well done, are a little too dark or, as they say in jargon, underexposed. Fortunately, you can manage to save your shots by resorting to photo editing solutions. What am I referring to? To programs like Photoshop and GIMP, online services and apps for smartphones and tablets useful for this purpose.
If you want to have some more information on how to lighten dark photos using these solutions, all you have to do is continue reading: in this guide you will find detailed explanations of how to proceed. Even if, from what I understand, you don't consider yourself an expert in new technologies and photo editing, you have no reason to worry: I'll take care of guiding you step-by-step.
So, are you ready to get started? Yup? Great! Courage: make yourself comfortable, take all the time you need to concentrate on reading this tutorial and, above all, try to put into practice the "tips" that I will give you. I just have to wish you good reading and have fun!
How to lighten dark photos from a PC
Let's see first how to lighten dark photos from PC using some software or online services suitable for the purpose: you just have to choose the solution that seems most appropriate to your needs.
How to lighten a dark photo with Photoshop
Let's start with the most famous photo editing program in the world: Photoshop. If you have not yet installed it on your PC, you can get a 7-day trial version by following my tutorial.
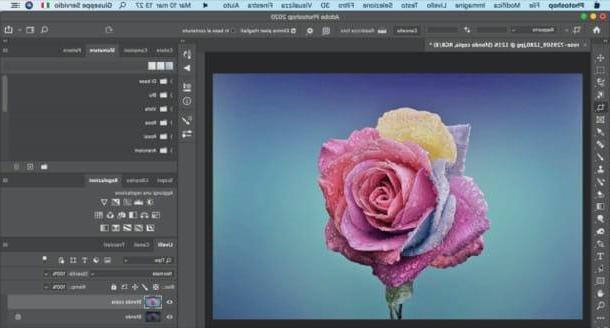
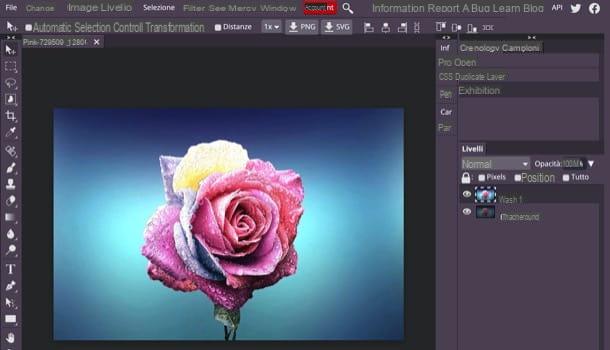
That said, if you're going to lighten a dark photo with Photoshop, the first thing you need to do is start the program and import the image to be edited into it: to do this, you can use the menu File> Open (top left) and select the image of your interest or, more simply, drag it into the Photoshop window.
After importing the image to be lightened in Photoshop, you must first duplicate the layer in which the same is present: open, therefore, the menu Subscription and select the item Duplicate Layer from the latter. After eventually renaming the level, click on the button OK, go to the menu Image> Adjustments> Shadows / Highlights and, as if by “magic”, the photo will be correctly exposed by Photoshop in a completely automatic way.
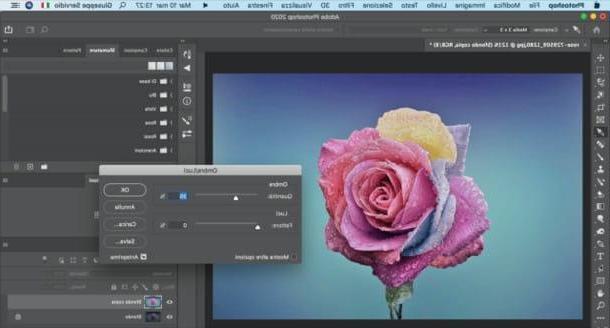
Be that as it may, know that you can act "manually" on the photo, by adjusting the shadows and highlights of the image. Through the box that appeared on the screen, in fact, you can manually act on shadows and lights by moving the cursors which can be found in correspondence with the words Quantity e Factor.
By placing the check mark on the box Show other optionsFurthermore, you have the possibility to manually adjust the parameters related to the colore and halftone through the appropriate adjustment bars. When you are satisfied with the result, click on the button OK present in the box Shadow / Luci.
Otherwise, go to the menu Image> Adjustments> Exposure and manually adjust the exposure using the cursor placed next to the wording Exposure. Once you have finished making the desired changes, click on the button OK present in the box through which you acted.
When you are ready to do it, then, save the image you have edited: go to the menu File> Save with nome and decide if save it in cloud documents or save it to your computerby clicking on one of the appropriate buttons. Simple, right?
How to lighten a dark photo with GIMP
Another useful solution for lightening underexposed photos is GIMP, considered the best free and open source alternative to Photoshop, available for Windows, macOS and Linux. Before explaining how to use it for this purpose, let me guide you in its installation.
To download GIMP, go to this page, click on the red button Download x.xx.x and then on the button Download GIMP x.xx.x directly.
When the download is complete, if you use Windows, april il .exe file you got and click the buttons Yes, OK, Install e end, to conclude the setup. If you use a Macinstead, drag GIMP in the folder Applications say macOS, click on destroy the program icon and select the voice apri twice in a row, to "bypass" the restrictions imposed by Apple on non-certified programs (an operation that must be done only the first time you start the software).
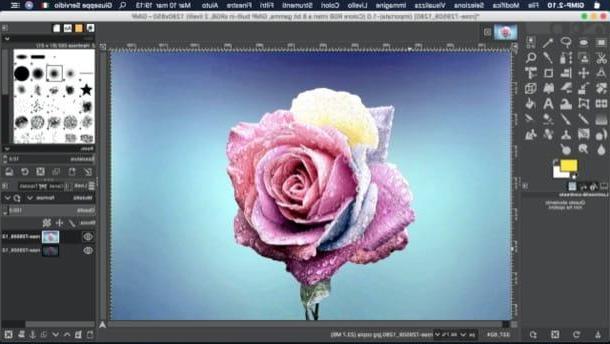
Once GIMP is installed and started, import the image you want to edit into it. Then go to the menu File> Open (top left) and select the image of your interest or, if you prefer, drag it directly into the program window. Then duplicate the image layer, opening the menu Subscription and selecting the voice Duplicate Layer.
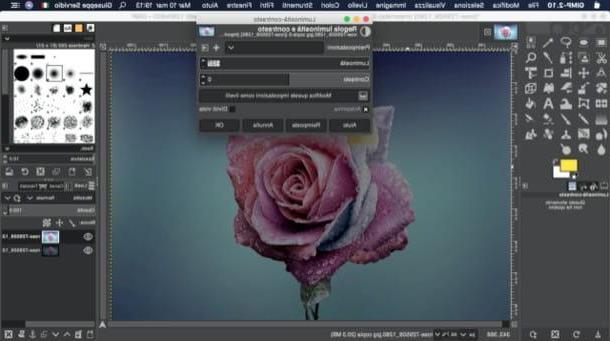
At this point, open the menu Colors, select the voice Exposure from the menu that opens and, in the box that appears on the screen, move the values in the adjustment bar to the right Exposure, until you reach the desired result; then click on the button OK.
Another thing you can do is go to the menu Colors> Brightness and move the value in the adjustment bar Brightness. Also in this case, at the end of the changes, click on the button OK to save everything.
When you are satisfied with the result, go to the menu File> Save with nome and select the location and format in which to export the output file. Did you see how simple it was?
How to lighten a dark photo online
Let's see now how to lighten a dark photo online with the help of a web application: Photopea. It is an easy to use solution, compatible with all major browsers and, since it is developed in HTML5, can be used without installing additional plugins. Furthermore, it is free, even if I point out the presence of non-invasive banners on its pages, which can be eliminated by subscribing to a subscription of 9 dollars / month.
To use this service, go to its home page and, if necessary, translate its interface into British, selecting the item cityno from the menu More > Language placed at the top. Next, click on the entry Open from computer and select the image to edit. Then duplicate the level of the same, by going to the menu Layer> Duplicate Layer.
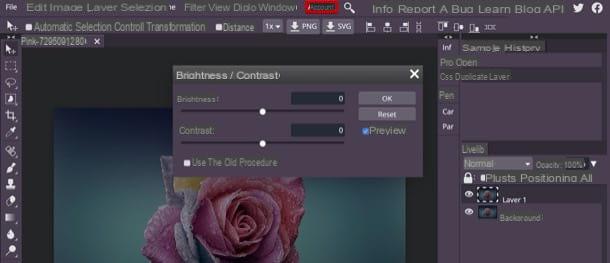
So go to the menu Image> Adjustments> Brightness / Contrast and adjust the level of brightness of the image using the appropriate adjustment bar (just move the slider to the right, taking care not to overdo the brightness too much). Next, click on the button OK, to apply the changes.
Another thing you can do is act from the menu Image> Adjustments> Exposure: after going to the latter, use the adjustment bar Exposure to correct the exposure of the image and, when you are satisfied with the result, click on the button OK.
In conclusion, save the output image you obtained: go to the menu File> Export As and choose the format in which to export the image.
App to lighten dark photos
We conclude this guide with a list of app to lighten dark photos. I am sure you will greatly appreciate these other solutions, especially if you have come to this guide wondering how to lighten dark photos on android o how to lighten dark photos with iPhone.
- Android and iOS / iPadOS photo editing functions - both Android and iOS / iPadOS integrate basic editing functions in the Gallery and Photos apps respectively, which allow you to adjust the exposure and brightness of the image.
- Snapseed (Android / iOS / iPadOS) - free app developed by Google, easy to use and full of photo editing tools, including some that allow you to act on the exposure of the photos. A must try!
- VSCO Cam (Android / iOS / iPadOS) - app that has become famous for its numerous ready-to-use filters and presets. It also includes “manual” photo editing functions that allow you to change parameters such as exposure and brightness. It includes in-app purchases to unlock various filters.
- Photoshop for iPad (iPadOS) - this is the mobile transposition of Photoshop that comes closest to the program for desktop systems, of which I told you a few lines above. It includes most of the functions of Photoshop CC plus some features designed for touch screen technology and official iPad accessories, such as the Apple Pencil. It is free for the first 30 days, then costs € 10,99 / month.
For more information about the use of these and other photo editing apps, take a look at the tutorial that I have entirely dedicated to the subject: I think it will be useful for you.
How to lighten dark photos


