


Making business cards on Microsoft Word
Means Microsoft Word Yes they can making business cards to be printed directly with your printer. The procedure to follow requires only a little time and patience: here it is illustrated in detail.
Create and set up a table
When avvii Microsoft Word, the first thing you need to do is create a new text document, via the button Blank document. After you find yourself inside the blank page, you will need to start designing the workspace, creating a table that will contain the different business cards.
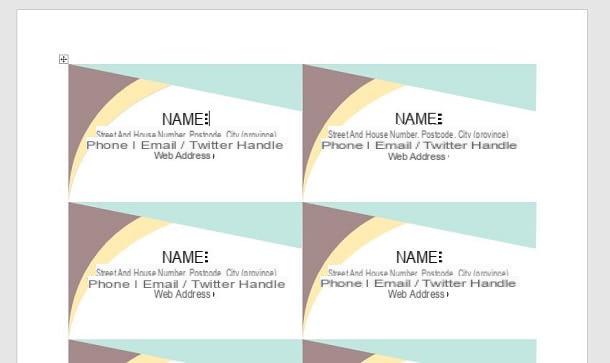
If you don't know, a business card has a standard size of 8,5 x 5,5 cm . A Word sheet is usually A4 in size equal to 21 x 29,7 cm . Taking these measurements and the presence of print margins into consideration, up to eight business cards can fit inside a vertical sheet of Word, spread over a table.
If, on the other hand, you have a Word sheet horizontally, you can create a table containing nine business cards, one more than the vertical orientation of the page.
Having said this, let's consider the most convenient distribution, that is, the one that foresees the sheet in a horizontal position, in order to have more business cards per page. To do this, go to the tab layout and press pulsating Orientation, choosing the option Horizontal, in the box you see.
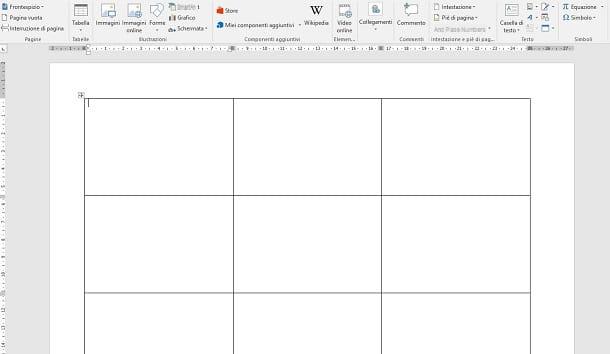
Now, move to the tab Inserisci and fai clic sul tasto Table. In the screen that is shown to you, tap on the item Insert table and sets a number of columns and rows equal to 3. In the field Fixed column width, type the value 8,5 and then press OK.
After the table has been automatically drawn on the sheet, move the mouse to its upper left margin, so that the mouse icon changes to one with a black arrow down. Then select all three columns to highlight them.
Once this is done, right-click on the highlighted area and select the item Table properties, in the context menu. In the card Riga, put a check mark on the item Specify height, type the value 5,5 and set the value Exactly in the field Row height. Poi il tasto award OK to confirm. If you have followed the steps I have indicated to the letter, you will have created a 3 × 3 area, containing nine boxes for business cards.
If you want to learn more about how to create a table in Microsoft Word, I suggest you read this guide of mine.
Insert the logo
A logo which immediately distinguishes one business card from another. If you don't already have one, you can make one using the tips I gave you in my guide on how to create a custom logo.
I recommend: the area around the logo must be transparent, so as to be able to insert the latter on the business card in a clean way, without smudging and color contrasts. Transparency can be removed directly in Word, when you import the image. However, take care that the background color is not contained within the logo itself, to allow Word's transparency tool to do its job at best.
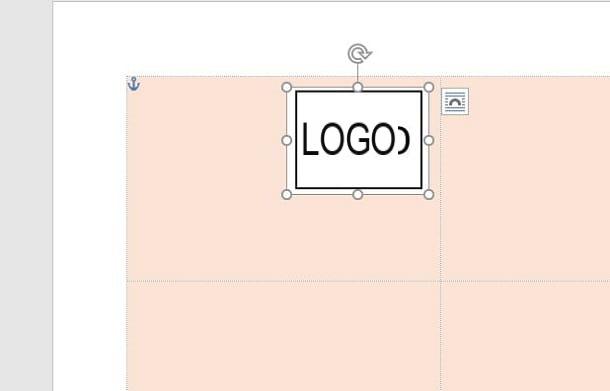
To import the logo, select the typing indicator outside the table and then go to the tab Inserisci. Then press the button Image, search for the logo you want to insert in the business card and insert it into the Word document. Now, resize the image using the indicators present at the four corners of the grid and then drag it into a cell of the table.
From now on, the procedures will be performed only for one cell but, when you are satisfied with the result, you will have to copy and paste all the elements of one cell into the others, so that all the business cards are the same.
As you may have noticed, the logo will be placed in the upper left corner of the cell, as the formatting is set to left alignment. To undock the image from the text, click on it and press theicon of a sheet with an arc inside, which you find alongside, and select the option In front of the text, in the box you see. Now you can move the logo to any position in the cell, without interfering with the text you are going to type.
Change the background color
After carrying out the operations indicated in the previous paragraphs, it is time to give some color to the business cards. Also, if the table margins are too sharp, you can think about making them more opaque. All these operations are reachable through the panel Table properties.
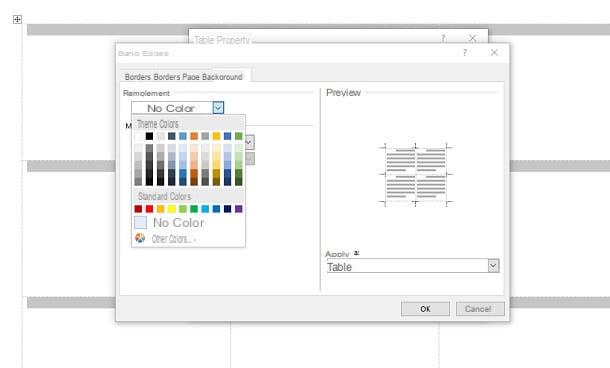
First, highlight the entire table by clicking on theicon with four arrows that you find in the upper left corner. Then right click on the table and select the entry Table properties give the menu answer.
At this point, in the screen you see, reach the tab Table and click sul pulsating Borders and background, to access the table customization settings. Now, in the tab Background, use the drop-down menu under the heading Filling to select any color for the business card.
Now, move to the tab Bordi and select the hatch type of the line. Then choose a light color (in shades of gray or white) and set the lowest thickness value. Once this is done, press the button OK to confirm the changes you just made to the table.
Format the text
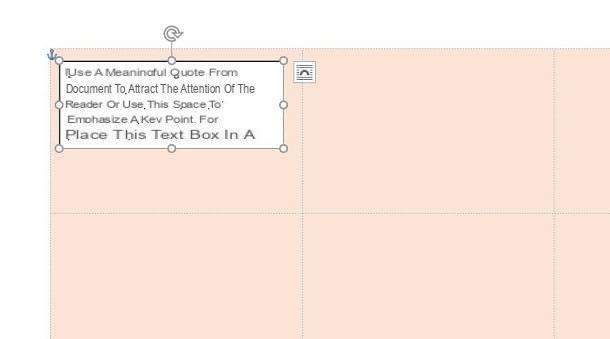
Once you've set up your business card graphically, it's time to add the different information into it. I advise you not to write directly in the cell, but I suggest you to add the text via Text box. To do this, go to the tab Inserisci and premium tasto Text box. In the box that appears, then choose the option Simple text box to add it to the document.
In this way, you will have added a box where you can type the text you prefer. In case the color set automatically by the text box is not suitable for the customization you made in the previous chapters, you can decide to disable its background color and its border. To do this, click on the text box and move to the tab Size, which you find at the top. Now choose the option No color from the buttons Form filling e Boundary crafts. I remind you to undock the text box, as I explained to you for the images in this chapter.
To format the text, then move to the tab Home and choose all the tools you need, such as bold, italics, font or font size. If you want to know more about using Word's text formatting tools, I recommend that you read this guide of mine.
Add decorative elements

We are almost there: the final touches are missing and the business card will be ready. For the different textual information you have added, such as phone number, email or office address, you can add icon.
You can certainly find several icons on the web to import as images, but you can also add them via fonts Unicode. Don't worry: nothing difficult! To do this, just open the emoji keyboard of Windows, through the combination Win +. (point) or that of MacOS (ctrl + command + spacebar).
Once the emoji panel is displayed, click on the figure you want to insert next to the text to add it in a flash. Also, know that you can add additional decorative elements to the text, which you find in the tab Inserisci, using the geometric shapes reachable via the button Form.
When you are completely satisfied with your work, you can proceed to print your business cards. In this regard, I suggest you read my guide on how to print business cards.
Making business cards through templates
If you don't have the time to devote to designing a business card, you can rely on Word templates. After starting Microsoft Word, instead of choosing Blank document, click on the wording tickets, which you find under the search bar at the top.
With that done, wait a few seconds to see a list of business cards that you can customize to your liking. When you've found what it can do for you, double-click its thumbnail to open the document template in Word.
All you have to do now is personalize the ticket with your personal information, referring to what I have indicated in the previous chapters.
Please note: Word is also available in the form of an online service, which can be used directly from the browser, however in this "incarnation" (which is less feature-rich than the standard one for Windows and macOS) it does not support the formatting options of the sheet useful for creating business cards, nor the predefined templates to create them in just a few clicks. It is therefore unsuitable for the purpose.
Making business cards on smartphones and tablets
On smartphones and tablets, you can use the Microsoft Word to create your own business cards, albeit with some limitations. Although Microsoft Word can be downloaded for free on Android, iOS and Windows 10 Mobile (on devices with screens smaller than 10.1 ″), a subscription is required to Office 365 to unlock some additional features.
This subscription, at a cost of 7 euros / month or 69 euros / year, allows, for example, to change the page orientation, set a background color for the cells of a table or apply more colors for formatting and shapes geometric. For these reasons, you will only be able to make plain business cards, due to the limitation of the free version.
In general, to create a business card, I recommend that you follow the same procedures that I indicated in this chapter. However, take into consideration that the tools I told you about are present in the top bar, in case you are using the app Microsoft Word on tablet; alternatively, on smartphones, you can access the Word tools via the drop-down menu accessible thanks to the ▲ (on Android) or ⋮ (on iOS) icon, located at the bottom right.
How to make business cards in Word


