In this article, let's explore the topic of managing photos on iPad tablets, and in particular we will understand how to organize photos, how to manage Photo Stream, how to import images from Windows or directly from a camera and how it is possible to share them with friends.
Import photos
The easiest way to import photos is to use the Photo Stream folders in Windows or iPhoto or Aperture on Mac. However, you can also import images directly from a memory card or USB device via Apple's iPad Camera Connection Kit. for sale at 29 euros.
It works with the first three iPad generations, if ours has the Lightning connector, we must also buy the relative adapter or wait for Apple to produce one with a Lightning connection. However, it supports standard image formats such as JPEG and a wide range of RAW formats, as well as H.264 and Mpeg4 videos. The kit includes two 30-pin adapters, one with an SD card slot, the other with a USB port.
By connecting the adapter, the IOS Images app opens automatically and we can choose which photos to save in the iPad library.
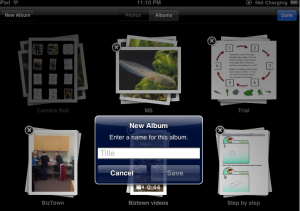
How to create and manage albums
Some albums are created automatically, such as Camera Roll and an image folder managed by iPhoto for iOS. However, it is possible to create our own, also because they simplify the management of the photos by allowing us to divide them into logical groups.
Let's open the Albums tab and then tap the '+' at the top left of the screen. Let's give the album a name and click on save. Now we need to decide which images it should contain. To add them, touch the photos in the Photos and Photo Stream tabs. Once chosen, we touch Finish.
We can later add more images to the album by opening it and tapping Edit, Add Photos. We can remove them with Edit, selecting the photos to delete, then tapping Remove. They are removed from the album, but not physically from the iPad, they can always be viewed in Photos.
Selecting a series of photos and adding them to a new album makes the library easier to manage and navigate.
How to delete photos
To remove the images from the iPad we have to go to the card in which they are stored.
We touch Edit, select the images to be deleted, then touch the red Delete button and confirm with “Delete selected photos”. If Photo Stream is enabled, we can recover any accidentally deleted photos from iCloud.
How to share photos
Next to the Delete button is the Share button. Its function is obvious, but its options are worth exploring. IOS 6,0 has greatly extended the sharing tools available.
The choices depend on the number of images selected. By choosing just one we can use the whole range: Twitter, Facebook, email or messages.
We can also print or copy the image, use it as a wallpaper, as an icon for a contact and save it in Shared Photo Stream.
Shared Photo Streams are posted online, with a public URL that we can pass on to friends and family with whom we want to share the images. This feature is disabled by default. To activate it, we need to go to Settings, iCloud, Photo Stream, Shared Photo Stream. If we select more than one, but fewer than five images, the Twitter option disappears. By selecting more than five, we also lose the ability to send them via e-mail.
Twitter and Facebook have been integrated into iOS 5.0. This means that we can send content directly to these social networks from the default iOS applications without using a third party client. If we are Twitter or Facebook users, it is sufficient to authorize iOS to send the contents to our account through the Settings application. We find the entries for Twitter and Facebook in the middle of the left column.
19