Do you need to reduce the weight of a photo to be able to send it easily via email to your friend? Do you have a website and want to make it load faster by optimizing the images on it as much as possible? If the answer to these and other similar questions is yes, I'm happy to let you know that I have something for you. With today's guide, I'm going to point out all those I believe to be the best solutions available for reduce the weight of a photo in a simple but at the same time effective way.
There are, in fact, numerous programs and apps useful to achieve this very result and many of these manage to do their job without excessively negatively affecting the quality of the output image. There are also some special ones online services that allow you to succeed in this "enterprise" directly from the browser, without having to download and install anything on your computer.
But let us clarify one point immediately: miracles cannot be done. In a nutshell, the solutions to reduce the weight of a photo that I'm about to show you are excellent, but clearly don't expect to make a file of a few KB become very heavy. Having said that, I would say to ban the chatter and take action. Find everything below!
Preliminary information

Nowadays, in order to ensure that photos (and images in general) are easily distributed via the Internet, a compression algorithm, which allows you to reduce the amount of space occupied in memory.
Compression algorithms can act at different levels: a low level of compression does not greatly affect the weight of the image, but preserves its quality; while a high level of compression, on the contrary, can considerably decrease the weight of the image but also affect the quality in an incisive way.
Mainly, compression algorithms fall into two broad categories: lossless (such as PNG, TIFF and GIF lossy (such as JPG / JPEG and GIF> 256 colors), i.e. lossy. However, it is not uncommon to come across images that have not been compressed, such as those in BMP o RAW: in this case, the file size can reach hundreds of MB, depending on the resolution and physical size of the image.
To intervene on the "weight" of an image without going to resize it (and, consequently, reduce its length and width), it is therefore necessary to act on its format: for example, transform a file BMP (without compression) in a file JPG it can reduce its size on disk by as much as 80%.
The gain, however, is significantly lower, when a compression algorithm has already been previously applied to the file: in cases like these, generally, it is preferred to recompress the image using an algorithm that also provides the possibility of intervening on the quality of the resulting image, such as the format JPG / JPEG.
I'll give you a practical example: if you have a 500 Kb large PNG file and you need its size to drop to at least 300 Kb, it is advisable to convert it to JPG and choose a quality equal to 50% (or lower) of the original image. Clearly, lower quality corresponds to greater loss of data and details, which leads to an almost certain grain / blur of the image, or the presence of indistinguishable lines.
The theme of this guide will be, precisely, to explain how to reduce the size of an image file using a series of software, online services and applications suitable for the purpose.
How to reduce the weight of a JPG photo from a PC
Having made the necessary clarifications of the case, the time has come to explain, in practice, how to reduce the weight of a JPG photo (or other source formats) from your computer. Below I will explain how to do this using some very popular software and online tools, accessible directly from the browser. Good fun!
How to reduce the weight of a photo with Photoshop
Despite Photoshop is a software that is not always easy to use, the steps to be taken to increase the compression level of an image (and possibly reduce its weight) are not complex at all. After running the software, use the menu File> Open (top left) to select the image to act on.
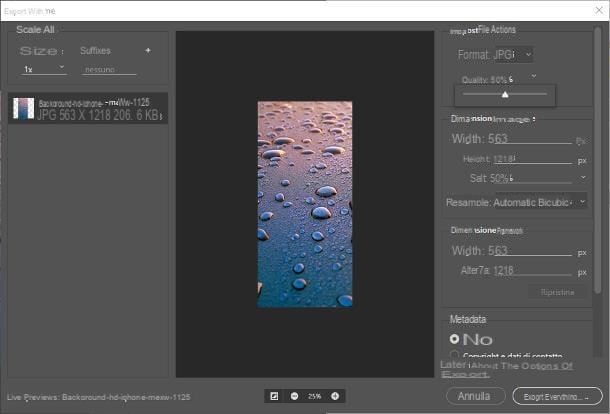
Once the photo has been imported, click on the menu again Fillet, place the cursor on the item Export e clicca sull'opzione Export as, which appears immediately after. At this point, use the options in the right part of the window to make the necessary changes: set the drop-down menu Size su JPG, select the quality of the resulting file and, if desired, use the option Ladder to specify the percentage by which to reduce the size of the photo.
The size of the final image, which will be automatically updated following each modification, will be available on the left side of the export screen, corresponding to its name. When you are satisfied, click on the button Export everything ... and, using the next window, conclude by indicating the name and folder to save the file and click on the button Save.
How to reduce the weight of a photo with GIMP
If you use regularly GIMP to manipulate your images, know that you can easily use this program to reduce the "weight" of existing photos. Like? I'll explain it to you right away.
To get started, launch the software and use the menu File> Open (top left) to choose the photo on which to intervene. After opening the image, go back to the menu Fillet and select, this time, the item Export as, to display the screen dedicated to exporting files.
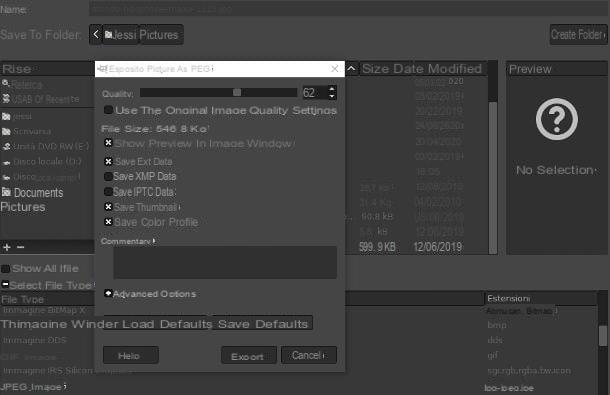
Now, select the folder to save the file to, specify a name to assign to the image, click on the symbol [+] placed next to the wording Select file type and indicates the file format (With art. JPG) to be used for saving, selecting it from those proposed.
Per finire, click on your button Export and use the options proposed to define the image compression level: put the check mark next to the wording Show the preview in the image window, so you can see its size, then use the adjustment bar named Quality to define the quality of the output files (the size will be updated automatically). If necessary, click on the button [+] corresponding to the item Advanced options to change the encoding options (use this option only if you know what you are going to do).
Once you have the size that suits you best, click on the button Export to save the image on the disc, in the format and with the quality chosen above.
Note: this method is not only valid on Windows, but can also be safely used for reduce the weight of a Mac photo or on Linux, as GIMP is available for all popular operating systems and works the same everywhere.
How to reduce the weight of a photo with Paint
You don't have some of the software I mentioned earlier, but you would still like to be able to get the desired result using Paint, the program dedicated to basic manipulation pre-installed in all editions of Windows?
In that case, I have no good news to give you: the software, in fact, does not provide any option aimed at recompression of the images. The only thing you can do to try to reduce its weight is to save it in a different format: doing this can be effective when switching from a format without or with little compression (e.g. BMP or PNG) to one with higher compression (eg. JPG), but it has no effect when you try to perform the reverse passage or to intervene on the same source and destination format.
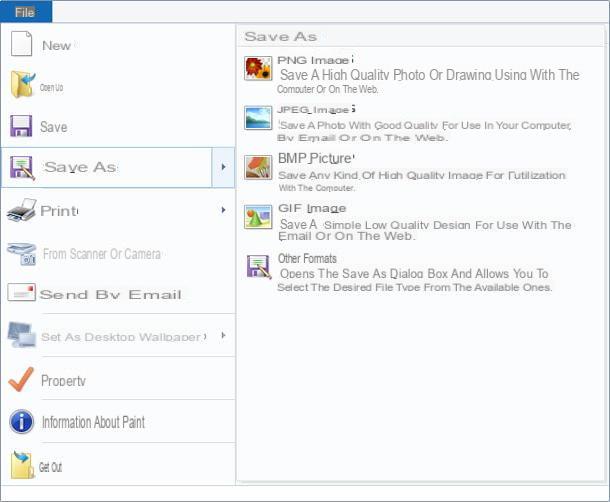
In any case, to change the format (and, consequently, the extension) of a photo with Paint, do this: after starting the program, click on the tab Fillet located at the top left and uses the voice apri, located in the menu that opens, to select the image on which to intervene.
After loading it, click again on Fillet, place the mouse cursor on the item Save with name and choose, from the next menu, the new format (With art. JPG) in which to save the file. Finally, he indicates a name to assign to the image, select the folder in which to store it and click on the button Save.
How to reduce the weight of a photo online

If you are interested in understanding how to reduce the weight of a photo online, since you can't (or don't want to) install programs on your computer, you can take advantage of one of the many free Web portals that, directly from your browser, allow you to apply compression to images, in order to reduce their size.
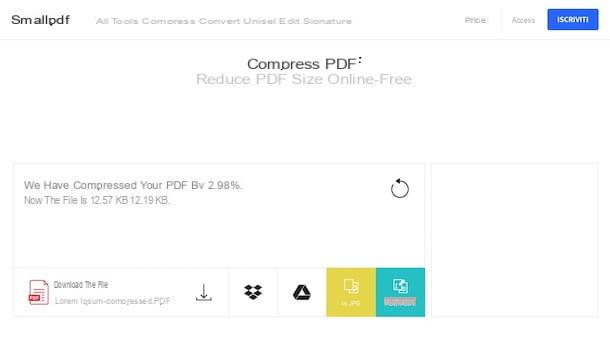
One of the best websites of this type is definitely Optimizilla, which, at no cost, allows you to compress images in JPG and PNG format, customizing the final quality of the images and with the possibility of working up to 20 simultaneously.
For services, go to your home page, click on your button Upload files and, using the window of Esplora File / Finder that appears on the screen, selects the image on which to act; alternatively, you can drag it into the box indicating the wording Drop your files here.
At the end of loading, the reduction will start automatically; when finished, you will be shown the percentage of compression applied, along with the new file size. If the result is satisfactory for you, click on the button Download, located below the photo preview (or on the button Download everything, if you have uploaded multiple images).
If not, you can customize the quality of the images before downloading them, using the adjustment bar next to the wording Quality. When you are ready, click on the button OK to apply the chosen parameters and download the file, as I indicated earlier.
How to reduce the weight of a photo from smartphones and tablets
If, instead of the PC, you prefer to compress images using the smartphone or of the tablet, you will be pleased to know that there are applications, available at no cost, that allow you to obtain respectable results.
How to reduce the weight of an Android photo
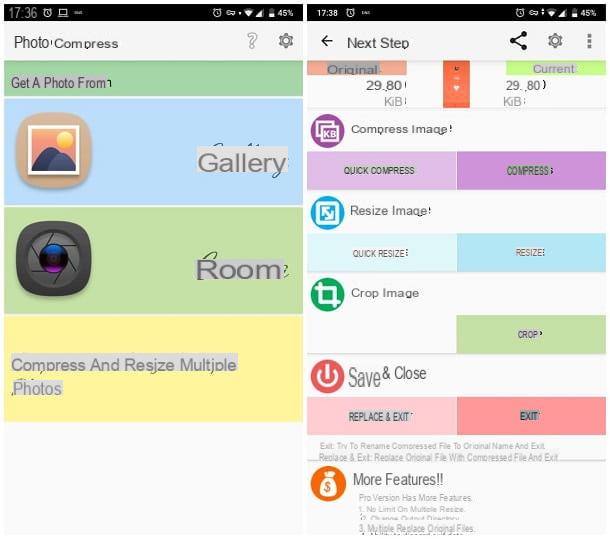
For example, Photo Compress 2.0 is an application for Android available at no cost, both on the Play Store and on the alternative stores dedicated to the operating system of the green robot, able to quickly compress images to and from multiple formats.
To get it, start the store installed on your device and use the symbol of magnifying glass (or the button Search) to locate the app; when you've found it, tap hers name and then on the button Install, to download and install it on your device.
Once this procedure is completed, start Photo Compress 2.0 calling it from the Home screen or from the Android drawer, tap the button Gallery and select the image to compress, using the panel displayed later (if necessary, grant the app permission to access the Gallery).
Fatto ciò, tocca il pulsating Compress and uses the cursor displayed on screen to define the level of compression to be applied; when you're done, tap the button Compress to apply the change made; finally press the button Exit to save the compressed image in the Android Gallery, inside the named album PhotoCompress.
How to reduce the weight of a photo on iPhone
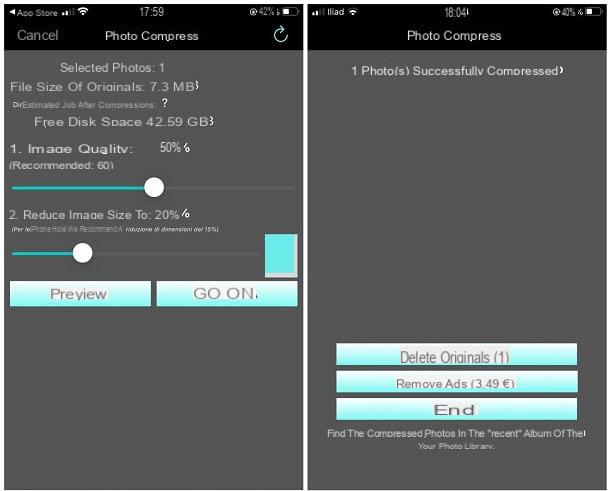
If, on the other hand, yours is a iPhone, one of the apps you can consider is Photo Compress: it is an application, available for free on the App Store (with the possibility of in-app purchases to unlock additional functions, such as the ability to compress more than 50 images at the same time), capable of reducing the weight of one or more photos, within a couple of taps.
To use it, open the App Store and use the button Search to locate the app in the market (or follow the link I gave you earlier, if you are reading this guide directly from the device); when you have found it, tap the button Ottieni / Installa and authenticate via Face ID, touch ID o Password Apple ID to complete its installation.
At the end of the procedure, start the application using the icon added to the Home screen or to the iOS App Library, choose whether or not to allow thesending notifications e fai tap sul pulsating Non-personalized advertising, so you can continue to use the app for free, displaying ads not based on your identifier. Made your choice, refuses installing additional software by tapping the button No thanks.
To select the image to compress, tap the button [+], resident at the top, and then on the buttons Consent e Allow access to all photos, in order to authorize the app to access archived images. At this point, tap on the preview of the photo to be processed, tap the button end located at the top right and use the adjustment bars which are located below to choose the quality of the image and the compression factor.
Once you've made your choice, tap the buttons Continue e Ends, to apply the specified changes and save the compressed image directly to the iOS photo album.
How to reduce the weight of a photo