


Taking pictures of the eyes is a step that all photographers must reach sooner or later. Since you bought your first SLR a few months ago, you have taken pictures of various kinds, but you have not yet "dared" to immortalize the eyes of a subject. Now that you have become more "familiar" with your camera, you would like to try this operation, even if you don't know exactly how to take pictures of the eyes. Well, what's the problem ?! If you want, I can give you some useful "tips" on the subject.
In the next paragraphs, I will give you some tips on how to choose the most suitable lens and lighting for taking pictures of the eyes with a DSLR, as well as giving you some tips to follow in the composition and shooting phase that can really make a difference. And in case you were wondering, in the last part of the guide, I will also show you how to take pictures of a subject's eyes using the camera built into your smartphone.
So, are you ready to get started? Yup? Great! Make yourself comfortable, take your time to concentrate on reading this guide and, more importantly, try to put into practice the advice I am about to give you. If you do, you shouldn't have a problem taking photos that feature your subjects' eyes. I wish you good reading and, above all, have fun!
How to take pictures of the eyes with the Reflex
want take pictures of the eyes with the Reflex? In this case, before setting out to take the photo of the subject that will lend itself to your "photo book", it is necessary that you do some preliminary operations, which concern the choice of the most suitable lens for this type of shot and the right lighting. Once this is done, you can compose the photo and shoot.
Choose the right lens

Choose the right lens it will allow you to take the photo in the eyes of your subject acting with greater agility and obtaining a much better final result. The choice of the lens must be made according to the result you want to obtain: if you want to photograph only the iris, therefore only a detail of the face of the subject you want to portray, the ideal choice would be to use a macro lens, able to focus even on a very close subject.
If you don't have a macro lens available and you don't intend to buy one (since they are not cheap lenses), you can try using the classic kit lens 18-55 mm which is also bundled on entry-level SLRs or you can opt for a fixed focal lens (it's a 50 mm), which allow you to obtain a much better photo rendering than the “all-do” lenses and are highly recommended for the creation of portraits (if this is the type of photo you want to take).
See offer on Amazon See offer on Amazon See offer on Amazon See offer on Amazon See offer on AmazonIf you want some more clarification on which lens to buy, I suggest you take a look at the guide I published on the subject, in which I have listed the best lenses available on the market for Canon, Nikon and Sony.
Choose the right lighting
Once you have chosen the lens that seems best suited to your needs and the type of photography you want to make, you have to choose the right lighting. In photography, the choice of light is never a negligible detail, but in this case this concept is even more valid since the protagonists of your shot will be the eyes of a person.
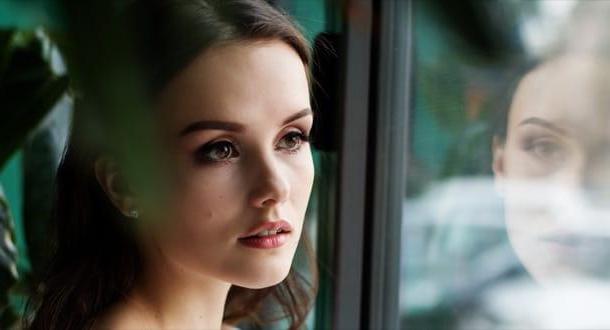
The advice I give you, therefore, is to look for a place that is well-lit. Maybe you could take pictures outdoors, especially if it's a nice sunny day, or you could have your subject positioned in front of a window pane. By doing so, your subject's eyes will be well lit, the iris (the "colored" part of the eye) will tend to dilate, the pupil (the black dot in the center of the eyeball) will shrink quite a bit and shot will take on a much more interesting connotation.
In choosing the right lighting, try to pay attention to do not place the subject in front of an overly bright light source. If you do not pay attention to this aspect, the subject you are photographing may be tempted to close their eyes due to the light intensity present in the surrounding environment, thus ruining your shot.
Always staying on the subject of lights, remember of course turn off the flash, if it is activated, because "shooting" it straight into the eyes of the subject at the moment of the shot, you risk "blind" and create a poor quality photo. Understood?
Compose the photo and shoot
After choosing the lens that you think is best suited to the type of photo you want to get and choosing the right lighting, you can finally compose the photo and shoot. Yes, but what shooting parameters to set to get a quality photo? I'll tell you right away.
As far as the 'ISO, I advise you to keep a very low value (therefore 100), especially if you followed my advice to choose an environment with good starting lighting. Since you are taking the photo of the eyes, I also recommend that you set a relatively fast shutter speed (ex. 1/500; 1/1000; 1/2000; etc.), so as not to force the subject to keep his eyes open forcibly or, in any case, for too long. As for theaperture opening, instead, I advise you not to open it more than f / 8, so that enough light reaches the sensor and obtains a sufficient depth of field.
If you haven't already, turn on the Reflex by flipping to ON the switch lever that is located on the camera body and then make sure it is set to manual shooting mode: otherwise, you can do it by turning the selection dial making sure that the M is placed side by side with the dash.
Now you have to use the shooting parameters that I recommended a little while ago. On the SLR in my possession (a Canon EOS 1300D), to adjust the aperture you have to press the button (Off / + -) to highlight the box Fx.x present in the menu, then place the index on the main bezel (the toothed "wheel" that is next to the shutter button on my camera) and move it to the right or left (based on the value you want to use). A similar operation must also be done to adjust the shutter speed.
To select the ISO value, however, in my case you have to press the button (ISO) which is located on the camera body and, with the help of the main bezel, select the value 100 (or whatever you prefer to use) and then press the button SET to confirm the choice made.
After setting the correct shooting parameters, try to compose the image taking into account the fact that the eyes, like a small mirror, reflect everything around us: the photographer (in this case you), the camera, the lights , the surrounding environment, and so on. If you want to avoid including some of these details, try to find an angle that allows you to achieve the desired result.
After you have found the right angle from which to take the photo, I recommend that you ask the subject to blink, so as to reduce the chances of this happening during the shot. Once this is done, you can finally take the photo: half-press the shutter button, so as to focus on the subject's eyes (in my case, a red dot which helps me to choose the detail to focus on quite precisely) and, as soon as you're ready, keep pressing the shutter button to make the photo.
If you want more information on how to take pictures with the Reflex, please read the in-depth analysis that I linked to you because it will surely come in handy to better master your camera.
How to take pictures of your eyes with your smartphone

want take pictures of your eyes with your smartphone? That you have a cell phone at your disposal Android or iPhone, know that you should have no difficulty in being able to complete an operation like this. If your phone has a good camera, chances are you can make a good photo.
Clearly, the quality of the shot will not be comparable to that made with a Reflex (at least not at first glance), but if your intentions are to post the photo on your social profiles, surely you can be satisfied. In this case, the advice I gave you in the previous lines applies: you need to find a place with good basic lighting, which can make the eyes of the subject you are photographing stand out. Then remember to turn off the flash, as the light reproduced by the latter could annoy the subject who, for obvious reasons, would close his eyes and ruin the shot, forcing you to do it all over again.
To turn off the flash on Android, apri l'app Camera, presses on the symbol of lightning which should be at the top left, and then tap on the item OFF, No o disable (depends on the version of Android installed and the brand / model of smartphone you own). If you use a iPhoneinstead, after opening the app Camera, tap on the lightning located at the top left and select the item No give the menu check if you press.
After turning off the camera flash, get as close to the person's eyes as possible, tap on the screen (in correspondence of the iris), so as to focus on the eyes and then presses on shutter button located in the center of the Camera app screen to take the photo. If you want some more advice on how to take beautiful photos with your mobile, take a look at the guide that I linked to you.
How to take pictures of the eyes


