


Thanks to its advanced photographic capabilities, iPhone has become for many users the favorite device on which to focus all their shots to show them to friends and share them on social media. You obviously are no exception but now you are faced with a problem that seems insurmountable: you have pictures taken with your old camera, you would like to transfer them to your "iPhone by" to always have them with you but you don't know how to do it.
Well, don't worry. Thanks to iTunes, you can sync one or more photo folders between your computer and iPhone in such a simple way that you will be amazed. Also, since we now live in the age of the cloud, know that you can create a single large online photo library and customize it from any device. This means that you can upload photos to your online library using your PC or iPad and magically find all the photos synchronized on the iPhone.
Do you want to know more? So don't waste any more time, roll up your sleeves now and find out how to upload photos to iPhone following the directions I am about to give you. Whether you have a Windows PC, Mac or other iOS device, rest assured you'll be able to upload new photos to your iPhone in no time.
Upload photos to iPhone using iTunes
Let's start with the more “traditional” procedure, ie from how to upload photos to iPhone by connecting the smartphone to the computer and using iTunes.
iTunes is Apple's famous multimedia software that allows you to manage iOS devices from your computer. It is available both for Mac, where it is installed “as standard” on all computers, and for Windows, where it is available as a free download.
If you have a Windows PC and have not yet installed iTunes, connect to the Apple website and click on the button Download to download the program. When the download is complete, open the installation package named iTunes6464Setup.exe and click on the buttons NEXT, Install, Yes, Yes e end to complete the setup.

At this point, connect your iPhone to the computer using the supplied Lightning / Dock cable, start iTunes (if it doesn't start automatically) and select theicon of the "iPhone by" which appears at the top left. If this is the first time you connect the iPhone to the computer, you must authorize the communication between the two devices by responding affirmatively to the warning that appears on both.
At this point, select the voice Gallery from the left sidebar, put the check mark next to the item Synchronize photos and choose the photos to upload to iPhone. To do this, you need to select the folders on your computer containing the images you want to sync with your smartphone. By default the folder is selected Images and all subfolders of the latter but you can customize this setting very easily.
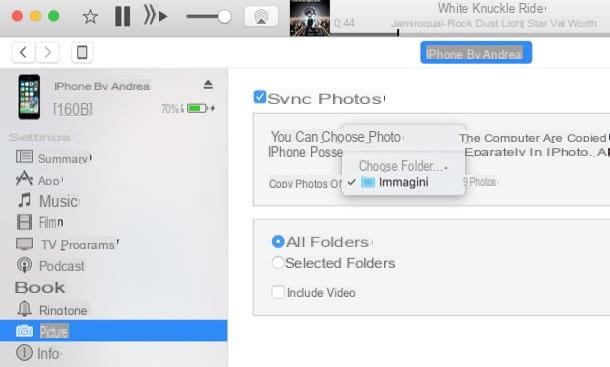
You can choose whether to copy photos from another folder to iPhone by selecting the option Choose folder from the drop-down menu located next to the item Copy photos from, or whether to copy only certain sub-folders of the Pictures folder, by putting the check mark next to the item Selected folders and the name of the folders to synchronize with the "iPhone by". To save the settings and start the image transfer, click the button Apply located at the bottom right.
If you are using a Mac, you can also sync the entire library of the app Gallery with the iPhone by selecting the appropriate icon from the drop-down menu Copy photos from. Also I point out that putting the check mark next to the item include videos you can make sure that not only the photos, but also the videos, are copied to the “iPhone”.
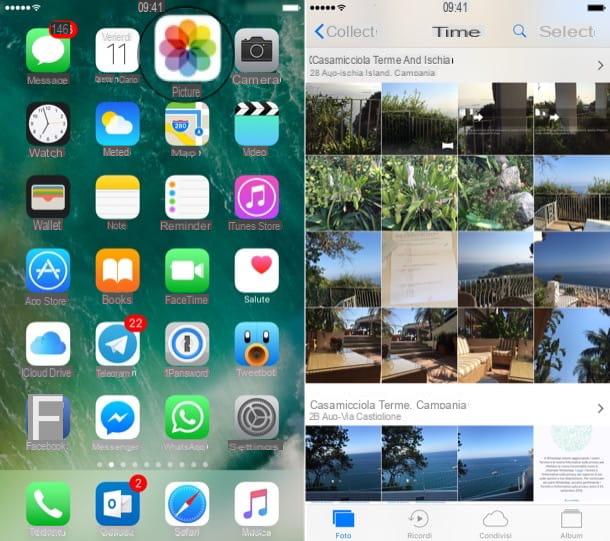
When the operation is completed, the image folders synchronized with the iPhone will be available within the app Gallery smartphone. Here you will find the entire folder structure and all the photos contained in them ready to be browsed on the mobile phone screen.
Remember that when you choose to caricature photo your iPhone, the folders you select to sync in iTunes are also synced the next time you connect your phone to your computer. To prevent this from happening, you can return to the tab Gallery iTunes, uncheck the option Copy photos from and choose to keep previously synced photos on iPhone.
Upload photos to iPhone using iCloud Photo Library
As mentioned at the beginning of the post, it is possible to transfer photos from computer to iPhone (or even from another iOS device to iPhone) using cloud services. Among the best cloud services for managing photos on iOS there is ICloud Photo Library which is offered directly by Apple and allows you to create a single photo library that automatically synchronizes on all the user's devices: iPhone, iPad, Windows PC and Mac.
The iCloud Photo Library is free, however, to take advantage of it, the 5GB of free storage that Apple offers for the basic iCloud plans are not enough. This means that you have to take your wallet and subscribe to one of the iCloud paid plans, which have prices starting at 2,99 euros / month for 200GB of storage.
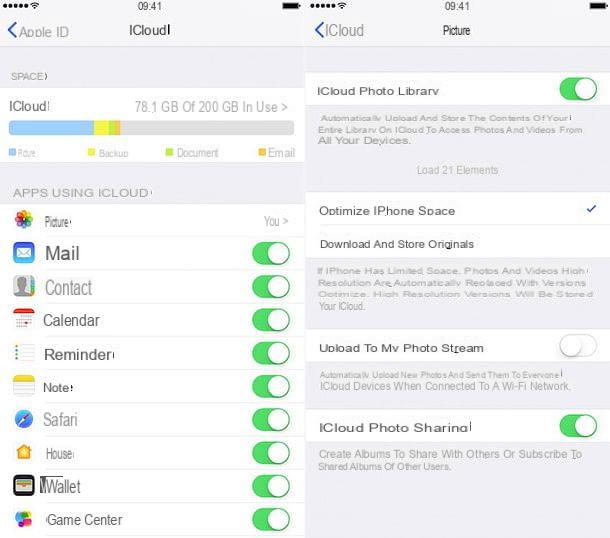
To sign up for an iCloud paid plan, open the app Settings on your iPhone, select the tua photo in the screen that opens and first go to iCloud, then on space chart available on your account and finally on the option Change storage plan. To turn on iCloud Photo Library, go back to settings of iOS, presses on tua photoi went his iCloud> Gallery then activate the options ICloud Photo Library e Optimize iPhone space.
Please note: if you use a device equipped with a version of iOS prior to 10.3, you have to follow a slightly different path. Here's what you need to do: go to the menu iCloud> Storage and select the item Buy more space from the screen that opens. To activate the iCloud Photo Library, instead, go to the menu Settings> iCloud> Photos and activate the options ICloud Photo Library e Optimize iPhone space.
At this point, you have a library of photos and videos automatically tuned to all your devices (via the Internet) and you can upload new photos to it from any device. Another important thing to point out is that by activating the function Optimize iPhone space you have left to iOS the task of intelligently managing the space reserved for photos and videos on the phone memory. This means that only the most recent content will be kept at the highest resolution, the others will be kept in low resolution and downloaded at the highest quality only when needed (i.e. only when recalled in the Photos app).
Having made these necessary clarifications, let's see how to transfer photos and videos to iPhone using the iCloud Photo Library. These are the steps you need to follow depending on the device and operating system you use.
- If you use a PC Windows, you need to install the free iCloud client, set it up with the same Apple ID used on the iPhone and make sure that the option to sync photos is active (by clicking on the button options which is next to the wording Photo). Once the client is properly configured, copy the photos you want to transfer to the iCloud library in the folder chosen in the client settings and the upload will take place automatically within a few seconds.
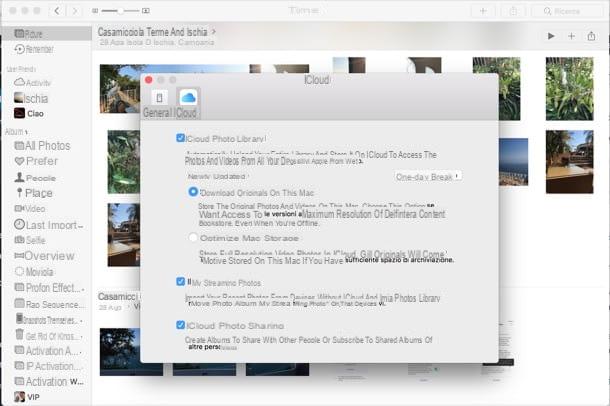
- If you use a Mac, open the application Gallery and drag the photos you want to copy to the iCloud library into it. For the operation to be successful, the Mac must be associated with the same Apple ID as the iPhone (you can check this setting in System Preferences> iCloud) and in the preferences of the Photos app there must be a check mark next to the item relating to ICloud Photo Library.
- If you use a iPad o an altro iPhone, you simply have to take a picture or save it to the system roll. Obviously, the iCloud Photo Library must be active on the device and the same Apple ID used on the iPhone on which you want to copy the images must be used.
If any of the steps are not clear to you, check out my tutorial on how to archive iCloud photos: there I explained to you in much more detail how synchronizing photos and videos to iCloud works. If, on the other hand, you are looking for completely free cloud solutions, try Google Photos which allows you to have an online photo library at no cost and without space limits also synchronized with Android.
Other solutions to upload photos to iPhone
To conclude, I would like to point out other solutions, more or less intuitive and more or less economical, which allow you to copy photos to iPhone.
- AirDrop - is a wireless data transfer system supported by all the latest Apple devices: iPhone, iPad and Mac. You can use it to copy a modest amount of photos from one device to another without having to wait for the loading times of cloud systems and without having to use cables. I told you about it in detail in my tutorial on how AirDrop works.
- Send Anywhere - it is a sort of universal AirDrop, that is a free app for PC, Mac, iPhone, iPad and Android devices that allows you to send files from one device to another wirelessly through the use of codes. To find out more, visit its official website.
- Lightning-USB sticks - iPhone memory cannot be expanded with microSD, however it is possible to buy Lightning-USB sticks that allow you to quickly exchange data (including photos) between your computer and Apple portable devices. Here are a couple that can be found at a good price on Amazon.


