


You took a picture with yours iPhone that you did particularly well, to the point that you would like to personalize it with a quote, to be able to send it to a person or share it on social networks. Being impractical in the field of photo editing, however, you do not know absolutely where to put your hands, and it is for this reason that you would like to try, with my help, to understand how to write on an iPhone photo.
If this is the case, I am delighted to be able to help you succeed in your small "business"! Editing images with personalized writings is much easier than you might think: as you will soon discover, there are applications that, in a few taps, allow you to add text to any type of photo, without having any technical skills on the subject and with completely appreciable results!
How do you say? Now that you are aware of the feasibility of this, can't you wait to get started? Then take some free time for yourself and carefully read everything I have to explain to you on the subject: I'm sure that, at the end of reading this guide, you will be able to choose the solution that suits you best. Happy reading and have fun!
App to write on iPhone photos
Without a shadow of a doubt, the simplest method for write on an iPhone photo is to use one of the many applications explicitly designed for this purpose. Below I suggest the ones that, in my humble opinion, are among the best in the category.
Annotable - Photo annotation
The first app I would like to point out to you is Annotable - Photo annotation: available for free on the App Store (with the possibility of in-app purchases to unlock additional features, such as the use of characters other than those of the system), it allows you to insert texts and elements of various types, including strokes, shapes and highlights, on existing images and on those taken at the moment.
To get it, open theApp Store of your "iPhone by", tap the button Search and type il name of the app in the appropriate field (or tap this link, to speed things up, if you are reading this guide from your iPhone); once you find the exact application, tap the button Get placed in its correspondence and starts the download and installation of the same, authenticating you through Face ID, touch ID o password dell'ID Apple.
Once the app installation is complete, open it and, to start, tap on the item Allow access to all photos, to allow you access to the iPhone camera roll; then, choose the image to edit from those available, or tap on the symbol of camera to take one "on the fly".
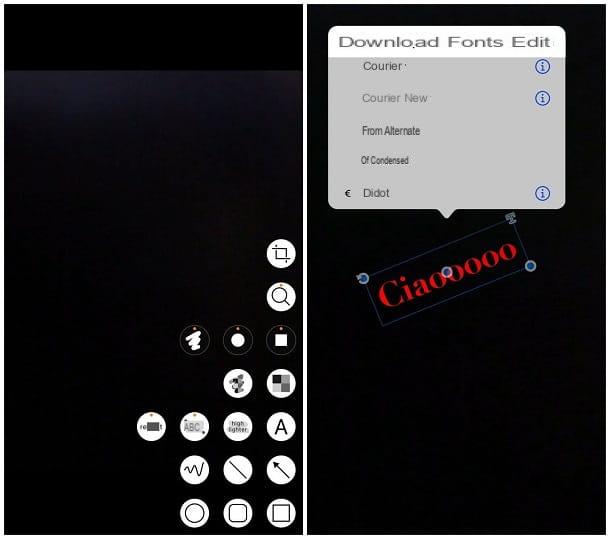
After selecting the photo, you should see Annotable's built-in editor: first, tap the single button at the bottom right (it should have the shape of a rectangle) to bring up the app function bar, tap the button A, tap on the point in the photo where you want to start write phrases on iPhone photos and start typing the content you want.
To change the font, tap the symbol T, displayed at the edge of the text area; to rotate the text, press and hold the icon of circular arrows and move your finger according to the angle you intend to use; to zoom in / out on text, “grab” two corners of the text area and drag them outwards or inwards.
When you are satisfied with your work, tap the symbol of sharing located at the top right and, if you want to save the edited photo by overwriting the original one, tap the buttons Save e Modification; if, on the other hand, you want to archive the photo to a new file, leaving the original one unchanged, tap the button instead Save immagine. If you prefer, you can also share the edited photo with one of the apps on your phone, using the proposed buttons.
Phonto — Text on photos
Another very valid application to write text on iPhone photos is definitely Phonto — Text on photos: also in this case, it is a completely free application that, among other things, allows you to apply custom styles to added texts, to use fonts installed through third-party apps and much, much more. Phonto is an app available exclusively in English, but its interface is extremely intuitive.
In any case, once you have installed the application from the App Store, start it and tap on the symbol of camera resident at the bottom, in order to select the photo on which to intervene: depending on your needs, you can start from an image taken on the fly (option Camera), from a photo in the iOS camera roll (option Photo albums), from an "empty" image (Plain images) or from a project that has already started (Projects). If necessary, authorizes Phonto to access the memory / camera, responding affirmatively to the warning that is shown.
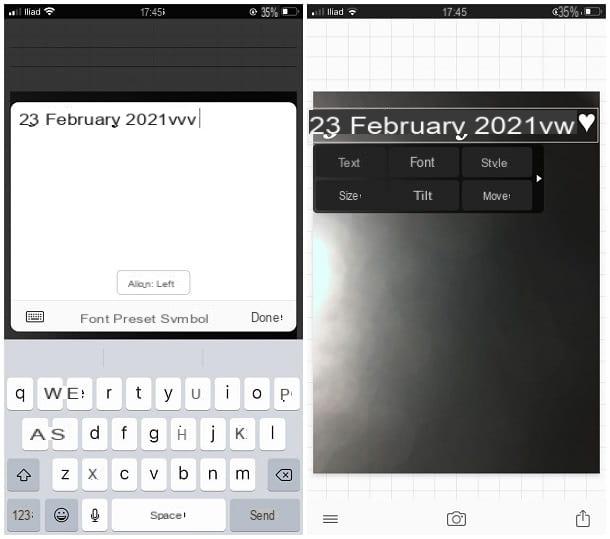
After selecting the photo of your interest, tap on a point of the same to recall it box dedicated to adding text: as a first step, type the phrase you prefer in the appropriate field. There are also presets: if, for example, you want write date on iPhone photos, tap on the wording Preset and choose the format you prefer among those available.
To change the font, tap the item instead Font, while to add custom symbols tap on the item instead Symbol. If you want to define the alignment of the text, tap the button with the wording Align. To move the text to another point, tap it instead and, always keeping your finger pressed on the screen, drag it where you prefer.

The beauty starts now! By tapping on the newly created text, a toolbar should appear, which allows you to apply any type of customization: Text, to change the writing; Font, to change the font; Style, to change the style of the text (fill, outline, shadow, spacing, and so on); Size, to alter its size; Tilt, to rotate the writing; Move, to move it; Curves, to bend it; And 3D, to add a three-dimensional effect (paid feature).
When you are satisfied with your work, tap the symbol of sharing at the bottom right and choose whether to save the image by overwriting the original (Save image), whether to store it in a new PNG file (Save Image as PNG) or whether to save the photo as a project to be resumed in the future (Save Project); alternatively, you can share the image created with the other apps installed on the iPhone, using the available buttons.
More apps for writing on iPhone photos

The ones I told you about a moment ago are two great applications for write on an iPhone photo, but they are certainly not the only ones! Here are some applications that are equally valid, albeit slightly different from the ones I told you about a little while ago.
- A+ Signature - it is an application that allows you to add text to your photos in a very simple way, by customizing their font, color, alignment and size. You can also add freehand lettering and predefined elements (e.g. the current date). It is free with the possibility of in-app purchases to unlock additional functions.
- Candy Font - another excellent application that allows you to customize your images by adding various graphic elements, including, of course, customized texts in shape and colors. It's free, with in-app purchases to unlock additional features.
- Photor - it is a real photo editor which, among its many features, includes the possibility of inserting customized texts and writings to the images. The app is free, but some effects can only be used after a specific in-app purchase.
How to write on an Instagram photo from iPhone
As you certainly know, through Instagram it is possible to publish at least two types of photographic content: i post, i.e. photos (or entire albums) that are added to your profile and remain visible in the latter; and the stories, that is, images that can be seen from a specific section of the app and that only last 24 hours.
As things currently stand, Instagram allows you to write directly only on photos intended for stories: if you don't know how to do it, start creating a story by tapping the button [+] located at the top of the Instagram home and, having reached the next screen, use the bar located at the bottom to select the item Story.
Now, if you want your story to contain a photo taken on the spot, select the cornice that you prefer among those low proposals (if you deem it appropriate) and tap on the symbol of white circle, to take the photo; if you prefer, instead, to use an image already present in the iOS camera roll, tap onpreview of the last photo taken resident at the bottom left and choose the image you prefer among those proposed.
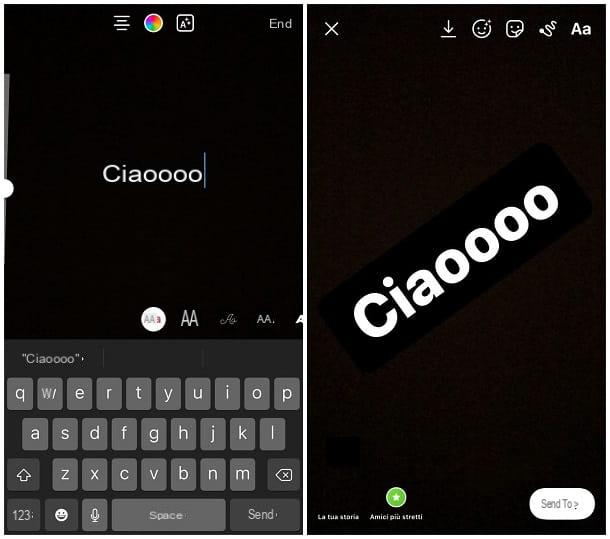
Having made your choice, tap the button Aa visible in the upper right corner of the next screen, so you can start writing on the photo right away. Using the buttons at the top you can choose thealignment, colore he effects some text; the adjustment bar on the left, on the other hand, allows you to define the size of the text, while the one at the bottom allows you to choose the font.
When you're done, tap the button end and, to move / resize the text just created, drag it to the position you prefer, rotate it or "pinch" it with your fingers. If you want to insert pre-set text in the image (the current date / time, position, a countdown, and so on), tap the button depicting a smiling square sheet, resident at the top.
Once you are satisfied with your work, tap the button The tua storia, to share the edited photo. More info here.
If, on the other hand, you need to write on photos intended for post of Instagram, you must necessarily modify them in advance through a third-party app, such as the ones I told you about in the previous chapters of this guide, or use the function Stories that I showed you a little while ago: after adding the text, instead of proceeding with the publication of the story, by touching the symbol of freccia rivolta verse il basso, you can download the image to the phone memory.
Once you have customized your photo (or your photos) with the method you prefer, open Instagram, tap the button [+] at the top right, choose the option Post from the bar located at the bottom and choose the photo to publish from the iOS roll; when you're done, tap the button NEXT, apply i filters and changes you prefer and, when you're done, write yours caption e tocca il pulsating Share, to publish it.
To find out more, I refer you to reading my guide on how to write on Instagram photos, in which I have treated the subject in great detail.
How to write on an iPhone photo


