


It has happened to everyone, at least once in their life, to delete a photograph by mistake, immediately realizing the mistake made or perhaps looking for it in the following days and not finding it anymore. Has this ever happened to you? I bet yes, and I'm sure a method would have been useful for you to recover deleted data without much effort. I'm right? If so, know that you are in the right place! With this guide, in fact, I will illustrate you How will I recover the photo? from all your devices using some simple but effective tools.
Once you put my tips into practice, you will be able to remedy the accidental deletion of your photographs in just a few steps. At least if you act in time. In fact, you must know that when you delete a file from your device, it is not completely lost but is marked as deleted by the operating system. This way, the part of memory that contained that image is made available for other files. As long as the operating system does not use that part of memory, however, it is possible to recover the photograph marked as deleted from it. It is therefore important to act before overwriting and avoid as much as possible to use the device on which the data to be recovered is present (precisely to avoid data overwriting).
Everything's clear? Well, then if you are ready to find out how to recover lost images from your mobile or PC, make yourself comfortable and take five minutes to try the solutions I am about to propose to you. You should thus succeed in your "business" without too many problems. Happy reading and good luck for everything!
How to recover lost photos on Android
Your smartphone Android it will surely be full of photos and, with so much data stored, you may have accidentally deleted a photograph. It happened to you? In this case, you don't have to worry - it will take you very little time to recover lost photos from mobile!
How to recover lost photos from Gallery
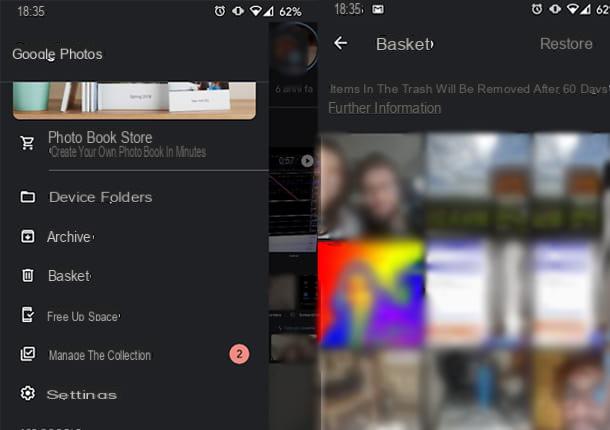
If you are using an Android smartphone, it is highly likely that you are using Google Photos to manage your gallery.
You can check this by opening the app you use to view your photos, in which you will see the word "Google Photos" appear at startup or in the search bar at the top. The icon, then, should be that of a colored pinwheel.
If so, I'll give you great news: Google has thought of introducing a very useful function that can move deleted photos into a temporary folder, the "Trash", keeping them for sixty days. This obviously only applies if you have deleted the image from Google Photos or if, in any case, you have activated the option to backup photos to the cloud via Google Photos (in the latter case, however, you should find the lost photos directly on the main screen application and not in the Recycle Bin).
After opening Google Photos, therefore, press the ☰ button located at the top left. Among the various items present in the opened menu, you will notice that Trash can: click on it and you will see all the images deleted in the previous sixty days. Just open one, by pressing on it, to view the option at the bottom Restore, which will return the image to where it was before accidental deletion.
By holding down on a photograph for a few seconds, you can also activate the selection of multiple images: in this way, you can restore multiple files in a single step by selecting the option Restore, bottom right.
App to recover lost photos
If you don't use Google Photos or if you deleted an image more than sixty days ago, don't despair - they exist other methods to recover photographs deleted from your mobile that you can use to find your images. One of these methods is to use apps dedicated to recovering deleted data that allow you to act on the portions of memory not yet overwritten, as I explained to you in the opening bars of the tutorial.
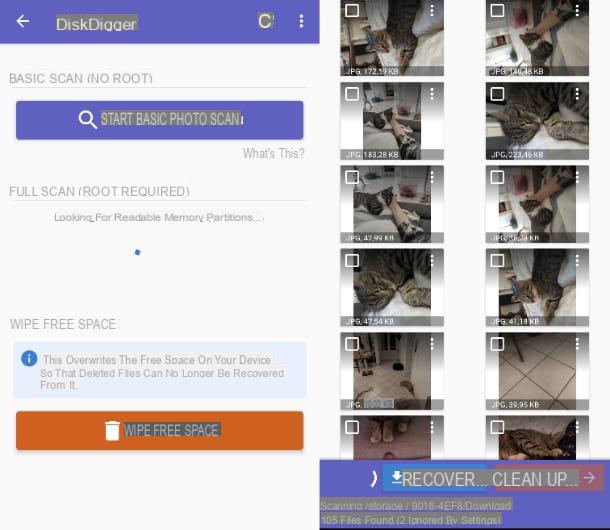
DiskDigger, freely downloadable from the Android Play Store, is an app of this type, which allows you to recover files for free JPG e PNG from smartphone and tablet memories and SD cards. There is also a paid version that allows you to recover other types of files, but at the moment you don't need it.
While it works on all popular versions of Android, DiskDigger benefits enormously from root permissions, which allow you to scan the memory of the device more thoroughly and, therefore, recover more data. If you don't know what I'm talking about, I suggest you read my guide on how to root Android, to find out more about this topic.
Once you have opened the application and granted, if required, root permissions, just press the central button Start Basic Photo Scan, to start the memory scan. If you have granted root permissions to the app, I therefore recommend that you use the section Full Scan (Root Required), for better results. In this case be sure to select, from the options, the location where the deleted images were present.
Keep in mind that the process may take a long time and you may see undeleted photographs or duplicates. The results are shown in real time. Just press on one or more photographs among those found to select them, then you can press the blue button Recover, to begin the recovery process.
You can also press onicon with l'ingranaggio at the top right to set filters that allow you to exclude images that are too small, such as previews or icons. DiskDigger will ask you whether to save the photos on a service such as Google Drive, Dropbox or the mailbox or to save them on device itself. Although it is very convenient to save them on the device, I always recommend that you use other options: this will allow you to avoid memory overwrite errors, especially if the space on your device is hardly or hardly used.
If you have decided to save your images on an external service, you will see the file sharing screen appear: through it, you can decide where and how to save the recovered files. If, on the other hand, for any reason you want to directly save the recovered files on your device, you will be shown the list of folders present.
By pressing the blue button Allow access followed by the location name, you can save the images in the selected folder. You can also decide to create a new folder by pressing the button with the three vertical dots at the top right and selecting the option New folder.
How to recover lost photos on iPhone
One of the strengths of the iPhone smartphones is the excellent photographic quality that allows you to take and keep many photos. If you also own an “iPhone by mistake” and you have accidentally deleted a photograph or an image, don't worry: there are, even in this case, some simple procedures that can help you recover lost photos from your mobile.
How to recover lost photos from Gallery
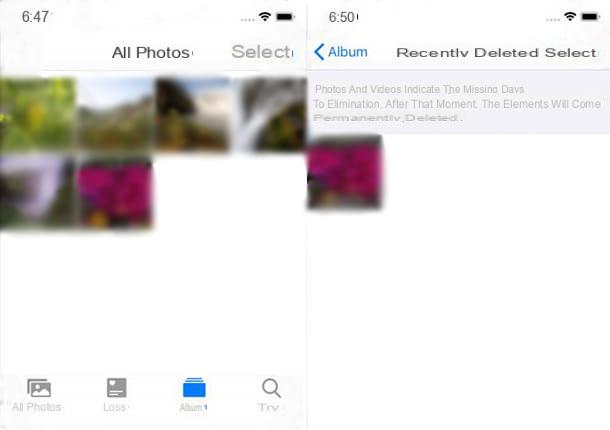
If you own an iPhone with iOS 8 or later, you can use an interesting feature introduced integrated into the app Gallery. In fact, when you delete a photograph or image in it, the iPhone moves the file to an album called Recently deleted, keeping it for forty days before final elimination. Here's what you need to do to access it and to recover the file.
First, open the Photos app as if you were viewing the photo gallery normally, then tap the panel Album at the bottom right and scroll until you find the album Recently deleted. Now tap on the option Select and press on the photos you want to restore. As a last step, tap on the option Recover and confirms the operation, which will restore the shots to their original position, preventing their definitive deletion.
If you have downloaded the Google Photos app on your "iPhone by" and activated its function for backing up photos to the cloud or in any case you use it as the default Gallery app, you can also recover your photos through the latter, as explained in chapter dedicated to recovering images from Google photos for Android: the steps to take are the same.
Programs to recover lost photos
Can't find deleted photos on iPhone or are you looking for an image that is more than forty days old? You may think you have no chance of recovery, but you don't. There are, in fact, gods PC programs that allow you to recover data from the iPhone memory or from backups on your PC or cloud.
Unfortunately for iOS there are no apps that allow you to act directly on the device, as happens on Android (this is due to the restrictions of the iOS operating system), but by connecting the phone to the computer - always keeping in mind the speech of the portions of memories not yet overwritten - it is possible to bypass the problem.
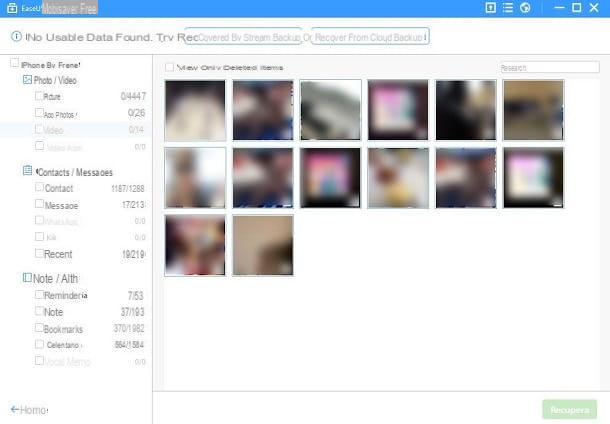
For example, EaseUS MobiSaver is a program for Windows and macOS that allows you to recover deleted data from iPhone by acting on the device or its backups: you can learn more by reading the guide I have prepared for you on how to recover deleted files on iPhone.
In the same article you will also find instructions on how to use other data recovery software, such as Dr.fone e PhoneRescue. Trust them and you should be able to recover at least a little.
How to recover lost photos on PC
If you need recover lost photos on PC, you will be pleased to know that there are many solutions that can help you achieve your goal. Just like on the mobile phone, in fact, even on the PC there are programs created specifically to search for deleted files and allow them to be restored (always as long as you act in time, but by now you know). Let me give you a few: I'm sure they will be useful to you.
Disk Drill (Windows / macOS)

Among the most reliable programs that allow you to recover lost photos there definitely is Disk Drill: a solution compatible with Windows and macOS that allows you to recover all major graphic file formats (JPG, PNG, BMP, GIF and also i RAW files cameras) from devices of all kinds: hard drive ed SSD (both internal and external), smartphone e tablet Android, iPhone and iPad SD cards, cameras, camcorders USB sticks etc. It also supports unformatted drives and is compatible with all popular file systems. In addition to photos, it can be used to recover and reconstruct many other types of files: documents, videos, music, archives and much more.
It also has the function Recovery Vault, which keeps the most important data in a reserved area of the disk and protects it from any unwanted erasure, and the monitoring of the disks through technology S.M.A.R.T., which alerts you to any problems on your drives and thus prevents data loss.
Disk Drill is free to download and use to recover up to 500MB of data, then you need to purchase the full version (with prices starting from around 94 euros).
To download Disk Drill for free, connected to the download page of the program for Windows or macOS and click on the button Scarica free. After that, if you use Windows, april il .exe file you have obtained and complete the setup by clicking on the buttons Install it., Yes e spear.
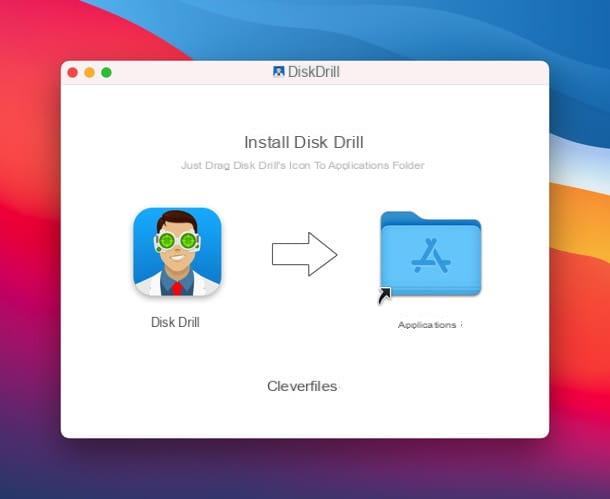
I invented a Mac, april il .dmg file you downloaded and drag theDisk Drill icon in the folder Applications say macOS.
Now start Disk Drill (the steps to take are the same on both Windows and macOS), accepts the conditions of use of the program, read the initial presentation, choose whether to activate the Recovery Vault data protection feature e / o if share anonymous usage data with the developers and press the button let's begin.
If you are using a Mac, at this point you will have to type the administration password computer and you will need to authorize Disk Drill in System preference, by clicking on the icon padlock present at the bottom left, by typing again Mac password and ticking off two o'clock boxes related to the program.
When you are ready to proceed, select theunit and possibly the partition from which you intend to recover the photos, use the drop-down menu on the right to select the recovery method to use (I recommend All methods of recovery which is the most complete, but you can choose too Fast analysis, In-depth analysis, Search for lost partitions, Allocate existing file system data e Protected data not deleted) and click on your button Search for lost data to start scanning.
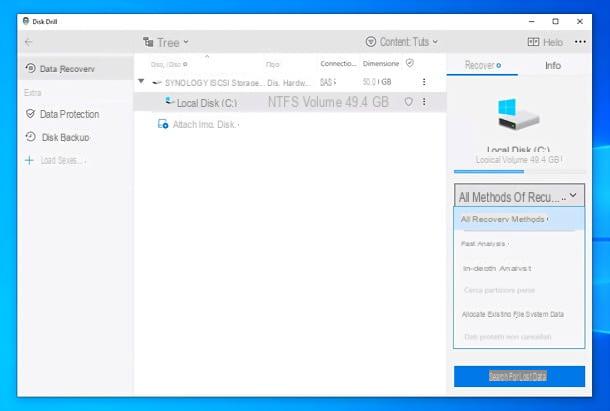
A window will open with the icons and the count in the center Images, Video, Audio, Documents, Archives e other files that Disk Drill finds during the scan. To view the list of photos that the program has identified, click on the icon Images and, to facilitate the search for the files of your interest, use the menu Vista placed at the top to set as the visual style the one with Icon and files: in this way you can directly see the thumbnails of the photos (otherwise visible by clicking on theicona dell'occhio next to each file name in the default folder navigation). Also, from the menu filters (always located at the top right) you can filter the search results based on dimensions, date of cancellation and other parameters.
Once you have identified the photos to be recovered, check the relative ones boxesclick on your button Recover located at the bottom right and choose the destination path to start saving.
I point out that you can stop and resume Disk Drill scanning at any time, using the appropriate buttons at the top left or by selecting the most recent session from the program sidebar. Instead, if you are interested in the function of data protection to prevent accidental deletion of photos and other files, click on the homonymous entry in the Disk Drill sidebar, confirm that you want to activate the feature in question, move to ON the lever in the window that opens and use the button Add to select the paths to protect. Find more details on Disk Drill and how it works on the program's official website.
Recuva (Windows)
Recuva is an excellent software developed by Piriform that allows you to recover many of the files deleted by mistake from the computer disk but also from external drives, such as USB sticks, SD cards and more. Thanks to its search function and the ability to choose between a fast and an advanced scan, Recuva can help you recover deleted images in minutes.
Recuva is available in a free version, more than enough for your purposes, but there is also a paid version (from about 20 euros / year) that allows you to recover files even from virtual disks and is able to update automatically.
That said, to download the free version of Recuva, visit the official website of the program and click on the button first Download free version e poi quello Download. Then open the .exe file obtained, select the British language from the menu located at the top right and then press the button Install. Once the installation is finished, press the button for start Recuva.
In the window that is proposed to you, you can click on the button NEXT and choose the file types you want to recover: in your case Images. Then press again on NEXT and choose the location where the data to be recovered was. If you are unsure, you can select the option I'm not sure.
Premium for your pulse NEXT twice and make yourself comfortable: Recuva will try to recover your images. You can also select the option Enable deep scan, if the first scan does not return the desired results.
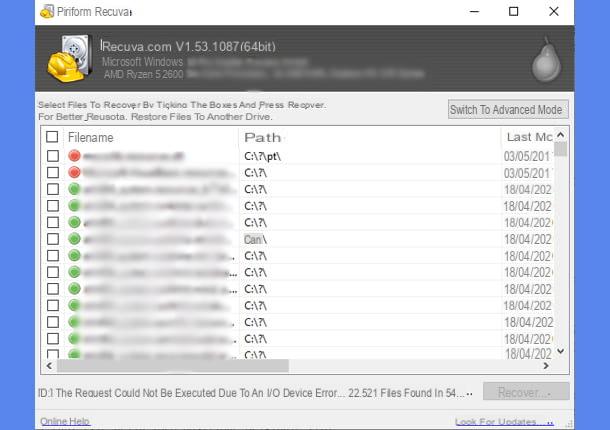
Once the scan is finished, Recuva will show you the found files. You can select them and press the button Recover, then choosing the location in which to save them. Remember that files marked with a red dot they are very damaged files, which you will hardly be able to recover. Therefore, prefer those with dots greens o Detective stories.
PhotoRec (Windows / macOS / Linux)
If the solution mentioned above didn't convince you or wasn't able to recover your files, you can use PhotoRec to try to find the deleted images. This free and open source software is compatible with Windows, macOS and Linux. Only on Windows, though, it has a graphical interface, so I'll focus on this version.
Thanks to PhotoRec, you will be able to perform an advanced scan of your computer's disk or external drives to recover files of all kinds, including photos and images. The software comes coupled with TestDisk, a data recovery software designed for the recovery of lost partitions, which you don't need right now.
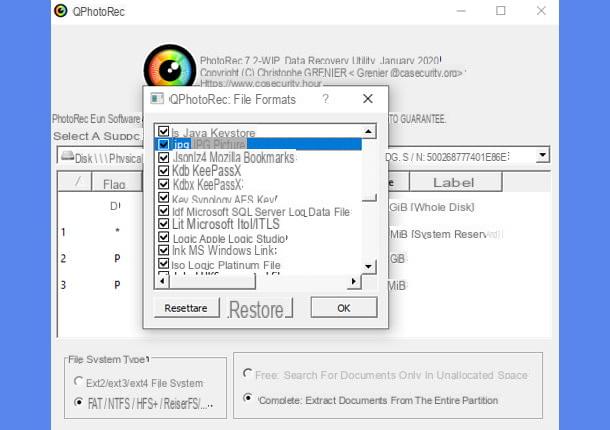
To download PhotoRec, visit the official website of the program and press the green button TestDisk Free Download. Then open thezip archive just downloaded and extract the files to a folder of your choice. Then double click on the file qphotorec_win.exe, to start the software user interface.
If you have multiple discs on your PC, they will appear in the top central menu: So make sure you select the correct one before proceeding further. Then press the button You may also like..., at the bottom right, to choose the folder in which to save the recovered files. Afterward, also click the button File formats, at the bottom center, to choose the types of files to recover: in the case of images, you have to choose the formats jpg, png, bmp e gif. Finally, start the scan by clicking on the button Search.
As I explained to you at the beginning of the chapter, PhotoRec does a very thorough scan, so be patient until the end of the process. Once completed, you can close the program and search the recovered images in the selected folder via the button You may also like....
Other solutions to recover lost photos on PC
Even if the programs that I have proposed to you in this guide are very valid and will surely help you in the search of your images, there are many other software that could be useful to you.
If, therefore, you want to discover other programs to recover lost images and photos on your PC, I suggest you read my guide to programs for recovering deleted photos, where you will find several to use on both Windows and macOS.
How to recover lost photos on WhatsApp
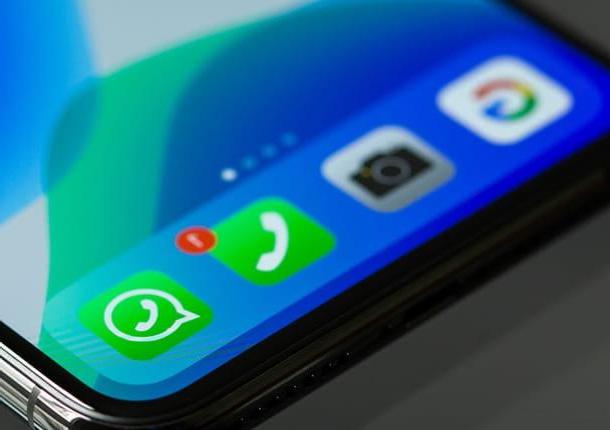
If you have accidentally deleted any photographs or images received on WhatsApp, don't worry: what I have explained to you in this guide can also be used for recovering multimedia files received or sent from the most popular messaging app in the world.
Yes, you got it right! You can follow the same procedures listed above and get your files back in the blink of an eye. Specifically, if you use an Android phone, follow the chapter on how to recover lost photos on Android, while if you use iPhone, the chapter on how to recover lost photos on iPhone will be useful. I am sure that by putting the solutions listed in this guide into practice, you will be able to recover the images you need. Good luck!
Article created in collaboration with Cleverfiles.
How will I recover the photo perse


