Ambush in the Arena is the second Fire Emblem Battle: Three Houses "DLC Cindered Shadows, and that's quite the event. This is the first time you will control the Ashen Wolves, the new unofficial home that was hiding under the church. It also marks the appearance of a formidable enemy.
Ambush in the arena
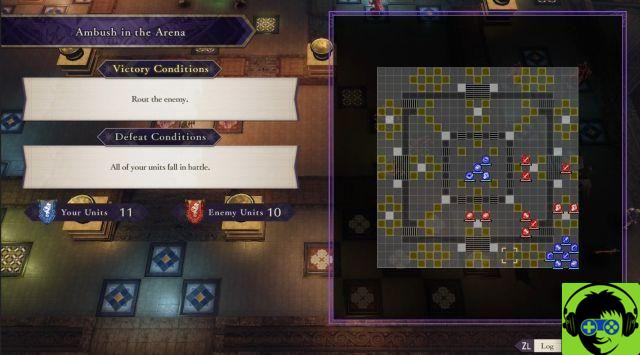

Ambush in the arena takes place in a layered room with several tiles scattered around it. The outer area is raised, with steps descending to a lowered area before other steps ascend to the center of the room. For this battle, it is best to take the lead of the Ashen Wolves, which will start in the center of the room. Your own students and Byleth will start in the lower left corner. There will be a scatter of enemies between you and three wave movements on the way.
- Wave 1 will appear in the upper right corner
- Wave 2 will appear in the center of the left side
- Wave 3 will appear in the lower left corner
- A Death Knight will accompany Wave 3 and appear in the lower right corner
As you can see if you stay in the lower right corner with Byleth, Claudius, Edelgard and the others, you will eventually come face to face with a Death Knight, and the Ashen Wolves will be overrun in the center.
At the start of the battle, you want to crush the first wave between the two groups, wiping them out quickly. Use Claude, Dimitri and Edelgard as the front line and go up the right side, then go down the wider stairs to the center. You can use the Ashen Wolves to hold the center or press lightly to engage enemies around them. It can be tempting to use Balthus as a front line, but he's actually pretty easy to pull off, so use him to get in and finish off lone targets instead.
Slide by eliminating the first wave a bit, to give yourself time to set up all your units on the central platform. This is a vital location, as the stairs will act as a funnel for enemies, making it easier to hold, and right in the center is a healing tile. Rotate the injured characters on this tile to help you heal them. Lindhard and Ashe should stay close to the center, to support those in need, while Edelgard, Claude and Dimitri should always be the front line facing the direction the wave will come from.
Again, you can set things up quite easily by simply sliding each wave a bit when you have them down for one or two enemies, allowing you to take the time to position yourself well for the next wave. If you wish, you can hold off Claude and Dimitri for lightning-fast attacks on weakening positions, but both can be very effective flanks on the front line as well, with Edelgard taking center stage with his massive shield. .
The secret to this battle is to slow down when you need to take the time to heal or reposition yourself. If you focus too much on quickly eliminating an entire wave, you risk exposing yourself to the next wave. Remember that Byleth and the Creator's Sword can do exceptionally high damage, so keep them close to Edelgard, so they can hack where enemies are thickest.
Despite the healing tile and healing spells, it may be a good idea to keep units in pairs, as if one was in trouble, the other could end the fight while using a Concoction. It is a war of attrition, and healing opportunities are vital to getting through higher difficulties without causing casualties.
Finally, don't hire the death knight. He won't take any steps towards you and you can leave him alone. Once you take out all the other enemies, he will leave and the battle will be over.


