Before purchasing, it is recommended to download the FREE demo version that allows you to check which and how many files are still recoverable from your Android device.
Download Buy
Support Windows 10/8/7 / Vista / XP
 If you have a Mac OS X go to Android Data Recovery for Mac
Features Dr.Fone for Android
 Recover deleted SMS, Contacts, Photos, Videos, Whatsapp Messages, Audio and Documents from your Android phone or tablet (read how to recover deleted data on Android)
Ease of use, 3 steps are enough to recover data: device connection, scan and file recovery
Recover / Extract data even from damaged or damaged Android devices broken screen
Carry out Backup & Restore of your Android device data
Powerful function to get permissions of ROOT on the device
Removes the Android screen lock (if you forget your password or lock code)
It supports photo and video recovery even after rooting or factory reset of the device
Compatible with a large number of Android devices, from different brands: Samsung, HTC, LG, Sony, Motorola, ZET, Huawei, etc.
Android Eraser: permanently erases all data in the device memory
Android Transfer: Allows you to transfer data between Android and / or iOS devices in one click
Android Repair: allows you to repair the phone in case of various blockages or malfunctions.
Dr.Fone Android Guide (Windows)
- How to Recover Contacts, SMS / Whatsapp Messages, Photos, Videos, Documents and Audio from Android device
- List of Devices Compatible with dr.fone for Android
Guide: How to Recover Deleted Files on Android
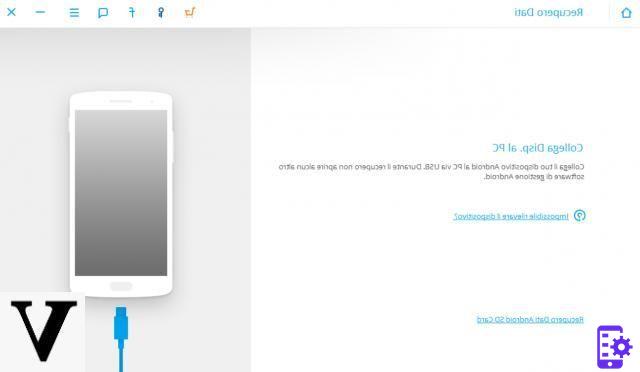
Step 1. Launch dr.fone for Android and connect your mobile / tablet to PC via USB cable
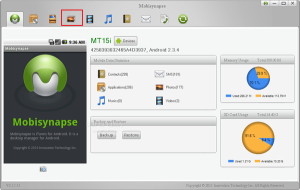
Initial program screen:
From the home screen you can choose the function you need. In case of data recovery click on the area DATA RECOVERY and this new window will open:
Step 2: Enable USB Debugging Mode (Optional)
If the "USB Debugging”(Essential for the software to communicate with the mobile phone / tablet), the program will show a screen like the one below, asking you to activate this mode.
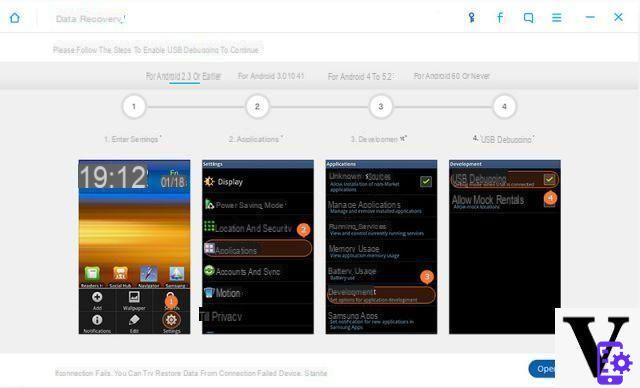
Depending on the Android OS version of your device, there are several ways to activate USB Debug mode, here are what they are:
1) For Android 2.3 or earlier: Go to "Settings" <Click "Applications" <Click "Development" <Select "USB debugging"
2) For Android 3.0 up to 4.1: Go to "Settings" <Click "Developer Options" <Select "USB debugging"
3) For Android 4.2 or later versions: Go to “Settings” <Click “Phone Info” <Click “Version Number” (or Serial Number) repeatedly until “You are in Developer Mode” appears <Return to Settings ”<Click“ Developer Options ”<Select“ USB debugging '
Step 3: Analysis and data scan of your Android device
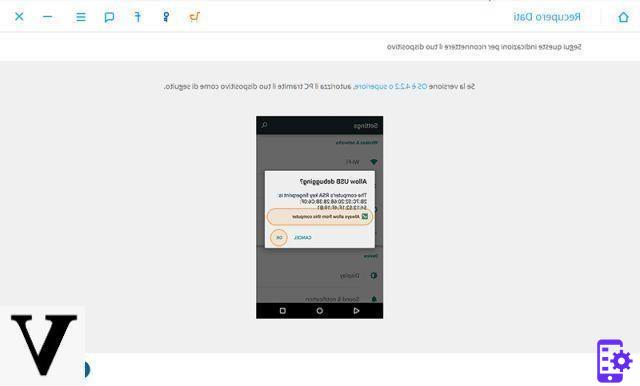
After putting your Android device into USB Debugging mode, plug it back into the computer and it should be recognized by dr.fone at that point. In the screen that appears click on "starts”To start analyzing the device
A warning may also appear on your device that you need to click OK to confirm USB debugging and allow the program to communicate with the device.
Once the operation is confirmed from the screen of your device you will be asked to select the data you want to recover:

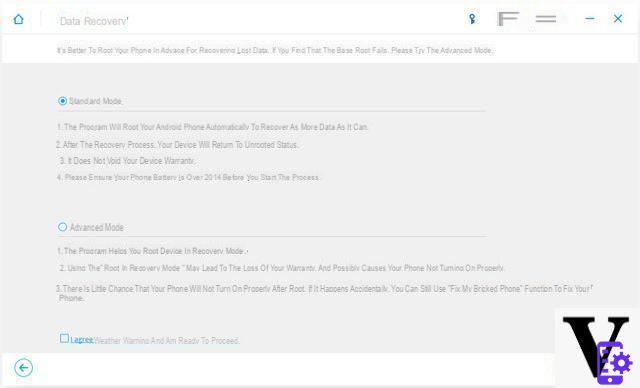
After selecting the data, click on NEXT and you will be asked what type of scan to perform: Standard o advanced. The latter is slower but recovers all the data present in memory. Our advice is to try the Standard mode first and use the other only if you are unable to recover the files you want.
By clicking on "NEXT”The program will start scanning for recoverable photos, videos, sms, Whatsapp messages, contacts and audio files!
During this scan, do not disconnect the device from the PC. In the meantime, you will see all the files that are gradually recovered by dr.fone:
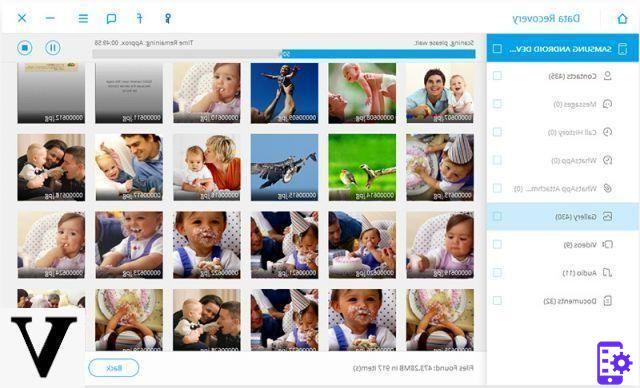
Step 3: Preview and Data Recovery
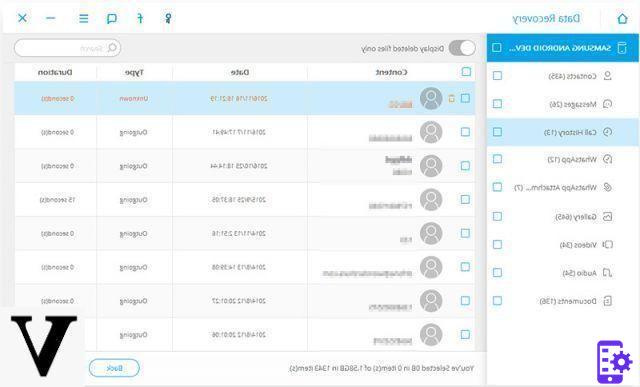
At the end of the scan (it may take a long time ... be patient!) You will finally be able to preview all the recoverable files. Deleted but still recoverable files will be highlighted in "orange".
Access the desired category (contacts, SMS messages, Whatsapp chats, photo gallery, video, audio, documents) and select the files you want to recover. Finally click at the bottom right on RECOVER to save them on your computer. The contacts, for example, can be saved in CSV, vCard or HTML files; SMS messages and Whatsapp chats instead in a CSV or HTML format file.

If you have a Mac OS X go to Android Data Recovery for Mac