


You have just received a call from a friend of yours who, desperately, informed you of the definitive loss of all the photos stored in the memory of one of his devices: terrified by the idea that this could happen to you too, after finishing the call, you immediately went to Google looking for a guide that could teach you how to create backup copies of the images you care about most, so you ended up right on my site.
How do you say? Have I definitely hit the point? Perfect, then let me tell you that you are really lucky! In this guide, in fact, I have every intention of explaining to you how to backup photos contained in the memory of all the most popular devices: Android and iOS smartphones and tablets, Windows and Mac computers. In addition, it will be my care to explain to you how to use the WhatsApp, Facebook and Instagram apps to save the photos you uploaded to your social profiles, if you were thinking of getting rid of it.
So, without hesitating a moment longer, take a few minutes of free time for yourself, make yourself comfortable and read very carefully everything I have to say on this topic: I am sure that, after this reading, you will be perfectly able to put securely your favorite photos, avoiding the risk of losing them forever. Having said that, I just have to wish you good reading and wish you a big good luck for everything!
How to backup photos on smartphones
Do you need to secure the images saved in the memory of your smartphone? Then this is the chapter of the guide that is right for you: in the following sections, I will explain how to perform this operation on smartphones and tablets equipped with Android e iOS and, later, how to create a copy of the photos of WhatsApp, Facebook and Instagram through simple wizards.
How to backup photos on Android
Without a shadow of a doubt, the simplest way of backup photos on android provides for the use of the app Google Photos, pre-installed on most modern devices (and available, for free, on the Play Store). Thanks to the strong integration with Google Drive (the “Big G” cloud service), it allows you to automatically save photos (and videos) of Android devices in the cloud.
This service is free, if you take into consideration that you only use the free 15GB available on your Google account. If there isn't enough space, then you need to purchase a Google One subscription plan. Please note that all compressed media files that were uploaded before June 1, 2021 do not take up your account space.
Using Google Photos is very simple: first, start the app by recalling it from the drawer of the device and, if this is the first time you use it, follow the very short initial tutorial to configure theGoogle account to use (you can safely choose the same profile already configured on Android).
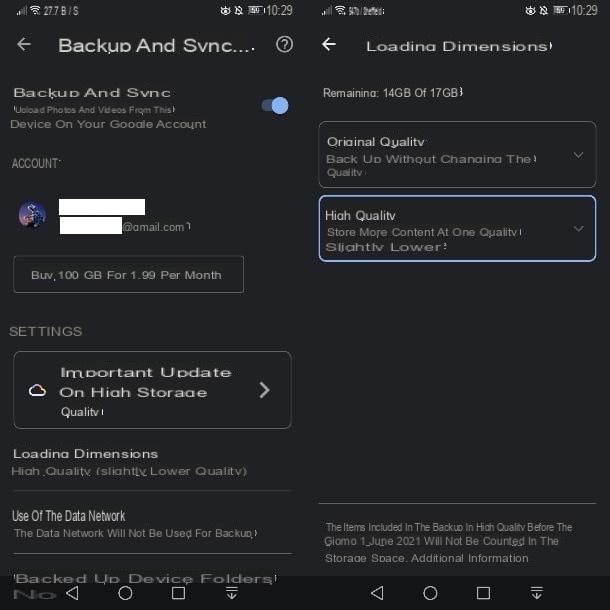
Next, tap on the thumbnail icon located at the top left, tap on the items Photo settings > Backup and synchronization and move up ON the lever of the same name that you find at the beginning of the next screen. Then, tap on the item Dimensioni cartoon and choose the setting that best suits your case.
The available modes are: High quality, to upload photos in high quality (up to 16MP for photos and 1080p for videos); or original, to upload the photos with the original size and quality (the space available for saving, in this case, coincides with that of Google Drive); the option may also be present Express, for uploading photos up to 3MP and videos at 480p.
In this way, all the photos and videos captured via the smartphone or tablet will be synchronized to the cloud immediately after the capture. If needed, you can use the same screen to set more details about it.
- Device folders backed up - using this item, you can indicate other Android folders for which to automatically backup images, such as the folders of WhatsApp (WhatsApp Images, WhatsApp Video e WhatsApp Animated Gifs) or the folder of Instagram, simply by moving up ON the levers corresponding to them.
- Use of the data network - you can decide, using these settings, whether to backup the images also on the data network (and not only in Wi-Fi) and whether to perform this operation even in roaming. Be careful with this choice, as, in some cases, you could quickly end the Internet traffic of your SIM and / or run into additional costs!
Later, you can access the backup of your photos using the Google Photos app for Android or iOS or the Google Photos web interface, available on this page. In any case, you must take care to log in with the same Google account that you used on the Android device in question.
For more information about the use of Google Photos, I invite you to consult the specific tutorial I have dedicated to the topic.
How to backup photos on iPhone
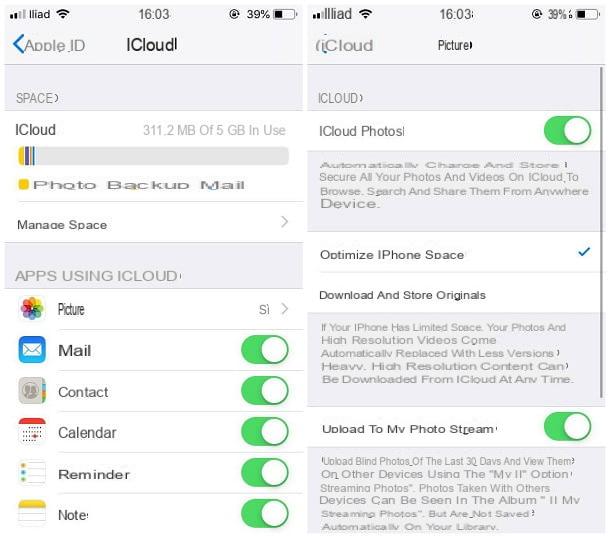
If it is your interest back up photos to iPhone, I recommend that you make use of iCloud, Apple's cloud solution built into iOS devices - basically, iCloud delivers 5 GB space for storing photos and other personal data, as well as the free service Photo stream which keeps online only the photos taken in the last 30 days.
To have a permanent backup of photos (and videos), you need to use the service ICloud Photo Library which erodes the storage space available on iCloud, free for only 5GB. To increase the available space, you need to subscribe to one of the iCloud paid plans, with prices starting from € 0,99 / month for 50 GB.
Usually, the automatic backup of photos to iCloud via Photo Stream is activated during the initial configuration of the iPhone but, if you have not already done so, you can proceed as follows: go to Settings of iOS by touching thegear attached to the Home screen, tap the you don't know, then on the rumors iCloud e Gallery and make sure the lever Upload to my photo stream is set to ON. If, on the other hand, you want to activate the iCloud Photo Library service and have a permanent backup of photos and videos, activate the toggle ICloud Photos.
Note that when iCloud storage runs out, syncing photos to iCloud Photo Library will automatically stop. If you need to know the space available on your account and the details of the occupied one, go to Settings> [your name]> iCloud and tap on the item Manage space.
To purchase additional space, then tap on the item Change plan, choose the subscription that best suits your needs, touch the voice Buy Now located at the top right and follow the simple procedure that is proposed to you to complete the transaction.
Cloud-synced photos are available in the app Gallery installed on all iOS devices, iCloud programs for Windows and MacOS photo and that in the section Gallery iCloud Web, as long as you log in with the same Apple ID configured on the iPhone you backed up for.
If iCloud does not meet your needs, you can also contact the Google Photos app for iOS, according to the same conditions already seen for Android: you can get unlimited and free storage space by choosing to automatically backup images in high quality.
As it is easy to imagine, even in this case, it is essential to have a Google account available to access the service: if you do not have one, you can quickly create one by following the steps I have shown you in this guide.
After installing and launching the app, granted access to the memory and sending notifications, select the Google account to be used for backup, activate the lever relative to Automatic backup from the screen that is proposed to you and that's it: the entire iOS photo gallery will be loaded on the space offered by Google.
How to backup WhatsApp photos

You are a frequent user of WhatsApp and want to keep all the photos you send and receive via this popular messaging app? Then this is the section of the tutorial that suits you best.
Without a doubt, the quickest way to proceed is to turn on the automatic backup of the app on Google Drive (for Android) or iCloud (for iOS). Doing it is really simple: first, start the WhatsApp app, tap the button (⋮) and then on the voice Settings attached to the proposed menu, if you are on Android, or on the card Settings, located at the bottom right, if you are using iOS.
At this point, touch the items Chat e Backup of chats and, to backup immediately, tap the button Back up / Back up now (at the first backup on Google Drive, you will have to authorize the app to access your cloud space). If you want to save the video (which may increase the time and size of the backup), be sure to mark the appropriate entry.
To make sure you back up your app data (including photos) at regular intervals, tap the item Backup su Google Drive/Backup automatico and select the time interval that suits you best, choosing between daily, weekly e monthly.
If, on the other hand, you want to focus exclusively on WhatsApp photos and save them independently from the app, you can use the automatic Google Photos / iCloud backups to include them in the automatic backups of Android and iOS.
- Android - go to the Google Photos settings, make sure the automatic backup is active, then select the item for device folders to backup and set to ON the levers at WhatsApp Images (WhatsApp images) and, if you wish, WhatsApp videos (video) e WhatsApp Animated GIFs (animated images).
- iOS - after activating the automatic backup on iCloud, manually save the photos to the iOS camera roll: open the message containing the image of your interest, touch the button of the square with up arrow (located at the bottom left) and tap the item Download from the menu that is proposed to you. I have provided you with further clarification on this procedure in my guide on how to save WhatsApp photos in the Gallery.
How to backup Facebook photos
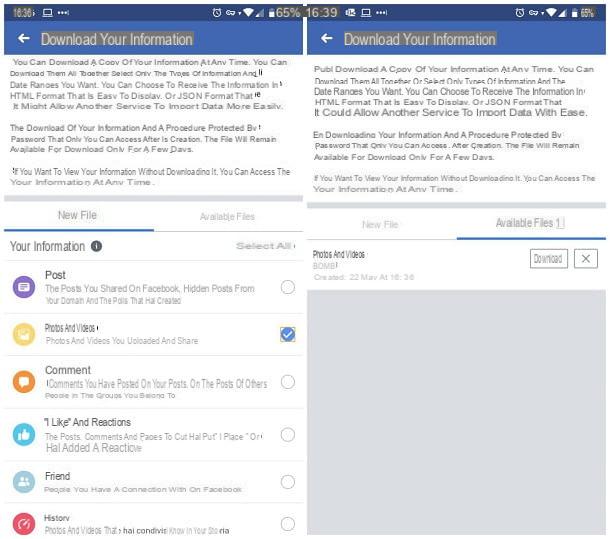
The app of Facebook for Android and iOS it integrates a practical feature to create and download, in a few taps, an archive containing all the personal photos uploaded to the social network. Doing so is not difficult at all: start the Facebook app, tap the button ☰ located at the top left on Android or bottom right on iOS, then tap the items Settings and privacy e Settings.
On the next screen, locate the section Your information on Facebook, tap on the item Download your information, play the voice Uncheck all and check the option next to the option Photo and video, then go to the bottom of the page and tap the button Create the file. The creation operation may take a few hours or days, depending on the amount of images on the social network: therefore, I recommend that you close the app and wait for the process to finish, which will be notified to you by email.
When this happens, go back to the screen seen previously, tap on the section Available files and then on the button Download corresponding to the archive created previously: to conclude, enter yours Password Facebook in the browser window that opens and waits for the file to be downloaded. By default, the archive is saved in the folder Download device.
At this point, all you have to do is auto-send you the file in question with the method you deem most appropriate (e.g. via email) to download it later in a safe place, or transfer it to your computer via USB cable or sharing app: if you don't know how to do it, I invite you to read my guides on how to transfer files from Android to PC and how to transfer data from iPhone to PC (the latter is also valid for iPad).
How to backup Instagram photos
You need to make a backup of the photos you have uploaded to Instagram? Also in this case, you can use the practical backup functionality included in the official app of the service, which can automatically create a .zip archive containing the personal photos uploaded to the social network.
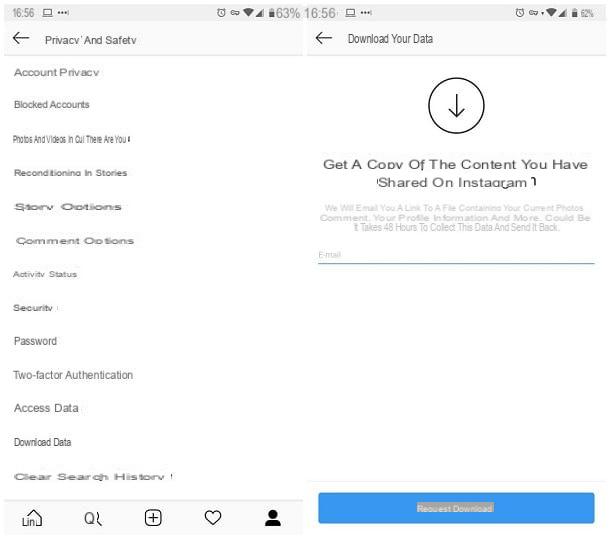
To use it, after starting the Instagram app, tap on thelittle man or yours profile picture located at the bottom right to access your profile, tap the button ☰ located at the top right, then tap the button Settings attached to the sidebar that is shown on the screen.
Then, touch the item Privacy and security, locate the box Safety e fai tap sull'opzione Download the data located in its correspondence. Finally, he indicates thee-mail where to receive the archive containing the photos (together with comments and profile information), touch the button Request the download and enter the passwords on Instagram to confirm your identity: the creation of the archive could take up to 48 hours. When the operation is completed, you will receive, at the specified email address, a link to download the archive containing the images you requested.
Note: If you have Android, you can also add the folder Instagram to the Google Photos automatic backup options, as I explained to you in the specific section on the subject.
How to backup photos to computer
Make a backup copy of the photos on your computer it's not difficult at all: you just need to know the right tools! In the sections to come, I'll explain both how to save photos from smartphones and tablets Android and iOS, which how to backup images residing in the PC memory, through well-known cloud storage services such as Google Drive e iCloud.
How to backup photos on Windows
The easiest way to backup smartphone and tablet photos to PC is to take advantage of theFile Explorer Windows: in this way, you can copy the photos present in the device memory and save a copy where you see fit, exactly as you would in any other case.
To be able to act in this way, however, you must check two fundamental conditions: if you have Android, you need to verify that the USB debugging of the phone either Off, by going to Settings> Developer options and moving on OFF the corresponding lever. If you don't find this menu, then it has never been enabled, so USB debugging is off by default.
For iOS, however, it is essential that the iTunes management software has been previously installed in the system, so as to provide Windows with the necessary drivers to recognize iPhone and iPad: if you have not already done so, you can proceed by following the instructions I have provided in this tutorial.
Once you have checked these conditions, do the following: take the USB cable and use it to connect your device to computer. If you find yourself on Android, then recalls thenotify area swiping your finger from the top of the screen towards the center, tap the notification USB options and put the check mark on File transfers. In any case, the recognition of the device may take a few seconds longer.
At this point, that's it: open theFile Explorer Windows (the gialla poster located in the system tray), click on theandroid device icon o dell’iPhone and act following the procedure most suitable for the type of device you are using.
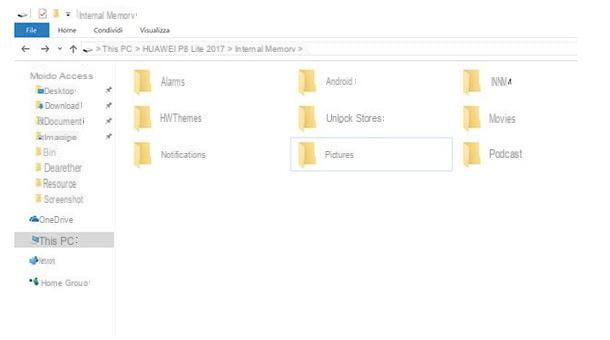
- Android - double click on the Internal Memory or of External memory, therefore, depending on your case, copy the folder DCIM, which contains all the photos saved in the phone gallery, in a safe place. If you want, you can do the same thing with folders in Facebook, WhatsApp images (WhatsApp Images), of Instagram and so on.
- iPhone - double click on the folder Internal Storage and copy the entire directory DCIM, containing the iOS gallery, in a safe place. If necessary, you can do the same with all the other folders located in the memory of the "iPhone by".
If needed, you can also import photos to your computer using the procedure of Windows Acquisition Wizard, which you can reach by right clicking on the device icon (Android or iPhone) in the File Explorer and selecting the item Import images and videos.
Alternatively you can use the app Windows 10 photo or, again, the wireless transfer modes. I have explained everything to you in detail in my guides on how to transfer photos from Android to PC and how to transfer data from iPhone to PC.
How to backup photos on Mac
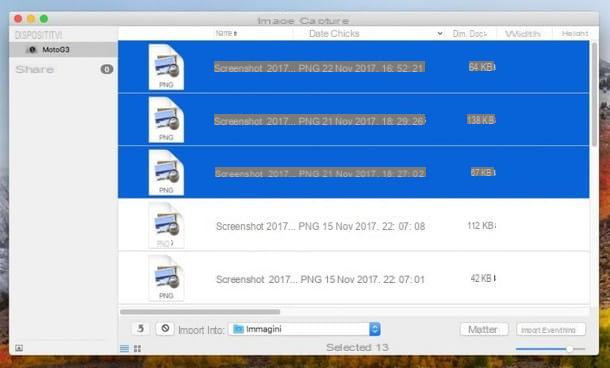
As regards the Mac, the acquisition of photos from smartphones and tablets via USB cable it's even easier! You can use the tool of Image capture, included "standard" in macOS, which allows you to quickly copy gallery images to a specific folder on your Mac: to use them, connect your smartphone or tablet to your Mac via the cable USB / Lightning supplied and, if you are on Android, recalls thenotify area, touch the banner USB options and activate the lever corresponding to the option Photo Transfer (PTP).
At this point, regardless of the operating system of the smartphone or tablet, return to your Mac, go to the folder Other of Launchpad (l'icona a forma di rocket annexed to Dock) and click on the icon Acquire Image: after a few seconds, all the photos saved in the device memory should appear in the program window.
From here, you can act in two different ways: dragging images from the Image Capture window to folder of the Mac where you want to save them, or selecting photos to save (with the help of the key cmd) and, after choosing the save folder from the drop-down menu Import into, make the backup by clicking on the button Import.
Alternatively, you can copy images from Android / iOS to Mac using the Android File Transfer program, or software such as AirDroid, which allow the transfer of photos via Wi-Fi: I told you about it in detail in my guide on how to transfer files from Android to Mac and how to transfer data from iPhone to Mac.
Google Backup and Sync
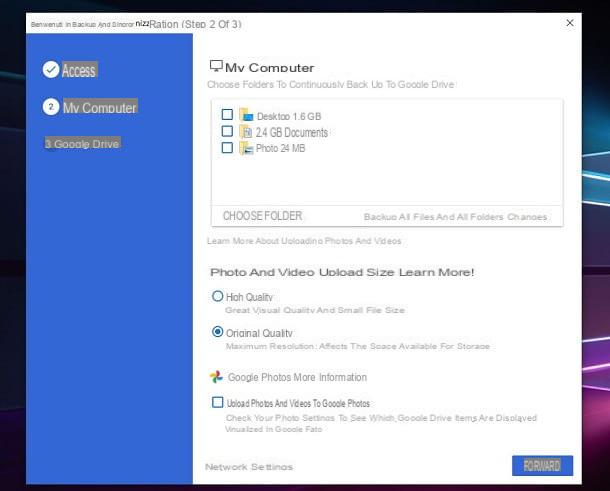
If, on the other hand, you are interested in making a backup of the photos already on your computer, you can give the program a chance Google Backup and Sync, Available for Windows e MacOS. This program is able to automatically send the photos and videos contained in the selected folders on Google Drive and Google Photos, taking advantage of the free space available (15GB) and possibly the additional space purchased through Google One. Clearly, you need to have a Google account in order to use the service.
To obtain the program, connected to this website, click on the button Download placed in the box Staff, then click on Accept and download and wait for the installation package to be saved on your computer. At this point, if you find yourself on Windows, start the downloaded file and click on the button Yes to start the installation immediately. If, on the other hand, you find yourself on MacOS, drag the program icon to the folder Applications, calls up the software you just installed from the Launchpad and click on the button apri to pass the Mac security check.
At this point, press the button Start, log in to yours Google account and click on the button OK, to access the configuration panel. Then check the folders containing the photos and, if they are not immediately visible, add them to the program by clicking on the button Choose folder. Later, if you want to upload only the multimedia files, click on the button Change and activate the appropriate option proposed in the next panel.
Then select the quality of the upload by choosing one of the options on the screen, then click on the buttons NEXT e OK. If you wish, check the box Sync my Drive to this computer and choose whether to synchronize the entire cloud space or only certain folders. To conclude, click on the button starts. The photos saved in this way can be viewed on all devices synchronized with the same Google account, or on the Google Photos website.
If you want to learn more about the use of Google Backup and Synchronization, I invite you to read the specific tutorial on the subject.
iCloud
Would you like to use the cloud service offered by Apple, iCloud, to archive photos on your computer? No problem - you can do it both on Windows, using the official client, which on MacOS, using the functionality built into the operating system. In this case, it is essential to have an Apple ID in order to take advantage of the iCloud storage space, which, in the free version, is equal to 5 GB.
All clear? OK, it's time to take action. If you find yourself on Windows, connected to this website, click on the button Download and wait for the installation package to be completely downloaded to your computer. When this happens, start the file obtained, put the check mark next to the item I accept the terms of the license agreement, click on the buttons Install e Yes twice, then wait for the setup to finish. To finish and restart the computer, press the buttons end e Yes.
If everything went well, on the next reboot, the iCloud login screen should open in the foreground: enter your Apple IDclick on your button Log in and, if required, complete two-factor authentication using the method you set up earlier.
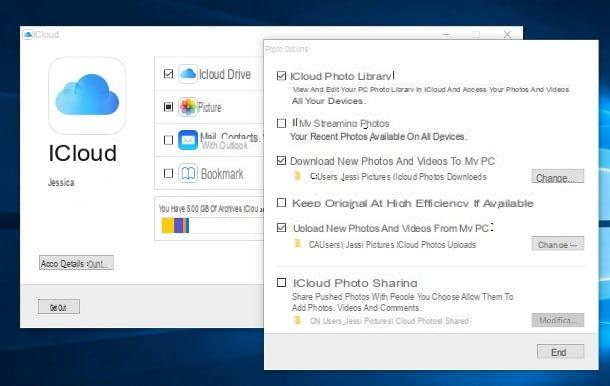
Successfully, I apponi il segno di spunta accanto alle voci iCloud Drive e Gallery, then click the button Opzioni ... corresponding to the latter to define the backup options: put the check mark next to the item ICloud Photo Libraryscegli se download the new photos and videos to your PC intervening on the appropriate text box, then put the check mark Upload new photos and videos from my PC and press pulsating end. When you are done, click on the buttons Apply e Close.
To immediately upload a folder of images to iCloud, open theFile Explorer Windows, double-click the icon ICloud Photos, select the voice Upload photos and videos and add the images you want to backup, using the screen that is proposed to you. The images loaded in this way will be automatically available in the program MacOS photonell'app Photos on iOS and in the Photos section of iCloud Web.
For Mac, backing up photos to iCloud is even easier: log in to System preference clicking on the d-shaped icongear placed on the Dock, click on the icon iCloud and enable automatic synchronization of the Mac gallery by placing the check mark next to the box Gallery. That's all!
Other cloud services

In this chapter, I've told you about some of the popular cloud storage solutions you can use for backup your photos present on smartphones, tablets and PCs: you must know, however, that they are not the only ones! Below I show you a series of cloud services that are equally efficient and can be used to create a backup copy of your images.
- dropbox - it is a cloud service that basically offers 2 GB of free space, which can be expanded upon subscription to a subscription plan. It features official clients for Windows, macOS, Android and iOS, with automatic synchronization functionality that can be activated on demand. I told you about it in detail in this guide.
- OneDrive - is the cloud storage service made available by Microsoft, integrated in Windows 10 and Windows 8.1, which has official clients for Windows 7, macOS, Android and iOS. Basically, OneDrive offers 5 GB of free storage, which can be expanded independently (with packages of 50 GB each) or in combination with the Office 365 service. To learn more, I suggest you read my tutorial dedicated to OneDrive.
- WOW Space - is the cloud storage service created by Fastweb which, at a price of € 9,95 / year, offers unlimited storage space. WOW space can be used from apps for smartphones and tablets and on PCs, through any web browser. I explained how it works in this guide.


