The application Paint Windows certainly cannot be defined as an advanced photo editing solution, yet in some cases it can come in handy for making small changes to images. Furthermore, it must be said that, if used in the right way, it does its job quite well without making you feel the need to resort to more advanced solutions. One of these cases is when you need to crop photos: even if using programs of the caliber of Photoshop and GIMP allows you to perform professional cropping, it is possible to do this very well even the good old software included in all versions of Windows.
If you don't believe it, take a few minutes of free time and find out how to crop photos with Paint following the directions I am about to give you. I already anticipate that I will provide you with the instructions to proceed both with the "classic" version of the program (to be clear, the one installed in all versions of Windows), and with Paint 3D (the most up-to-date version of the software only available on Windows 10).
So, are you ready to find out what needs to be done to crop photos with Paint? Yup? Very well! Make yourself comfortable, take all the time you need to concentrate on reading the next paragraphs and, more importantly, implement the "tips" that I will give you. I am sure that, by following my suggestions scrupulously, you will not have the slightest problem in completing your "business" today. There is nothing left for me to do but wish you good reading and, above all, have fun!
Crop photos with Paint

If you want to learn how to crop photos with Paint, you must first start the program: su Windows 10, type "paint" in search bar located in the lower left corner of the screen (next to the icon of the windows flag) and presses on the first occurrence that is found.
If you are using an older version of Windows, open the menu instead Home, pig sul sul bottone All programs, select the voice Accessories and then click on Paint.
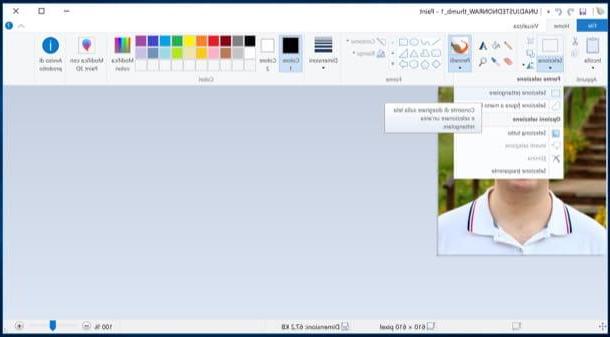
After starting Paint, you need to import the photo you want to crop into the application. To do this, press the blue button Fillet located in the upper left corner, select the item apri (l'icona della yellow folder with blue arrow facing left) and then choose the image you want to act on.
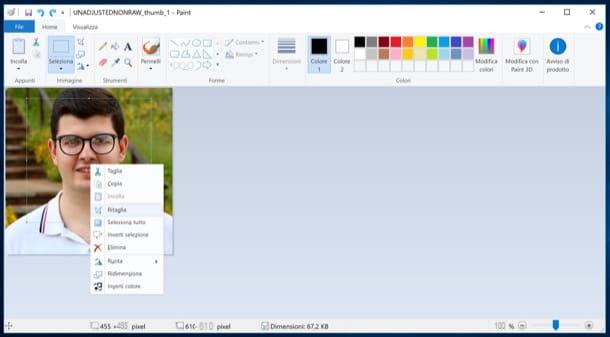
Once you have imported your photo into Paint, press the button Select located in the program toolbar (top, left) and create a selection rectangular around the portion of the photo you intend to crop (i.e. the one you want to keep). Then right click inside the selection and choose the item Cut out from the menu that appears, in order to perform the actual cutout.
If you are satisfied with the result, you can save your cropped photo with Paint by pressing the blue button Fillet located at the top left and selecting the file format in which to export the image from the menu (PNG, JPEG, BMP, GIF, etc.) from the menu Save us name.
If your first attempt to crop a photo with Paint was unsuccessful, cancel the operation by pressing the key combination Ctrl + Z on the PC keyboard, and try to repeat it, perhaps with the help of the tools included in Paint, such as lo zoom (there is a special adjustment bar located at the bottom right) and theindicator of the number of selected pixels that appears in the program status bar when you create the selection for cropping.
If you want, you can also cut out individual elements from your photos by creating one selection frees it and not rectangular. In this case, you need to click on the arrow located below the button Select I will select the voice Freehand figure selection from the menu that appears. Next, you have to hold down the left mouse button and make a selection as precise as possible around the element to be cut out.

Once you have made your selection, you can delete the hatched element by pressing the key Canc keyboard or crop it as seen before (right click). Unfortunately, you do not have all the possibilities to refine the selection offered by professional software such as Photoshop but, as I already told you in the introduction of the article, Paint is not an advanced photo editing program, so you have to be satisfied with what it allows you to do.
Note: I made the guide using the version of Paint included in Windows 10, Windows 8 and Windows 7: It has a slightly different interface than that included in previous versions of Windows. However, the procedure to be followed in the latter is quite similar to what I explained to you in the article.
Cropping photos with Paint 3D

You want to know how to crop photos with Paint 3D, the updated version of the application only available on Windows 10? In this case, start the latter by typing "paint 3d" In the Campo di Ricerca located in the lower left corner of the screen (next to the icon of the windows flag) and presses on the first result that is found.
In the Paint 3D welcome screen, press the button apri (l'icona della purple folder on a white background), presses the button Browse files and select the photo you want to crop. At this point, press the button Cut out present in the Paint 3D toolbar (at the top of the window) e choose the shot of the crop by selecting one of the options located on the right: PM16:9; PM5:3; PM3:2; PM4:3; PM1:1; PM9:16 o custom.
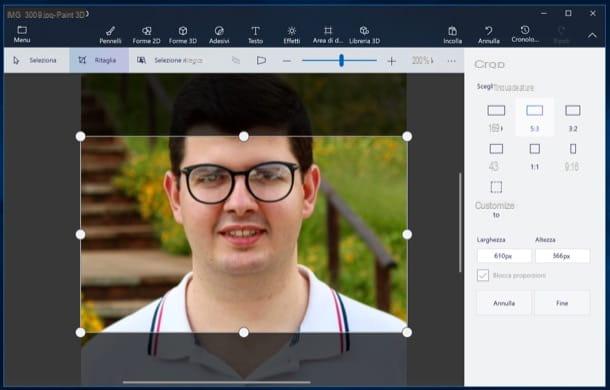
At this point, resize and reposition the cropping box: then position the mouse cursor on one of the white dots placed at the corners and on the perimeter of the crop box on the left and drag the slider to increase or decrease the area of the photo to keep.
To reposition the crop box, on the other hand, place the cursor on the photo (within the area you want to keep) and, as soon as the symbol appears (✚), hold down the left mouse button and drag the crop area until you get the desired result. As soon as you are ready to perform the cutout, then, press the button end located at the bottom right (in the sidebar on the right) and that's it.
If, on the other hand, you want to crop a photo by removing its background, press the button Magic select located at the top, highlight the portion of the photo you want to keep using the box that appears on it and press the button NEXT. At this point, the perimeter of the area that will be kept will be highlighted in green: if you want to include some elements present in the image or if, on the contrary, you want to delete some of them, you must use the tools Add e Remove which are located at the top right. After completing this operation too, press the button Done.
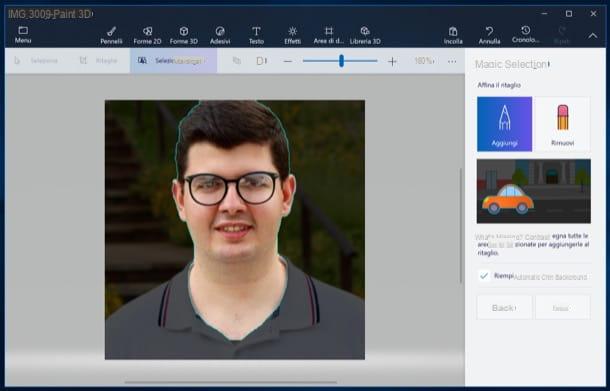
Now it is time to erase the photo background. You can proceed in various ways: by inserting a neutral color shape that covers the background by pressing the button 2D shape; you can add a second photo as a background by going to Menu> Insert or, again, you can transform the subject you cut into a sticker by selecting it and then pressing the button Create sticker which is located at the top right (under the heading 3D selection).

Whether you have decided to crop a photo using the "classic" crop tool or the magic selection tool, as soon as you are satisfied with the work done, save it by pressing the button Menu located at the top left and then presses on the item Save from the menu that appears. Did you see that it wasn't that difficult to crop a photo with Paint 3D?
If you are not satisfied with Paint's cropping tools, I suggest you take a look at the tutorials in which I explain how to crop photos and how to crop photos, so as to know other solutions that may be useful to you.
How to crop photos with Paint