


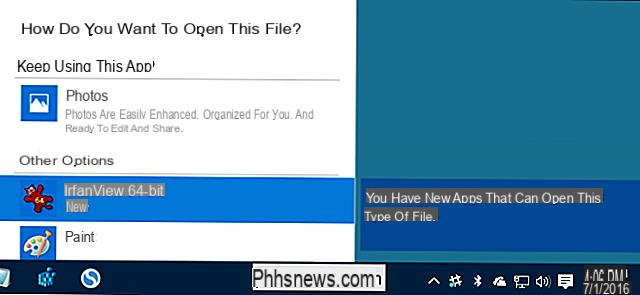
When you install a new program with potential file associations or when you open a file type for the first time on Windows 10, the operating system asks you the big question "How do you want to open this file?“, Showing you the app that the system currently uses to open it and possibly the new choices.
This is a behavior of Windows 10 that can be useful in many scenarios but which, for example, if the apps are all correctly associated with the file types, it could be annoying.
In this guide we will teach you how to disable the notification window for installing a new app in Windows 10, so that the system stops asking you - every time you install a new program - how to open the potential associated file types.
The result can be achieved in two ways: using thegroup policy editor (Windows 10 Pro only) ed using the registry. In both cases the procedure is completely reversible.
Preliminary information
We always recommend doing an installation through one 100% genuine and original license, this is to avoid data loss or hacker attacks. We are aware that purchasing a license on the Microsoft store has a high cost. For this we have selected for you Mr Key Shop, a reliable site with free assistance specialized in in your language, secure payments and shipping in seconds via email. You can check the reliability of this site by reading the many positive verified reviews. Windows 10 licenses are available on this store at very advantageous prices. Furthermore, if you want to upgrade to the latest versions of Windows operating systems, you can also purchase the upgrade to Windows 11. We remind you that if you have a genuine version of Windows 10, the upgrade to the new Windows 11 operating system will be free. Also on the store you can buy the various versions of Windows operating systems, Office packages and the best antivirus on the market.
Group Policy Editor
Press the key combination WIN + R and type the command inside
gpedit.msc
followed by enter. From the left side of the window that appears, go to
Computer Configuration> Administrative Mode> Windows Component> Esplora file
Look for the voice now “Do not display new application installation notification”And double click on it.
In the next window put the check mark on Enabled and click OK.
You can now exit the Group Policy Editor: the change will take effect immediately and you will no longer see the notification.
To restore the original behavior, repeat the procedure and move the check mark to Disabled or Not configured (with the latter option, the operating system will decide what to do).
Register
Press the key combination WIN + R and type the command inside
regedit
followed by enter. From the left side of the window that appears, go to
HKEY_LOCAL_MACHINESoftwarePoliciesMicrosoftWindows
Right click on "Windows" and select New> Key.
Give the new key its name Explorer, as shown in the picture.
Now right click on Explore (the key you just created) and select New> DWORD Value (32 bit).
Call the newly created value
NoNewAppAlert
and hit Enter. Now double click on it: a window similar to the one below will appear:
Enter the number 1 in the box "Value data" and click OK, then close the registry and restart the computer. From now on, the notification will no longer appear.
To restore the original behavior of the system you can completely delete the created Explorer key or, alternatively, reset the NoNewAppAlert value data to 0.
Doubts or problems? We help you
Remember to subscribe to our Youtube channel for videos and other reviews. If you want to stay up to date, subscribe to our Telegram channel and follow us on Instagram. If you want to receive support for any questions or problems, join our Facebook community or contact us on Instagram. Don't forget that we have also created a search engine full of exclusive coupons and the best promotions from the web!


