


You have recently purchased your first Mac, would you like to copy the photos you took with your iPhone to the latter but you don't know how to do it yet? Have you activated the iCloud Photo Library service on your iPhone but can't get the photos to sync to your Mac automatically? Don't panic, I can help you if you want.
Give me a few minutes of your time and I'll show you all the most effective solutions for download photos from iPhone to Mac. We will see how to transfer photos and videos from the "iPhone by" to the Mac using the default application for managing photos (Apple Photos or iPhoto). We will get acquainted with some "alternative" applications for capturing images from smartphones, tablets and other devices, which perhaps not everyone knows, and finally we will deal with iCloud: the Apple-branded cloud storage service that allows you to synchronize photos and videos via the Internet.
You just have to choose the solution that seems most comfortable for your needs and start using it by following the instructions below. I assure you that in one way or another you will be able to solve all the problems related to managing photos on iOS and Mac. Have fun and happy reading!
Photo app

The more "traditional" (and also simpler) method for download photos from iPhone to Mac is to use the application Gallery from Apple, which is included "standard" in all the latest versions of macOS and iOS.
To use it, all you have to do is connect your iPhone to the Mac using the Lightning / Dock cable supplied with the smartphone and wait for the Photos app to run automatically. In case this does not access, manually start the application by clicking on its icon in the Dock bar or in the MacOS LaunchPad (the multicolored flower).
At this point, wait for the list of photos and videos that are present on the iPhone memory but which you have not yet imported to your computer to be shown. Then click on the button Import all new items located at the top right and waits for the photo (and video) import to be completed automatically.
If you do not want to import all the photos and videos on the iPhone memory to the Mac but only some of them, click on their thumbnails in the tab Import of Photos and presses the button Import selected xx that appears at the top right to start transferring it to your computer.
All photos and videos imported into the Photos app are stored in a large database which is normally located in the folder Images from the Mac: Photo Library. If you want to extrapolate some images or videos from the latter, open the Photos application on your Mac, select the thumbnails of the content you want to save in standard format (such as single photos or single videos) using the combination cmd + click and drag them to a folder of your preference. The copied items will remain in the Photos library and will be copied in standard format to the folder of your choice.
If you're using a Mac equipped with an older version of macOS and haven't switched to the Photos application yet, you can import photos to your computer using iPhoto, the historic photo management software that Apple retired after the launch of the new Photos app. Its operation is very simple, I told you about it in great detail in my tutorial on how to archive photos with iPhoto.
Image capture
Don't you go crazy at the idea of having all your photos and videos enclosed in a closed database? Do you find the Photos app too inconvenient to use? No problem.
Maybe not everyone knows this, but macOS also includes another application, called Image capture, which allows you to capture photos from smartphones, tablets, cameras, scanners and other devices without going through iTunes or the new Photos app.
It is a very essential tool… and for this reason it is a great alternative to the Apple Photos app! By importing images from iPhone to Mac with this utility, you will be able to organize your shots (and your videos) in simple folders, without forcing them into "closed" databases accessible only from computers and portable devices produced by the Cupertino company.
download photos from iPhone to Mac means Image capture, connect the "iPhone by" to the computer using the classic Lightning / Dock cable and open the application by searching for its icon in the folder Other from the launchpad.
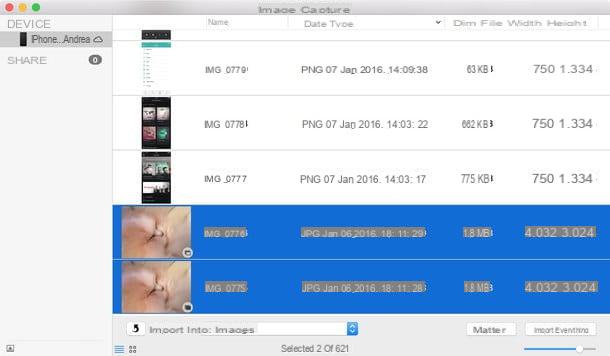
At this point, select the iPhone name from the Image Capture sidebar, choose the folder where you want to copy photos and videos via the drop-down menu Import into (located at the bottom left) and click on the button Import everything to start the data transfer.
If you don't want to copy all the photos and videos to your Mac, but only some of them, select their thumbnails using the key combination cmd + click and click on the button Import located at the bottom right.
ICloud Photo Library

Thanks to iCloud, Apple's cloud storage system, you can save your photos online and synchronize them with all the devices connected to your Apple ID, including Mac.
But be careful, there are two different services to synchronize photos through the "cloud" of the Cupertino giant: ICloud Photo Stream which stores up to 1.000 images at a time for a total period of 30 days e ICloud Photo Library which instead has no limits of time, space and also supports videos. The first is active by default on all iOS devices and does not erode the storage space on iCloud Drive. The second, on the other hand, must be activated by the user and consumes the space available on iCloud Drive, this means that to use it you must activate one of the paid plans of iCloud Drive (0,99 euros / month for 50GB, 3,99 euros / month for 200GB and 9,99 euros / month for 2TB).
The application Gallery of the Mac supports both Streaming Photos and the iCloud Photo Library, so it is possible to pass photos from the iPhone to the computer even without physically connecting the two devices, taking advantage of the cloud.
To make sure everything is configured properly, go to the menu Settings of your iPhone (Settings> iCloud on iOS 10.2.x and earlier) and in the menu System Preferences> Apple ID / iCloud of your Mac. Both devices must have the same Apple account configured and the option must be enabled Gallery.
Once this is done, open the application Gallery on the Mac, go to the menu Photos> Preferences, select the scheda iCloud from the window that opens and make sure there is a check mark next to the items ICloud Photos e My Photo Stream. In this way, the app will automatically synchronize with iCloud and allow you to download to your Mac (or automatically download, if the iCloud Photo Library is active) all the photos stored on your online account.
Another way to download photos from iCloud, available only for users who have activated the iCloud Photo Library on their account, is to connect via browser to the website iCloud.com, log in with your Apple ID and click on the icon Gallery. This opens the online library of your photos, from which you can freely view and download the contents (even from Windows or Linux).
For more information on iCloud Photo Library and Photo Stream, I invite you to consult my guide on how to store photos on iCloud in which I talked in more detail about both services.
How to download photos from iPhone to Mac


