


Until recently, the computer was a mysterious object to you. Fortunately, the situation has now changed. Recently, thanks to the help of relatives and friends knowledgeable in the field, you have managed to get closer to this world. But now, even if you are still not very good at handling mouse and keyboard, you have decided that you would like to impress everyone by sending a photo of your recent holidays via email.
It is certainly a great idea but would you like me to give you a hand to complete this "mission"? Of course, no problem. However, send photos by email, via the PC is a simple and immediate operation that I can explain to you in no time at all. All you need is a few minutes of free time and you can find out how how to email photos, using one of the main Webmail services.
For completeness of information, I will also tell you how you can send photos by email via your email application for Android or iOS smartphones. You will see that, if you follow my advice to the letter, send photos by email it will be child's play. I recommend, before starting to read this guide on how to email a photo, make sure you have correctly registered for the email service. If you are not sure how to proceed, I suggest you take a look at my dedicated guide. All done? All right, then let's get started!
How to log in to Gmail

If the e-mail address you registered is gmail, then, for send photos by email, through Gmail, you will need to log in by returning to the official website of the service. To do this, first you will need to open the web browser of your choice and type the following address in the search bar: www.google.com/gmail.
To log in, you will then need to click the button Log in, located at the top right. A new screen will now appear and you will need to enter your login details (e-mail e Password) that you chose when registering your Gmail email address.
Specifically, then type yours e-mail and Password and confirm by pressing the button NEXT. Also, I recommend that you check the item Stay connected. In this way, if you later want to return to your inbox, Gmail will automatically remember your data when you log in. This procedure will in fact prevent you from disconnecting from the service, allowing you a faster and more immediate login.
Gmail email can also be accessed using the app of the same name for Android and iOS smartphones. To log in, you must obviously have already downloaded the app from your device's virtual store. If this is your first time using Gmail from your smartphone, you can use the link below to download the app on iOS. On Android devices, the application is already installed by default, while the official Gmail app is not available for Windows Phone smartphones: you will have to use the pre-installed email application on the Microsoft device.
- gmail - Download from the App Store on iOS
To log in to Gmail from the app for Android and iOS smartphones, first open the app on your device and then tap the button Log in and then on your account name. You will then be able to add an existing email address by logging in with the email address you registered previously.
How to email a photo with Gmail
If you have correctly accessed your Gmail email, following the steps above, you should find emails, contacts and attachments and, more generally, all your content, perfectly synchronized. In the following lines I will now explain, step by step, how to send a photo via email, via Gmail. Don't worry, you will see that it will be very simple.
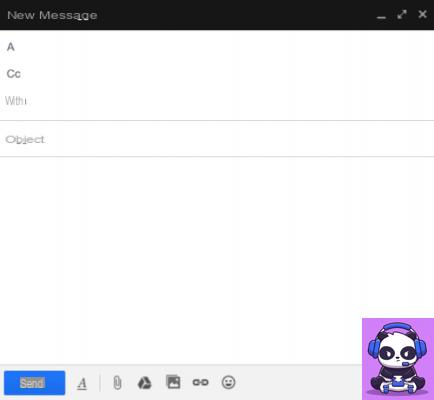
To send a photo via email to any email address, using the email service offered by Gmail via the desktop browser, all you have to do is press the button Write top left. This will open a new window at the bottom right, through which you can start composing your email. Before sending a photo via email, it is necessary that you take into account the tools available for sending an email and any attachments.
The first thing you absolutely need to take into consideration is the pitch A: this is the text field where you will have to enter the email address of the recipient of your email (for example [email protected]). In case you want to send a photo via email to multiple recipients, you can do it in a simple way: just type one or more recipients in the respective text fields that will open by pressing the buttons CC e CCN.
Field CC is a text field where you can enter a person's email address to let them know that an email is being sent to another (Copy Knowledge). By entering an email address in the field CCN (Copy Hidden Knowledge), you will make sure that this person's email address remains hidden from other recipients.
Also don't forget to fill in the field object: when you send an email it is good practice to write an extremely brief description of its content, through this field. Finally, the space below the field object, is dedicated to the content of your email.
Now that I've talked to you about the basic tools for compiling an email, I want to explain to you how to email a photo. Then take a look at some buttons at the end of the email: the button A with a bar below it is for formatting options, the clip for sending attached files, the symbol of Google Drive will allow you to send a file via Google Drive, the picture symbol is dedicated to sending multimedia files and the symbol of chain it is used to insert links within the text. Finally, the smiley face symbol opens the menu of emojis that you can insert into your text. To email a photo, via Gmail, then press the picture symbol: you will be able to select or more photos to send by uploading them from your PC, from a web address via URL, or by uploading them from the photos of your Google Photos albums. The Google email service integrates with the popular cloud service. When you have finished filling in your email, click on the blue button Send to send it.
If you want to send an email with Gmail, using the application for Android or iOS smartphones, you will first have to open the application and, once logged in correctly, press the button with the pencil symbol. As previously done using Gmail via browser, before sending a photo via email, take care to fill in all the main information: the body of your email, the items A e Subject and fields CC e CCN. Once this is done, to send a photo via email, you will have to press the button of clip, upload one or more photos from the memory of your device and send it by pressing the button arrow.
How to access Outlook
If you previously registered an email address with Outlook and you want to use it to send photos via email, I can explain how to do it in an extremely simple way.
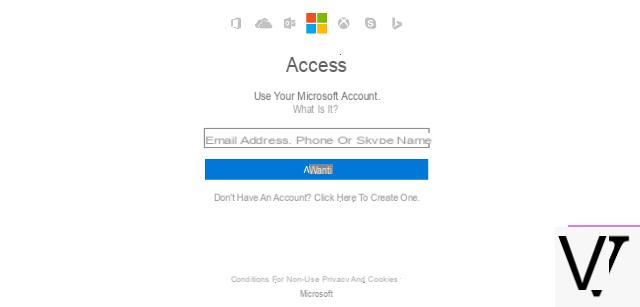
First you will need to log in from the official Outlook website. Then open your web browser and type the following address in the search bar: www.microsoft.com/en-gb/outlook-com/. Now log into your account by pressing the button Log in, located at the top right. To log in to Outlook, enter all the necessary information in the text field: the email address of your previously registered Microsoft account or the mobile number or Skype account associated with the account. When done, press the button NEXT. Now type the password and put a check mark on the item Stay signed in, to avoid disconnection from the e-mail service.
Alternatively, you can log into your email account Outlook, even using the app available for Android and iOS smartphones. If this is your first time doing this, download the app from your device's default store. Below you will find the links to download it on Android and iOS. If you have a Windows device, the app is already pre-installed and you won't need to download it.
- Microsoft Outlook- Download from Play Store on Android
- Microsoft Outlook- Download from the App Store on iOS
To log in to your email Outlook from the app, open the Outlook application on your device, then tap the button Start. When prompted, enter your email address and password and log in by pressing the button Continue.
How to email photos with Outlook
Once you have logged into your email, you will be able to send a photo by mail having all your contacts perfectly synchronized. So I want to explain step by step how to do it using the e-mail service offered by Outlook via Web and through the smartphone application.
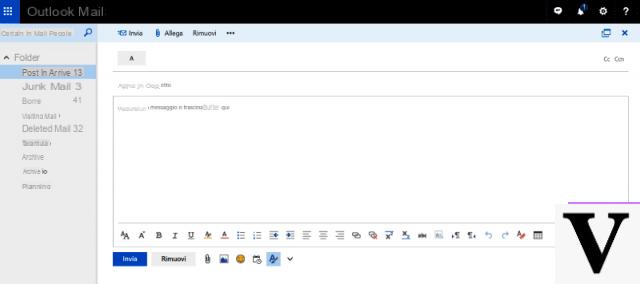
To send an email to any email address using Outlook via the desktop browser, first press the button + New. A new screen will then open, thanks to which you can send your email. Also in this case, before actually sending a photo via email, you must take care to fill in the basic fields of an email.
First you will have to fill in the field A which refers to the recipient's email address. If you wish, you can also enter one or more recipients by pressing the buttons CC e CCN. Specifically, using the CC field (Copy Knowledge) you can also enter a person's email address to let them know they are sending a dedicated email to another person, while using the CCN field (Copy Hidden Knowledge), the recipients of the messages entered in this space will still receive the email, but their email address will remain hidden from the other recipients. The field object it is also very important as it will serve to indicate a brief description and presentation of the contents of your email, while the white space below it is reserved for the content of your email. You will then be able to write a personal message accompanying the photo you wish to send via email.
Below, near the button Send, you find a bar with several buttons. It will be through these that you can send a photo via email and, more generally, you can customize your email. In addition to sending photos, you can attach fillet, emoji, set the formatting and even insert one table in the body of the email. In the specific case that you want to send a photo by email, just click on the button with the symbol of a picture. A dialog will open that will allow you to upload a photo to be emailed via your computer or via your One Drive archive. The Outlook e-mail service is owned by Microsoft and will therefore be integrated with the respective cloud service. When you have finished writing your email, click on the blue button Send to send it.
If you want to send a photo via email with Outlook, using the app on your mobile device, you will have to press the button with the pencil symbol. As previously done, first fill out the body of your email, the entries A e Subject and add recipients in the additional fields if you wish CC e CCN. Sending photos or attachments in general with the Outlook app must be done through the button clip and sending can be completed by pressing the button with the symbol of a arrow.
How to email photos other Webmail services
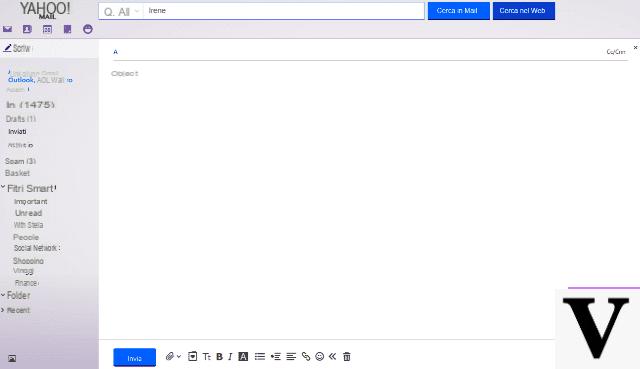
Besides gmail e Outlook, Yahoo Mail e Virgilio Mail address are probably the most used online email services that will allow you to send photos via email. In any case, any e-mail service via web client or desktop client, allows you to send photos by email. Generally speaking, in fact, the button that allows you to send photos or attachments via email is a symbol of clip. By pressing this button in the email you wish to send from your email, you can in fact have access to the photo upload panel from your computer or through the main cloud services.
How to email photos


