


You just downloaded some photos you took last weekend with your digital camera to your PC and you noticed that some of them are slightly blurry. I imagine how frustrating such a situation can be, but if you have installed Photoshop on your computer, you should be able to remedy the situation, as far as possible.
All you have to do to complete your "business" today is to take five minutes of free time to concentrate on reading the next paragraphs and put into practice the instructions on how to fix a blurry photo with Photoshop that I am about to give you. I guarantee you that, even if you are not a photo editing expert, you should be able to obtain more than satisfactory results (as long as your shots are not too compromised!)
Just a small clarification before starting: for the writing of this article, I used Photoshop CC 2020 which, at the time of writing, is the most recent version of the famous Adobe photo editing program. In any case, the indications you will find in the next lines are valid for all the most recent versions of Photoshop and for all platforms, therefore both Windows and macOS. In addition, I will also tell you about Photoshop apps for smartphones and tablets. But now let's put the chatter on and roll up our sleeves! I wish you good reading and have fun!
Go to ▶ ︎ immediately Fix a blurry photo with Photoshop on PC and Mac | Fix a blurry photo with Photoshop on smartphones and tablets
Fix a blurry photo with Photoshop on PC and Mac
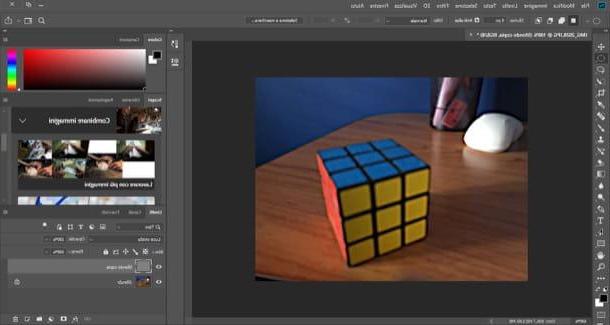
fix a blurry photo with Photoshop on PC and Mac, you must first import the image into the program by selecting the item Apri ... from the menu Fillet which is located at the top. Next, go to the menu Subscription and click on your voice Duplicate Layer ... to create a copy of the background layer of the photo and confirm the operation by pressing the button OK from the box that appears on the screen.
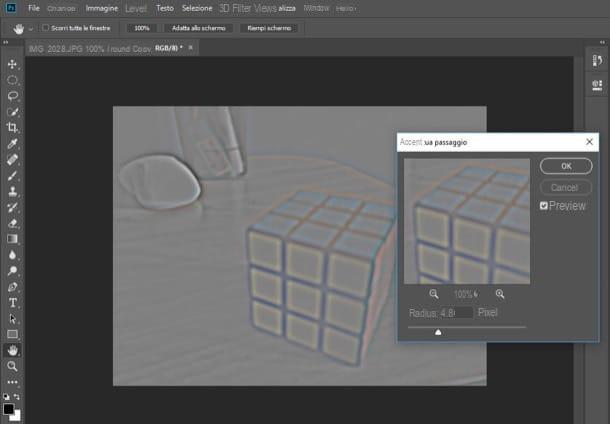
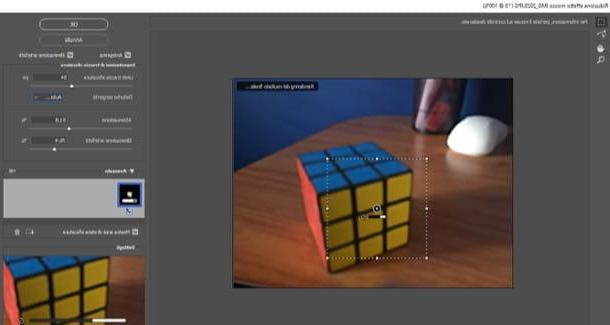
Pray, select the voice Accentuate passage ... from the menu Filter> Other and, in the window that opens, move the adjustment bar relative to radius until from the completely gray picture you can see all the features of the subject of the photo (if for example it is a face, you must also see the small wrinkles around the lips and other smaller details).
Usually, the right value is between 2,5 pixels e 5,0 pixels, but a lot depends on the shot you are retouching and the degree of blur you need to correct. As soon as you have identified the correct value, press the button OK which is located at the top right of the open pane, so as to apply the changes.
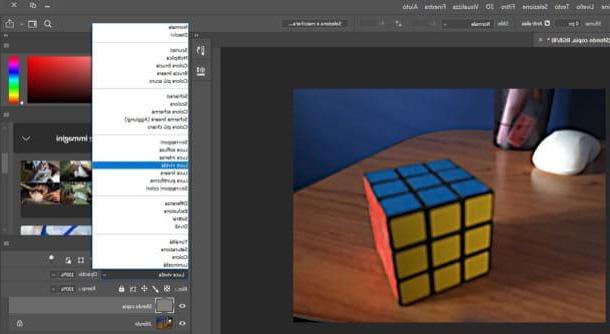
The next step you are called to take is to visually merge the layer on which you have applied the accentuation of the passage and the base layer of the photo. Put like that, it might seem like a complicated operation, but I guarantee you it's not at all. To proceed, click on the drop-down menu Normal located in the panel relating to the management of levels (bottom right) and set the blending mode for the layer by selecting one of the following options.
- Overlap - to trace the edges of the photo with a medium intensity (recommended).
- Soft light - to trace the edges of the photo very lightly.
- Intense light o Looks vivid - to trace the edges of the photo more markedly.
Later, if you wish, you can decrease the force with which the edges of the photo are “traced” by lowering the opacity value. To do this, you must always act from the layer management panel: press, therefore, on the symbol (⌵) placed in correspondence with the percentage next to the item Opacity and select the desired degree of opacity by moving the cursor attached to the menu in question.
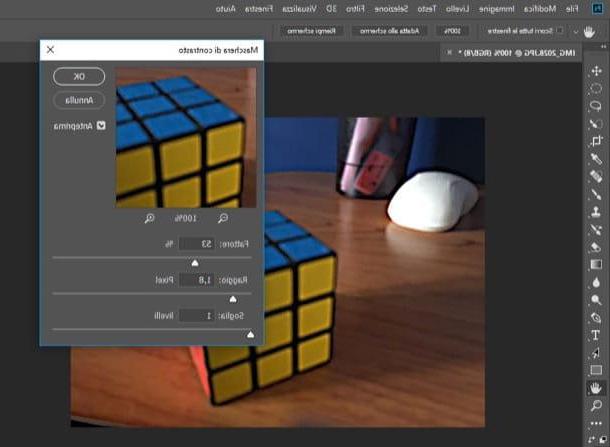
At this point, you should already be able to get a good result. If not, open the menu Subscription and select the item Only level which is located at the bottom of the drop-down menu that has opened. Then open the menu Filter, select the items Sharpness> Unsharp Mask ... and use the sliders in the box that appears on the screen to manually correct the focus of the image.
Then adjust the value Factor taking into account that the changes applied will affect the intensity of the sharpening (so do not use an excessively high value); define the values of the radius, which is the number of pixels surrounding the edges to sharpen and select the Threshold, that is the parameter relating to the application of the unsharp mask. To apply the changes made, then, presses once again on the button OK.
If you have not yet managed to get a noticeable result, you should try using the filter Blur reductionespecially if the photo you are retouching turns out to be blurry due to a sudden movement of the camera during the shooting phase. Then open the menu Filter, select the voice Sharpness and click on your voice Blur reduction ... from the drop-down menu that opens.
In the window that appears on the screen, you should see one on the image dotted selection (the so-called blur trace): if not, expand the menu Advanced located on the right and make sure there is a check mark on the item Show blur estimation areas.
Since a shot can be characterized by multiple areas of blur, you can create more traces of blur to obtain appreciable results: just press on the symbol of the dashed rectangle located at the top left and “draw” the blur track inside the image (if you want, you can also move and resize the blur track according to your needs and the corrections you want to make).
To remove the blur effect from an image, then, select one blur trace and act on the controls located on the right: Trace limits blur, to indicate the size of the number in pixels of the blur on which you want to act; attenuation, to reduce the noise generated by the sharpness applied to the shot and Artifact elimination, to remove the noise that usually comes out when you sharpen an image or a part of it. When you have finished fixing the blurry photo with the filter that reduces the blur of the photos, press the button OK per salvare I modified it.
If there are no other adjustments to be made to the image, save your work: open the menu Fillet, select the voice Save with name ... and, in the window that opens, select the folder in which to save the photo you have placed, give it a name by typing it in the field File name e pigia his Save to complete the operation. Did you see that it wasn't that difficult to retouch your shot with Photoshop?
Fix a blurry photo with Photoshop on smartphones and tablets
You don't have your own PC at the moment and would like to know if it's possible fix a blurry photo with Photoshop on smartphones and tablets? The answer is yes! Thanks to the Photoshop apps that Adobe has made available for free on the main stores, in fact, it is possible to act on blurred photos directly from your mobile device. Among the most interesting mobile "incarnations" of Photoshop, I would like to point out Adobe Photoshop Express, free application that is available for Android, iOS / iPadOS and Windows 10 Mobile - let me show you how to best use it to fix blurry photos.
After installing and starting Adobe Photoshop Express on your device, scroll through the information sheets that illustrate its features and press the button Adobe ID and log in with your Adobe account. Alternatively, if you want, you can also log in with your account Google or your account Facebookby pressing on the relative buttons. I want to remind you that, by logging in with Adobe ID, it allows you to use some extra functions, such as those related to digital noise reduction and the fog effect.
Once logged in, tap the button OK and grant Photoshop Express permissions to work properly. Once logged in, tap onpreview photo you want to retouch or open the menu All the pictures and select the import mode you prefer (eg. Camera, Creative Cloud, Etc.).
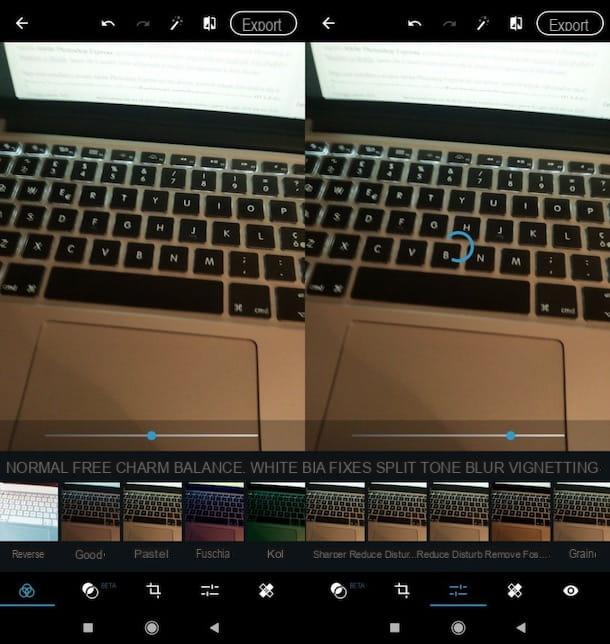
Subsequently, then presses on the symbol of adjustment bars which is located at the bottom and, in the opened menu, tap on the tab Sharper and adjust the sharpness of the photo using the cursor you see on the screen. Then use the tools Reduce luminance noise e Reduce Color Noise to correct gloss and noise (if necessary).
As soon as you are satisfied with the result, press the button Export located at the top right and tap the button Save in gall to save the edited photo on the roll or, if you prefer, share it on Facebook, Instagram, WhatsApp, etc., using the appropriate share buttons.
How to fix a blurry photo with Photoshop


