


“Wow, this photo is really nice, where did you take it? And this other one? No, don't tell me you did this in Paris! " Admit it, afternoons spent at home with friends and family telling you where, how, when and why you took your photos are one of the most boring things in the world.
So why don't you put the word "end" to this dripping by directly inserting descriptions in the photos? How do you say? You are not very good with computers and therefore you do not know how to insert writings on photos? I guarantee you that this is a very simple operation to complete. Just use the right tools, in the right way, and anyone - even those who, like you, don't exactly consider themselves a computer genius - can be able to complete this "business" using ad hoc programs, online services and even some free applications for Android, iOS and Windows 10 Mobile.
I intrigued you and now would you like to go deeper into the subject? Yup? Well, then make yourself comfortable, take all the time you need to read the next paragraphs and, more importantly, implement the "tips" that I will give you. I assure you that, at the end of this tutorial, you will no longer have doubts about what to do. I wish you good reading and, above all, have fun!
Programs to insert writings on photos
There are numerous programs that allow you to insert writings on photos. In the next paragraphs I will tell you in detail about some solutions included "standard" on your PC that are quite simple to use. I will not fail to show you a couple of third-party programs that could always come in handy.
Paint (Windows)
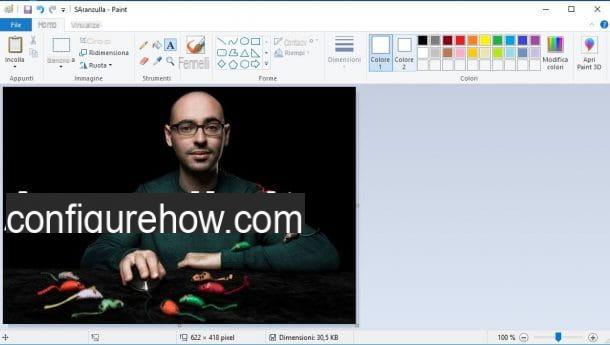
One of the simplest solutions to insert writings on photos is Paint, the popular graphics program installed by default on virtually any version of Windows. I am sure that you too have used it at least once in your life. If not, you can still rest assured because I'm about to show you in detail how to use it.
First, open the image you want to edit with Paint - click the right key mouse on the photo and, from the menu that opens, click on the item Open with and then Paint. On the main Paint screen, click on the symbol (A) located at the top, in the Paint toolbar, click on the point in the image where you want to insert the writing and digitize it in the testo field that appears.
To change the color of the text, its font, its size and so on, select it with the mouse and then use the drop-down menus located inside the menu Text. When you are finally satisfied with the changes made to the image, click on the button Fillet and then on the voice Save.
Please note: once you have added a text to a photo with Paint you cannot select and remove it, except by canceling the changes made to the image by clicking on the arrow pointing left located at the top left (next to the Paint icon) or by pressing the key combination Ctrl + Z.
Paint 3D (Windows 10)
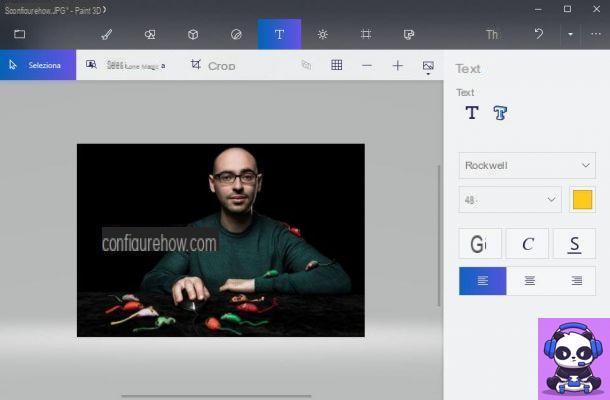
If you use a PC Windows 10, you can add text to photos using Paint 3D, the "enhanced" version of the program I mentioned earlier that allows you to create 3D projects and which is installed by default on the most recent version of the operating system developed by Microsoft.
To write on a photo with Paint 3D, open through this program the image you want to modify (just click on the right key mouse on the photo and, from the menu that opens, click on the items Open with e Paint 3D). Next, click on the icon of (T) located at the top and, in the menu that appears on the right, select the item 2D to insert a “flat” writing or on the voice 3D to insert a three-dimensional inscription. Then choose the font of the writing, its size, its color and so on using the corresponding drop-down menus.
Now, click on the place in the image where you want to insert the text and type it into the box that appears. If you have chosen to use three-dimensional writing, use the arrows placed on the four sides of the writing to modify the 3D effect.
When you are satisfied with the result, click on the symbol of folder located at the top left and, in the menu that opens, click on the item Save to save the project.
Preview (macOS)
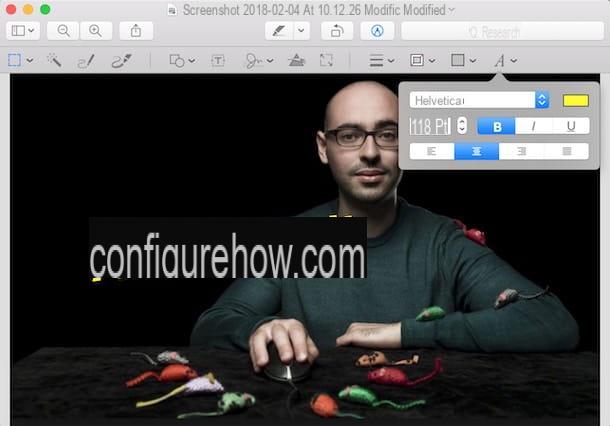
If you use a Macinstead, you can insert writings in photos using Preview, the image and PDF file reader installed by default on all the computers of the “bitten apple”.
To add text to photos with Preview, first open the photo you want to edit with the program. If by chance you have changed some macOS settings and Preview is not the default image reader, click with the right key mouse on the photo, then select the item Open with from the context menu and then click on the item Preview.
Then click on the symbol of pencil located at the top and, in the menu that appears, click on the symbol (T) and type in text box that the writing you want to add to the image has appeared. Next, click on the symbol (A) and, in the menu that opens, select the font, font size, color, etc. using the appropriate drop-down menus.
When you are satisfied with the changes made to the image, click on the option Save from the menu Fillet to save your work.
Paint.Net (Windows)
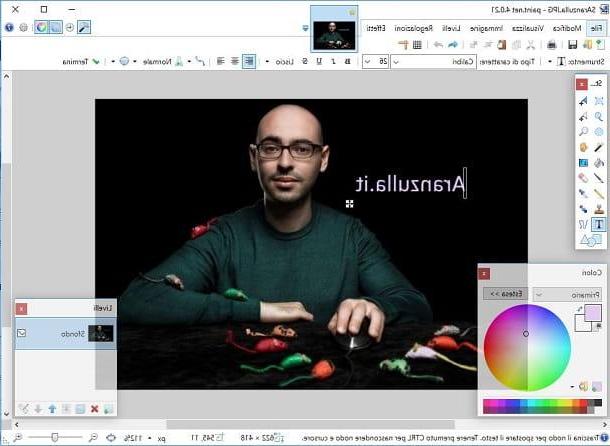
Paint.Net is the first third-party solution that I invite you to consider if you want to add writings to photos quickly and easily. Paint.Net can be downloaded as a free program or, alternatively, as an app for Windows 10.
Unlike the standard version of the program, the Paint.net app available in the Microsoft Store is not free as it normally costs 8,99 € (sometimes it is on offer at a price of 4,99 euros). What are the differences between the free program and the paid app? Virtually none! The developers have published the app in the Microsoft Store simply to allow users to give their financial support to the development of the app. If, at least for the moment, you do not want to make a financial contribution to Paint.Net developers and want to download the program for free, follow the instructions below.
Before going into the merits of the speech, I want to tell you that to use Paint.Net you must have downloaded the component on your PC .NET Framework from Microsoft. If the component in question does not appear to be installed on your PC, download it immediately from the Microsoft website. Then connected to the Paint.Net website and click on the item paint.net xxxx located at the top right, immediately under the heading Free Download Now.
When the download is complete, double-click on the zip archive paint.net.xxxx.install.zip that has been downloaded and run the program paint.net.xxxx.install.exe contained within it to start the Paint.Net installation procedure.
Nella finestra che si apre, fai clic sul pulsado NEXT, metti il segno di spunta accanto alla voce Accept (to accept the conditions of use of the program) and, to finish the Paint.net installation procedure, click on the buttons NEXT and then end.
At the end of the installation, Paint.Net should start automatically (if this does not happen, start it manually by clicking on its icon): in the main program window, then select the item Apri ... from the menu Fillet, and upload the photo where you want to add text. Then click on the tool Text (the icon depicting the letter "T" present in the toolbar on the left of the screen), click on the point in the photo where you want to insert the text, choose the writing character to use using the drop-down menu located next to the writing Character type (always in the toolbar of the program located at the top) and type your personalized text. Easier than that ?!
To format the inscription inserted in the photo, you can use the commands found in the Paint.Net toolbar: click on the button (B) to apply bold; click on the button (I) to apply italics; click the button (U) to underline the text or click on the button (S) to cross out the writing.
To align the text to the left, center or right, instead, use the buttons depicting the lines that you find in the Paint.Net toolbar, while to change the size of the writing use the drop-down menu containing a numerino and select the desired size.
You can also vary the color of the writing using the palette located at the bottom left (to be clear, the colorful wheel present in the main screen of the program) and move the text anywhere in the photo, selecting it and then moving the mouse cursor white square with black cross present next to it.
As soon as you are satisfied with the result, save the changes made to the photo by selecting the item Save with name ... from the menu Fillet.
PhotoScape X (Windows/macOS)
Another photo writing software that I recommend you consider is PhotoScape X, an easy-to-use solution that is available for both Windows 10 (for older versions of Windows you can download the older version of the program) and macOS.
In addition to allowing you to add text to photos, PhotoScape X allows you to use various editing tools which make this desktop app particularly complete. This is not a completely free solution, since some features and some tools are exclusive to the Pro version of the app (which costs 39,99 euros on Windows 10 and 43,99 euros on macOS) but it is possible to use its free version to freely use some basic features, including the one to write on photos.
To download PhotoScape X on your computer, connect to the program's website and click on the button Download located next to the name of the operating system you are using. Within a few seconds, you should see the relevant download page of the program present in the store of the operating system in use from which you can proceed to download the program by clicking on the button Ottieni / Installa.
At this point, if you have downloaded the Windows version, access the Start menuclose il program name and click on it to start it. If, on the other hand, you have installed PhotoScape X on your Mac, go to the Applications macOS and click onprogram icon to start it.
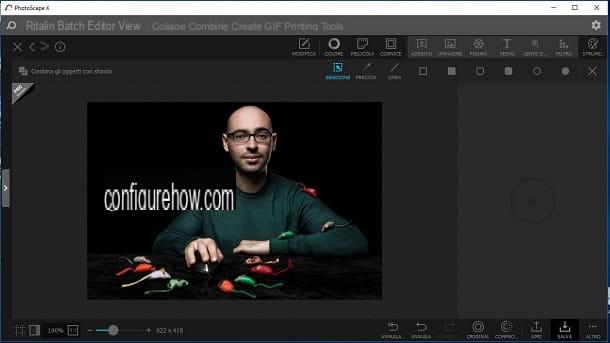
After starting PhotoScape X, click on the item Editor, in order to access the main tools of the program, drag the photo on which you want to write in the window where the editor is present, click on the items Inserisci and then Text and edit the sample text that was automatically added to the photo by typing it in testo field present in the toolbar (right). Also from the toolbar, format the text using the tools provided by PhotoScape X to change the font, color, transparency, inclination, font size, color and so on.
As soon as you are satisfied with the final result, click on the button Save located at the bottom right and, from the window that opens, select the destination folder and the format in which to save the file.
Online services to insert writings on photos
Have no intention of downloading new programs on your PC? No problem! You can always use one of the many online services to insert writings on photos usable directly from the browser. Below I show you in detail how to use two popular free tools that do not require the download of any additional plugins and that are very easy to use.
PicFont
PicFont, as easily understood from its name, is a Web service that allows you to write on photos using numerous types of fonts and effects. It can be used without registering and without downloading any additional plugins.
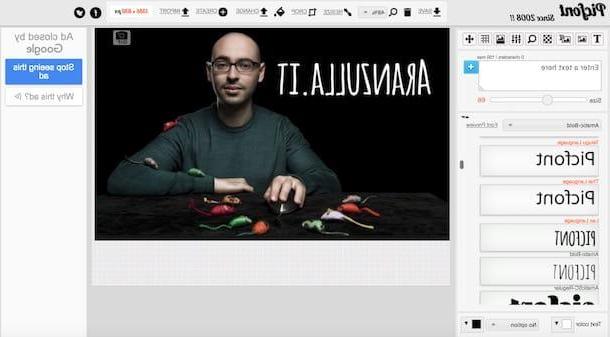
To use PicFont, connected first to its main page, click on the button Or select Picture from computer… and select the photo you want to work on bearing in mind that you can use images that are no larger than 5MB.
When upload is complete, you will see the PicFont editor, thanks to which you can edit the uploaded photo by adding text and making other changes to it. Then select the test text that was automatically added to the photo and replace it by typing the desired phrase in the text field Enter a text here located on the left. To add new phrases to the photo, however, always use the text field you used just now and then click on the blue button capacitor positive (+) lead standing sideways; while to delete an inscription, select it and click on (X) red placed next to it.
Then use all the other tools to edit the text in the image: move the cursor on the adjustment bar placed next to the item To you, to resize the text; select the type of font from the drop-down menu located next to the item Font preview; click on the square next to the item Text color, to change the color of the text, and so on.
As soon as you are satisfied with the result, hover the mouse cursor over the button Save (above) and, in the drop-down menu that appears, select one of the formats available for download: JPG, PNG, PDF, etc.
canva

Didn't the solution I indicated in the previous paragraph particularly satisfy you? In that case you can try canva, a very versatile web service that allows you to create numerous graphic works, including adding writings to photos. Unlike PicFont, which I told you about earlier, Canva is a semi-free solution since some graphics are paid and requires registration in order to be used.
To insert writings on photos with Canva, first connect to its main page and click on one of the options located in the box First time on Canva? Subscribe! to indicate why you intend to use the service. Then register for free via your address email, your account Facebook or your account Google by clicking on the corresponding button and then entering your personal data in the form that is shown to you and select the type of project you want to create (Photo collage, leaflet, etc.) from the section Create a project.
At this point, select the layout you like best from the left sidebar, go up Uploads and click on the green button Upload your images and select the photo (or photos) on which you want to add text and then click on the photo preview to insert it into your project. Then click the button Text located on the left sidebar, add text to the image by selecting one of the available styles and then edit the sample text automatically inserted on the photo.
Next, use the tools at the top to change the font, size, color, spacing, and so on. While to delete an inscription (perhaps entered by mistake), select it and click on the symbol of basket always located at the top. As soon as you are satisfied with the final result, download the photo you edited by clicking on the button Download (top right) and choose the download format you prefer (JPG, PNG o PDF).
Canva is also available as an app for Android and iOS; therefore, it allows you to add writings to photos through even from smartphones and tablets.
App to insert writings on photos
Would you like to try some solutions to add writing on photos from your portable device? So what are you waiting for? Try some of the app to insert writings on photos listed below and then use the ones you like best.
- Phonto (Android / iOS) - this is one of the most popular applications for writing on photos. It allows you to use over 200 different fonts and numerous formatting styles. Phonto can be downloaded for free, but to access all the tools included in it, it is necessary to make in-app purchases starting from € 1,00 on Android and € 1,09 on iOS.
- Photor (Android / iOS / Windows 10 Mobile) - this app is also quite well known in the field of photo editing on the go. Fotor not only allows you to add writings of various kinds to images, but also offers several other useful features for photo editing. It can be downloaded for free, but some effects are available in the form of in-app purchases starting at € 1,09 per item. For more details on how this app works, please read the tutorial dedicated to apps for writing on photos.
- LetterFX (Android / iOS) - this completely free solution allows you to insert writings on photos by inserting masks of shapes, letters and numbers that create very suggestive and modern effects. To remove the advertising in the app and to unlock all the available themes, it is necessary to make in-app purchases starting from 1,09 euros per item.
- A+ Signature (iOS) - if you are looking for an app to add your signature to photos, you can't miss this semi-free solution. A + Signature, in fact, allows you to use a very complete editor that includes hundreds of fonts and numerous symbols and watermarks to apply to your shots. To access all the contents included in A + Signature and to remove the advertising banners present in its free version, you need to make in-app purchases starting from € 1,09 each. For more details on how it works, please read the tutorial dedicated to apps for signing photos.


