Install WordPress on a domain
If you have already purchased a web space and you want install WordPress directly on the domain, without “going through” your provider's control panel, all you need is an FTP program and WordPress installation files. In addition, you must also have purchased a MySQL database and be in possession of the related data (which are usually sent by email from the provider immediately after purchase).
When you are ready to start, first connected to the official WordPress site, press the button Download WordPress at the top right and, in the new open page, click on the item Download WordPress [version] to download the latest version of the CMS. If, on the other hand, you want to download another version, scroll down the page, locate the section Development resources, scegli l'opzione Downloadable Versions and click on the entry zip o tar.gz (in that case, my guide on how to open TGZ files might be useful) of the version of your interest.
Once the download is complete, open the ZIP package you just downloaded to extract the WordPress installation files and start the FTP program installed on your computer to transfer the CMS files downloaded just now to the server hosting your website. you still have one installed, I recommend using fileZilla, which I'll take as an example to show you the detailed WordPress installation procedure.
After downloading and launching FileZilla, click the button Site manager (l'icona dei three server top left), press the button New site and enter the required data in the fields Host, Port, Protocol, Encryption, Access type, Username e Password (you can find this data in the email sent by your web service provider or by contacting customer support) and presses the button Connect to establish connection with the server.
Now, select the root folder of your domain by acting in the section Remote site FileZilla, then select the main WordPress folder (the one extracted just now on your computer) on the left side of FileZilla where the item appears Local site and drag it into the server root folder. By doing so, you have initiated the transfer of data from your computer to the server. To learn more, I leave you to my guide on how to use FileZilla.
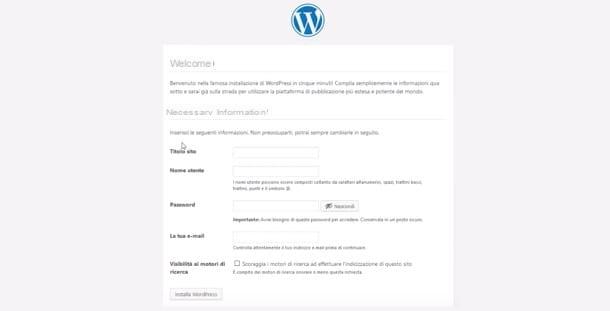
Once all the files have been transferred, open the browser you usually use for browsing the Internet, connected to your website and presses the button let's begin. In the new screen that appears, enter your MySQL database data in the fields Database name, Username, Password e Host del database and click on the button Submit. If you see the writing All right man! it means that the data entered is correct and your website is able to communicate with the database.
Pigia, quindi, sul pulsating Run the installation, insertion and date richiesti nei campi Site title, Username, Password e Email Address, click the button Install WordPress, wait a few moments and that's it. You will automatically be redirected to the WordPress admin panel and you can start modifying the look of your website and publishing your content. In this regard, my guide on how to use WordPress may be useful.
Install WordPress locally
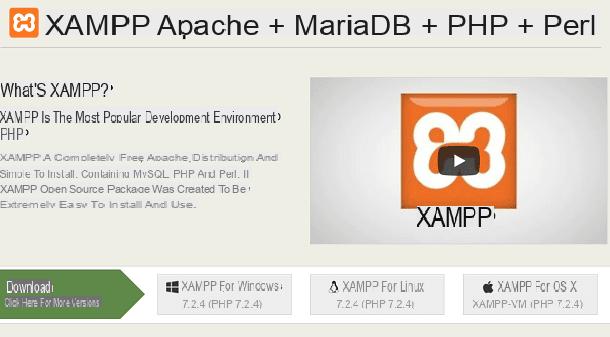
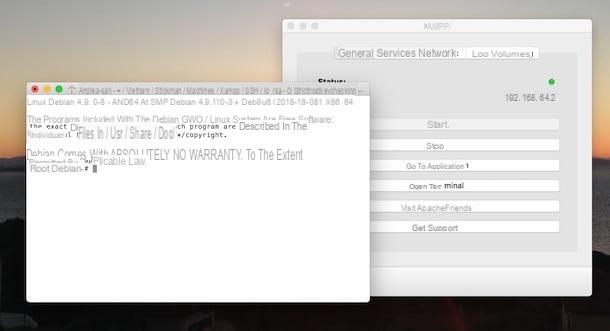
install WordPress locally you need to download first XAMPP, a free application available for Windows, macOS and Linux and which allows you to create a local server on your computer.
First, therefore, connected to the XAMPP official site and start downloading the software by clicking on an entry in XAMPP for Windows, XAMPP on Linux e XAMPP for OS X, depending on the operating system installed on your computer.
Download completed, if you have a PC Windows, double-click the file xampp- [version] .exe, pigia sul pulsating Yes and click sul pulsating Next five consecutive times to start the installation. Wait, then, for the progress bar to reach 100% and press the button Finish to complete the installation and launch the XAMPP control panel.
A Mac, april il dmg package just downloaded, move XAMPP in the folder Applications macOS and open it, then right-click on the software icon and select the item apri to bypass macOS restrictions on applications from non-certified developers (only necessary on first launch).

Once the installation is complete and XAMPP is started, press the button Home related to items Apache e MySQL if you have a PC Windowswhile on Mac click on your button Home in the main screen of the XAMPP control panel, then select the tab Services and check that next to the entries Apache e MySQL an icon is present green round. If not, select the individual items and press the button Home.
You are now ready to install WordPress locally. The simplest and least complex procedure to do this is to download Bitnami, an add-on compatible with XAMPP that you can download for free in the Add-ons section of the official XAMPP website. Then click on the item WordPress and, if you have a PC Windows, select the option Windows and click on your voice No thanks, just take me to the download to start the download.
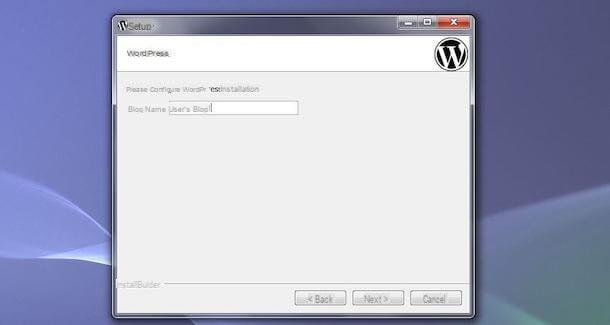
Once the download is complete, double click on the file you just downloaded, choose the language of your interest via the drop-down menu Please select the installation language e pulsing sul pulsating OKDopodiché by clicking on the button Next twice in a row, enter the required data in the fields Login, Your real name (your name is Email address (required), choose one Password access to WordPress indicating it in the appropriate fields and presses the button Next. Finally, enter the name to give to your local site in the field Blog name and click on the button Next four consecutive times to start the installation.
Once the installation is complete, press the button Finish and automatically your default web browser will open with the home page of the basic website built in WordPress. To access the Dashboard of the famous CMS, enter the address 127.0.0.1/wordpress/wp-login.php in the address bar at the top, type the access data created during installation and press the button Login.
If, on the other hand, you have a Mac, on the XAMPP page dedicated to add-ons, click on the option WordPress and choose the item Linux (the macOS module is no longer supported). Once the download is complete, start XAMPP, click on the tab Services and make sure that all available options are active, then choose the item Network and verify that the option localhost: 8080 is enabled. If not, select it and press the button Enable.
Now, click on the tab Volumes, presses the button Mount and then on the button Explore. In the new open window, click on the folder Temp and drag the file you downloaded into it (bitnami-wordpress-[versione]-module-linux-x64-installer.run), then close the window, go back to XAMPP, select the tab General e pulsing sul pulsating Open Terminal.
Then enter the command cd / opt / lampp / temp e pulsing sul pulsating Submit on the keyboard, then type the command chmod +x bitnami-wordpress-[versione]-module-linux-x64-installer.run and press the button again Submit. Finally, enter the command ./bitnami-wordpress-5.0.2-1-module-linux-x64-installer.runpigia il tasto Submit of the keyboard and wait for the WordPress installation to start.
To proceed, type the number corresponding to the installation language of your interest (eg 1 for English, 2 for Spanish etc.), indicates the folder in which you want to install WordPress and follow the instructions shown on the screen to set the Password and username to access the WordPress Dashboard and the blog name. As soon as you see the writing Setup is now ready to begin installing Bitnami WordPress Module on your computer, press the button Y on the keyboard to start the installation, wait for the message Setup has finished installing Bitnami WordPress Module on your computer And that's it.

Now, all you have to do is close the terminal, start your browser and enter the address http://localhost:8080/wordpress/wp-login.php in the address bar to access the WordPress dashboard with the credentials created during installation.
To change the WordPress language, click on the entry Settings present in the sidebar on the left, select the language of your interest (eg. cityno) via the drop-down menu next to the item Site Language e pulsing sul pulsating Save changes. To learn more, I leave you to my guide on how to install WordPress locally.
Install WordPress on Aruba
Install WordPress on Aruba it is a simple procedure that takes just a few minutes. All you have to do, if you have already bought a domain and selected the hosting services of your interest, is to access the control panel of your account and select the WordPress installation.
Then connect to the Aruba website, press the button Customer area present at the top right, select the item Customer area relative all'opzione Hosting and Domains, enter your account login details (which were provided to you via email after purchasing your domain) in the fields Login e Password e pulsing sul pulsating Log in.
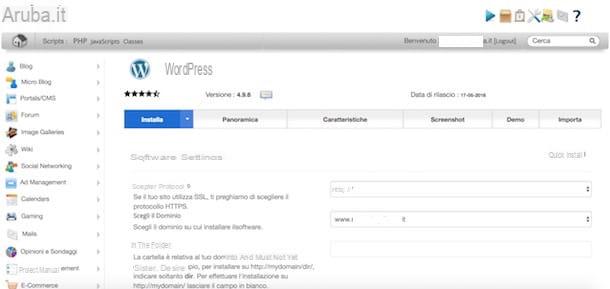
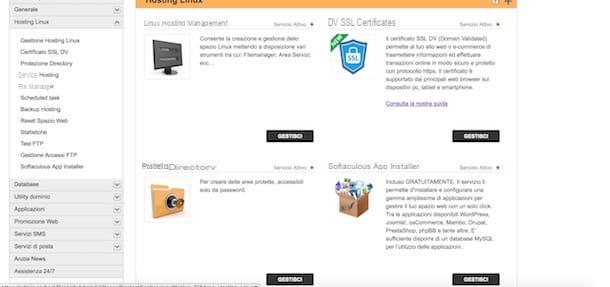
Now, locate the section Domain management and click sul pulsating Control Panel related to the domain of your interest. On the newly opened page, choose the option Linux hosting e pulsing sul pulsating Manage present in the box Softaculous App Installer, then pause with the mouse pointer over the item WordPress e pulsing sul pulsating Install.
On the new screen that appears, make sure next to the entry Mastery the website of your interest is selected, choose the protocol (Http o https) to be used via the drop-down menu next to the option Protocol and specify the folder in which you want to install WordPress in the field In the folder. Then enter the required data in the fields Name of the database, Database username, Password del database e Database host name (data that you can find in the activation email sent by Aruba).
In sections Site settings e Account admin enter the name and description of your blog and specify the data to be used as login credentials, then scroll the page down and press the button Install to start the WordPress installation. Once the installation is complete, all you have to do is connect to the login screen of your site (eg. www.nomesito.it/wp-login.php) and log in with your data. For the detailed procedure, you can read my guide on how to install WordPress on Aruba.
Install WordPress on Register
As well as on Aruba, too install WordPress on Register it is an almost automatic procedure. All you have to do, if you have already purchased a domain and a web space, is to make sure you have activated a Linux hosting and a MySQL database, which are necessary to use WordPress.
If, however, you are not yet a Register customer, connected to the hosting website, click on the item WordPress present in the main menu and choose the option WordPress hosting, then select the item Buy the service and proceed with the purchase indicating the domain of your interest and specifying the payment method to complete the purchase. In this regard, my guide on how to buy a web domain may be useful.
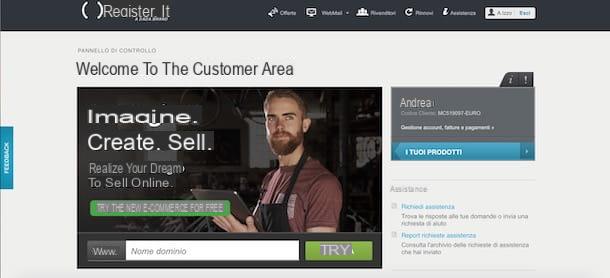
Once the service activation is complete, click the button Customer area present on the main page of Register, enter your account access data in the fields Username e Password e pulsing sul pulsating Log in. Now, in the control panel, click on the entry Your products present in the box on the right and select the domain of your interest in the section Hosting services, dopodiché pigia sul pulsnte Manage to access the CPanel of Register, locate the section Softaculous App Installer e scegli l'opzione WordPress.
Nella nuova page aperta, pigia sul pulsating install Now, make sure next to the item Choose a domain the one of your interest is selected, then specify the protocol to use (Http o https) and indicates the folder in which to install WordPress (you can leave blank if you want an installation in the root folder of your domain).
In the Site settings enter the name and Description of the site in the appropriate fields, then choose the username and Password to use to access the WordPress dashboard, scroll the page down and press the button Install. Wait, then, for the progress bar to reach 100% and that's it.
Now, type in the address www.nomesito.it/wp-login.php in the address bar of your browser and enter the data created above to start publishing content on your site.
Install WordPress on Altervista

If you have decided to open a blog with WordPress relying on Altervista, you should know that this free platform provides for the automatic installation of WordPress. All you have to do is sign up for the service, choose the name of the blog you are opening and verify your identity.
To proceed, then, connected to the main page of Altervista, click on the item Create site e pulsing sul pulsating Continue. In the new screen that appears, enter the name to be displayed in the URL of your site in the field above, specify your personal data in the fields Your name, Last name, Gender, Year of birth ed Email and apponi il segno di spunta accanto alla voce I'm not a robot to verify your identity, then put the check mark next to the option I have read and accept the terms of use page and the privacy policy e pulsing sul pulsating Continue.
To complete the registration and install WordPress on Altervista, log in to your email box, open the verification email sent by the Altervista staff and click on the activation link contained within it. Within a few moments, you will receive a second email containing the access data to your new website: then press the button Log in contained in the email (or linked to the address nomesito.altervista.org/wp-login.php), enter your login details in the fields Username e Password e pulsing sul pulsating Log in to access the WordPress dashboard.
How to install WordPress