


You were asked to make some rather urgent photocopies and, intending to remedy the matter, you immediately turned on the printer to get to work. Unfortunately, however, you have realized that the stack of sheets at your disposal is about to run out and, at this moment, you just do not have the possibility to buy a new one: therefore, you would like to understand how to print on both sides of the sheets at your disposal. , however you have never done anything like this before and you have no clue how to achieve this.
If this is exactly the case, I am happy to let you know that you are in the right place, at the right time! In fact, in the course of this tutorial I will explain to you in detail how to make double-sided photocopies, whether using a real copier or using a multifunction printer or, again, a separate scanner and printer.
So, without hesitating a moment longer, make yourself comfortable and carefully read everything I have to say on the subject: I am sure that the result will fully satisfy you. Having said that, there is nothing left for me to do but wish you good reading and good work!
Preliminary information
As I have already mentioned in the introductory lines of this guide, it is possible to make double-sided photocopies of documents of various kinds in different ways: using a copy machine professional, a device usually equipped with tray for automatic document loading (ADF), integrated scanner e duplex module; making use of a multifunction printer, which may or may not have an ADF and / or F / R form; or, finally, using separate scanners and printers, which can be "joined" in order to make photocopies, using a special software or app. During this tutorial, it will be my specific goal to explain to you how to act, depending on the tools at your disposal.
How to make a double-sided photocopy of the document
If you are interested in understanding how to make a double-sided photocopy of your identity card, or any other type of document, then this is the section of the tutorial that best suits your case: below, in fact, I will explain how to do this using a copier, a multifunction printer or, again, a printer and of a separate scanner.
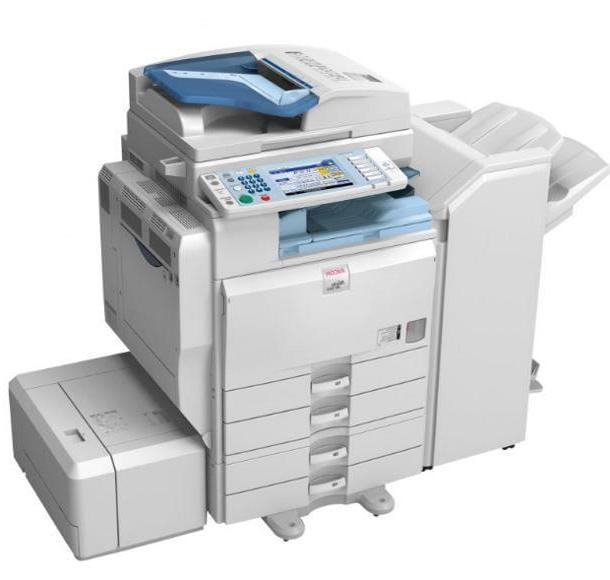
Copy machine
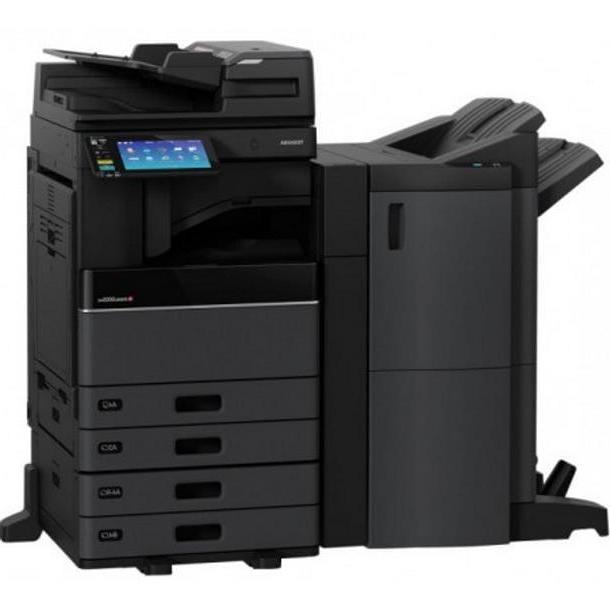
If you have a copier, you can easily print a identity card using the special function accessible via the display of the appliance. To begin with, therefore, place the document of your interest on the exposure glass, taking care to position the front towards the scanning area (usually located at the bottom).
Now, depending on the printing device in your possession, you can access the "Copy document" section in at least two different ways: by pressing the appropriate physical button located on the push button panel of the device (usually called Copy ID card), or by going to the menu dedicated to double-sided printing printer and selecting options Combines e Print ID card / ID card.
Remember, once again, that the document must necessarily be placed on the exposure glass (and not in the automatic tray), with the first side facing the scan area.
Once you have printed the first side of the sheet, turn the ID document, when requested, facing the back towards the scanning area.
The steps I have shown you in this section are generally valid for most copier models on the market; however, if you need more specific instructions, you can do a quick Google search by typing the phrase in the appropriate field photocopy of document [make and model of copier].
Note: if you are interested in printing each side of the document on a different side of the paper, you must use the copy option instead 2 sides -> 2 sides. In this case, you can also insert the document to be copied into the ADF.
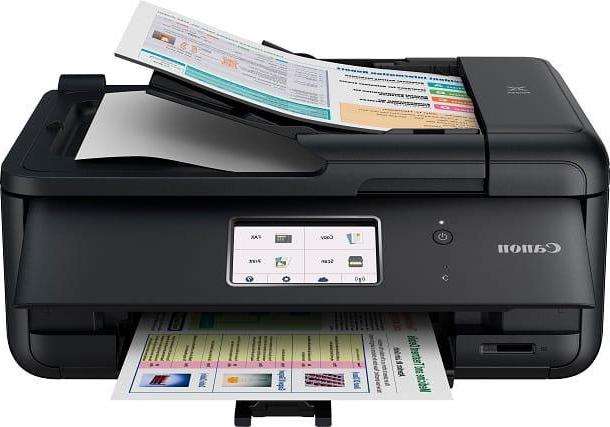
Multifunction printer
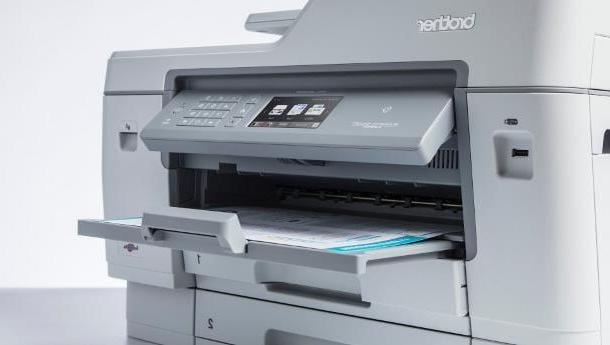
If you don't have a photocopier but one multifunction printeryou can also make photocopies of double-sided documents using the display and function keys of the printer itself. In order for the new sheet (i.e. the one on which the copy is made) to be automatically turned over, it is essential that the printer is equipped with duplex module (o F / R module): you can easily check this information in the data sheet of the printing device.
Now, if you are interested in understanding how to copy documents via printing devices equipped with LCD screen, function keys e F / R module, you can follow the steps that I illustrate below, very similar to those already seen in the section relating to photocopiers.
- Place the document to be copied on exposure glass (turning the front down).
- After turning on the printer display screen, it indicates that you want to make one copy and then choose the option for the copy of an identity document. On some appliances, it is located within the section Combined print.
- Now, if requested, indicate the type of identity document to be copied and choose whether to make it larger or smaller. Finally, specify whether to print both sides of the document on the same side of the paper, or whether to print the first side on the front, the second on the back.
- When you are ready, press the button for start printing and, if applicable, follow the instructions provided on the display to turn over the original document at the appropriate time.
If, on the other hand, you don't have a printer with a duplex module or a dedicated LCD screen, you have to act a little differently.
To begin with, place the document on the exposure glass, taking care to turn the front side down, making the two sides of the document coincide with the “borders” of the glass itself (usually, the exact position in which to place the document is imprinted on the glass).
Once this is done, press the button for make a copy (in color or black and white) and wait a few moments for the copy of the first side of the document to be completed; at this point, you can act in two different ways, depending on the result you intend to obtain.
- All the document on the same side - reinsert the sheet just ejected from the printer into the sheet loading tray, in the same verse; then open the scanner compartment and turn the second side of the document towards the scanning area. Now, to appropriately “offset” the print and avoid overlapping it with the one just made, place the document as low as possible. When you are done, press the print button, to finalize everything.
- Each side of the document on a different side of the paper - finished printing of the first side, flip the sheet just ejected from the printer and place it back in the sheet loading tray. Finally, open the scan tray, turn the document placed inside it (in order to position the second side towards the glass) and press the button of print, to conclude the procedure.
If you need help, I suggest you take a look at the user manual of your printer, or do a simple Google search with the key how to make double-sided photocopies [printer brand and model] documents (With art. how to make double-sided photocopies Brother documents).
Separate printer and scanner
How do you say? Do you have a separate printer and scanner (or a wireless printer already configured with your smartphone or tablet) and would you like to use it to make photocopies of your documents? Nothing simpler. If so, you can contact the program iCopy for Windows, or to the app Scanbot for Android and iOS; both software allow, in a very short time, to acquire documents (through a separate scanner or through the camera of smartphones and tablets) and send them to print.
iCopy
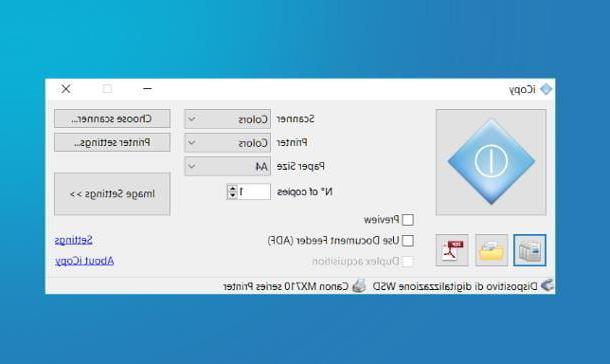
As I have already mentioned to you a moment ago, iCopy is a software for Windows able to “combine” the operation of a separate scanner and printer, obtaining, from this union, a real copier.
For iCopy to work properly, both the printer and scanner must be turned on and already configured on the computer; at this juncture, my guides on how to install a printer and how to scan may come in handy.
Having made the necessary clarifications, it's time to move on to the work: first, connected to the iCopy website, click on the button Download version xx.yy and then click on the link iCopyx.y.zsetup.exe placed under the section Installer and wait for the software installation package to download to your computer.
Once the download is complete, start the file you just obtained (eg. iCopy1.6.5setup.exe), then click the buttons Yes e NEXT, put the check mark next to the box I accept the license conditions, press the button again NEXT three consecutive times and, to complete the installation and start the program, click on the buttons Install, NEXT e Close.
In some cases, Windows may ask you, during the setup phase, to install .NET Framework: if this happens, press the button Download and install this functionality, to proceed with the automatic download of the necessary files.
In any case, once the program setup is finished, start it, using the icon located in the Start menu, and wait for the program to recognize the scanner connected to the computer. Then click on the button Choose scanner, to select the scanner to use, press successively on the dedicated button Printer settings, to indicate the printing device to be used and, if necessary, specify the scan mode (black / white, color), the print mode (black / white, color) and the size of the sheet, using the appropriate drop-down menus .
The game is practically done: place the document to be photocopied inside the scanner, with the first side facing down and, when you are finished, click on the blue button iCopy, to print it right away. Subsequently, follow the same instructions indicated in the previous section to proceed with printing the second side of the document (taking care to press, once the necessary settings have been completed, the print button on iCopy).
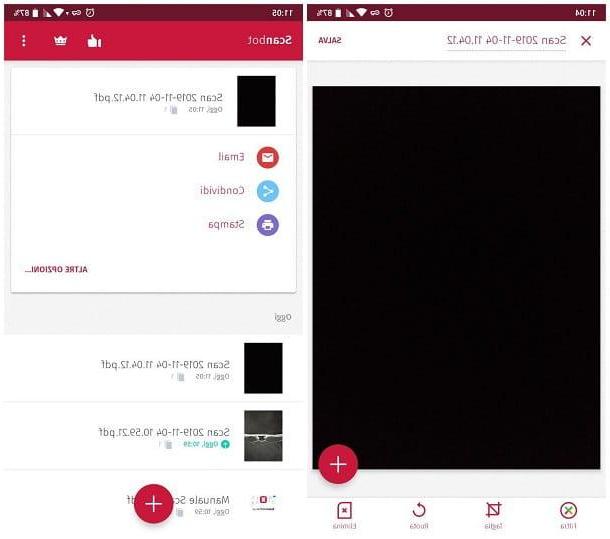
Scanbot
If, on the other hand, you do not have a scanner but have a printer compatible with smartphones and tablets, you can scan and duplex documents using the app Scanbot, available for Android and iOS / iPadOS.
For everything to go well, it is essential that the printer is turned on, connected to the network and appropriately configured on the device in use: if you have not yet done so, you can remedy the thing by following the steps I indicated in my guide. on how to connect the phone to the printer (also valid for tablets).
In any case, once the necessary preliminary operations have been carried out, start the Scanbot app and tap the button several times Continue, to view the first use tutorial; later, to continue using the free version of the app, tap on the item Salta located at the top right and, if you do not intend to subscribe to the Scanbot newsletter, do the same thing on the next screen as well.
Now granted the app to access the system camera, responding affirmatively to the warnings displayed on the screen and, when you are ready, frame the first side of the document (which I recommend you place on a clean background, preferably white) and touch the button in the shape of camera, to acquire it.
After having acquired the first side of the document, use, if you deem it appropriate, the buttons displayed on the screen to apply filters, crop or rotate the document and, when you are ready, tap on the item Save, located at the top right, to access the settings for saving the document just scanned.
At this point, if you have a printer configured with Google Cloud Print/AirPrint, you just have to touch the button Print (if you don't see it, tap the wording Other options ...) and follow the instructions given to you to proceed with printing the document. If, on the other hand, you usually print using the plugin provided with your printer, tap the button Share and select the item related to the plugin in question from the next panel.
When you have finished, flip the sheet ejected from the printer, reinsert it in the loading tray and repeat the same steps seen above to scan (and print) the second side of the document.
How to make a double-sided photocopy on the same sheet
How did you say? Vorresti make double-sided photocopies on the same sheet, transferring two different prints on the two sides of the same sheet? Then this is the section of the tutorial that best suits your case, in which I will teach you how to do this using both a copier and a multifunction printer; later, I will explain how to act even if you have a separate printer and scanner.
Copy machine
Almost all existing photocopiers on the market have duplex module (o modulo F / R), automatic loading tray of the documents to be scanned (ADF) e dedicated display from which to manage print jobs. In this case, therefore, creating double-sided photocopies on the same sheet is really very simple.
To start with, insert the two documents to "merge" into the ADF tray; if instead you need to photocopy both pages of the same document, place the first of the two sides to be scanned on capture glass, facing down.
Once this operation has been carried out, using the display on the copier, press on the option dedicated to double-sided printing (usually referred to as FR / Series / Combine), indicates your willingness to print a document front-to-back and then specify the type of printing you intend to carry out, according to your needs.
- 1 sided -> 2 sided - in this way, the first side of the document will be printed on the front of the sheet and, to proceed with the printing of the next side, it will be necessary to turn the document manually. If uploaded from the ADF, the next sheet will be photocopied.
- 2 sides -> 2 sides - in this way, both sides of the original sheet will be printed on both sides of the new sheet automatically.
In both cases, if requested, remember to select theorientation (horizontal or vertical) and any binding direction.
However, once you have chosen the option that best suits your needs, press the button Start and wait for the copier to finish the job: if you have chosen the print mode 1 sided -> 2 copies or 2 sided -> 2 copies and you placed the original document inside theADF, then you don't have to do anything else, as the copier will scan both sides of the original sheet when needed.
If, on the other hand, you have chosen to use the scanning glass, wait for the copier to ask you to insert the next sheet inside it, carry out this operation and, to complete the printing, press the key again. Start.
For more information on the operations to be carried out on specific brands and models of photocopiers, you can search on Google, using the key how to make double-sided photocopies [make and model of copier].
Multifunction printer
If you own one multifunction printer equipped with display and function keys, duplex module and / or ADF tray, then you can follow the instructions above, to make a double-sided copy of one or more sheets. In general, you should act by following the steps below.
- Place the sheet (s) to be copied within the ADF tray, or on exposure glass (turning the first side down).
- After turning on the printer display, it indicates that you want to make one copy and then choose the option for the double-sided copy o per la copy of an identity document. On some appliances, both options are found within the section Combined print.
- Now, specify whether to use the mode 1 sided -> 2 sided (you must manually change / turn the sheet, if you have used the exposure glass, or wait for the next page to be scanned, if you have chosen to use the ADF), or 2 sides -> 2 sides (The document is automatically turned over from the ADF). If prompted, choose orientation e sense of binding.
- When you are ready, press the button for start printing and, if applicable, follow the instructions provided on the display to turn over the original document at the appropriate time.
If, on the other hand, you have a multifunctional that does not have a dedicated LCD screen or a duplex module, you have to act in a slightly different way: place the first page to copy on exposure glass, face down, and press the button for make a copy (color or black and white) to start printing.
In no time, flip the sheet just ejected from the printer, reinsert it in the tray of the sheets to be used and place the second page to copy (i.e. the one that will end up on the back) on the exposure glass, then press the button again for make a copy and wait for the job to be done. Easy, right?
Separate printer and scanner
Finally, if you don't have a multifunction printer but a separate printer and scanner (or if you perform acquisition using the camera of your smartphone or tablet and a specific scanning app), then you will be interested to know that, by acting from the print settings, it is possible to obtain double-sided printing of the same.
From PC
If you use the computer, first, acquire the pages to be photocopied (preferably in PDF format), using the software supplied with your scanner, or, alternatively, following, if you deem it necessary, the instructions I have provided in this tutorial.
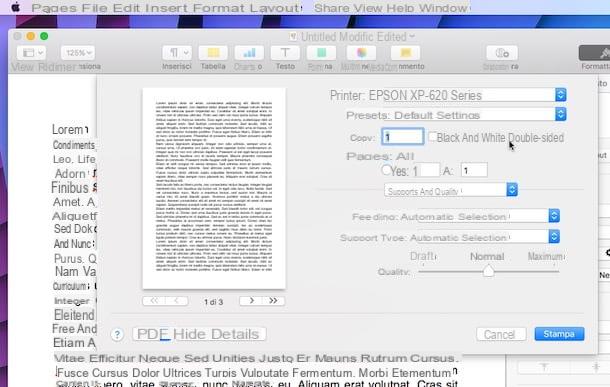
When you are done, open the document using the PDF software you usually use (eg. Adobe Reader on Windows or Preview on Mac), click on the menu Fillet collocato in alto a sinistra and selects the voice Stampa ... give the menu that you come purpose.
Now, if you have a printer equipped with duplex module, put the check mark next to the item Double-sided printing, or set the option for print on both sides and click on your tasto Stampa ..., to proceed with printing the document.
If, on the other hand, your printer does not support the duplex module, choose the option for print only the odd pages, located in the menu through which you can select the pages to print, and click on the button Print to photocopy the first part of the document.
On macOS, you can access the above settings by selecting the drop-down menu below the box Pages: su Paper handling and then choosing the option Only odd from the menu Pages to print.
After the first part of printing, flip the sheets that came out of the printer, reinsert them in the tray dedicated to blank sheets and repeat the steps seen above, printing, this time, the only even pages.
Give smartphone and tablet
Also on smartphones and tablets Before proceeding, it is essential to acquire the pages to be printed using a special app and, subsequently, to open the file containing the scans made.
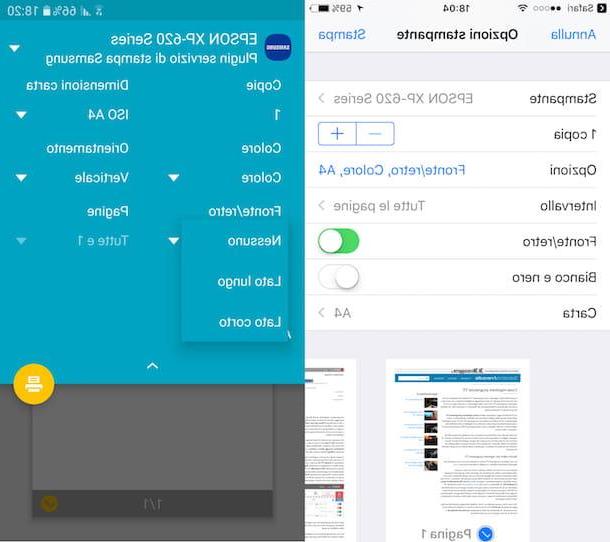
Now, if your printer supports the double-sided printing, proceed by following the steps that best suit your operating system.
- Android - tap the button (⋮) usually located at the top right and choose the option Print from the proposed menu; then, touch the drop-down menu located under the item Front / back, select one of the available options (Long side, to switch from side to side by turning on the long edge, or Short side, to get the opposite effect) and, when you're done, tap the button in the shape of printer, to start the printing phase.
- iOS / iPadOS - tap on the button sharing (The quadrato with the freccia verso l'alto), tap the menu options located in the print options screen and, finally, move up ON the corresponding levetta alla voce Front / back and play the voice Print, located at the top right, to start printing the document.
If your printer does not support double-sided printing, you can still succeed by printing only the odd pages first, then the even ones.
So, in the print preview screen, remove the check mark from all even pages visible in the preview and tap on the printer/ on the button Print to start printing the first part of the documents.
When it is over, flip the sheets that came out of the printer, reinsert them in the blank sheet tray and start printing the document again on your smartphone or tablet, this time deselecting only the odd pages.
How to make two-sided photocopies


