


By doing a bit of "cleaning" on your Facebook profile, you noticed that some photo albums have "wrong" images, that is, the photos should be in other albums and not in the ones they are currently in. So you wondered if it is possible move photos from one album to another on Facebook and, by making this request on Google, you have found this guide of mine.
Well, let me tell you that you couldn't have found it on a better page! In fact, below I will explain to you in detail how to reorder photo albums on Facebook by moving the images that are in the wrong albums. The operation is very simple to complete and can be carried out both from a computer and from a smartphone and tablet. However, at least at the time of writing, it cannot be implemented by the social network's official app for Android and iOS. You must always act from the browser.
Another very important thing to underline is that not all albums allow free movement of photos: the one called "Diary photos", for example, in which the shots uploaded to your profile are automatically inserted, tends to "hinder" the movement of photos. present within it and therefore requires additional steps: I'll tell you about it shortly. If, therefore, you want to learn more about the subject and want to know more in detail how to move photos from one album to another on Facebook, continue reading: you will find everything explained below.
Move photos from album to album on Facebook from PC

As just mentioned, the procedure for move photos from one album to another on Facebook it is of a disarming simplicity. If you want to act as a PC, the first step you need to take is to open the browser you usually use to surf the Internet, visit the Facebook home page and log into your account (if necessary).
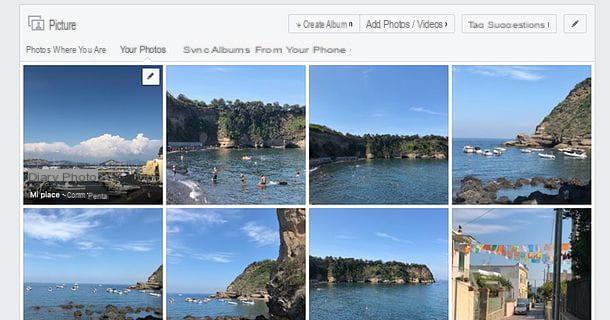
At this point, click on you don't know (top right) to access your personal profile page, select the tab Gallery (under the cover image) and go up Album (in the list of sub-tabs located above the thumbnails of the photos uploaded to your diary). Therefore, identify thealbum which contains the images you want to move and select it.

If the album you want to transfer photos from is one of Facebook's default ones, that is Diary photo (in which the photos uploaded from the computer or from smartphones and tablets are automatically saved using external apps compared to the official Facebook one) or Uploads from mobile (where, instead, the photos uploaded by the Facebook smartphone app are saved), select the tab Your Photos (in the list of secondary tabs), move the mouse pointer over one of the photos you want to move and click on the album name (Diary photo o Uploads from mobile) that appears on it.
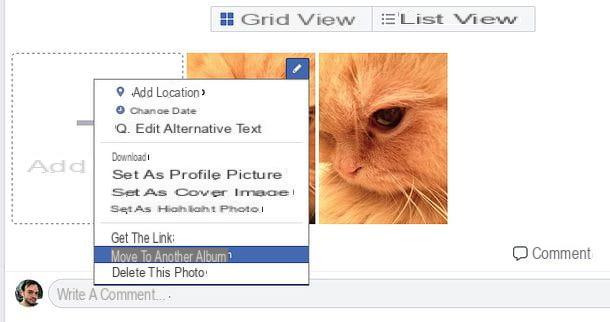
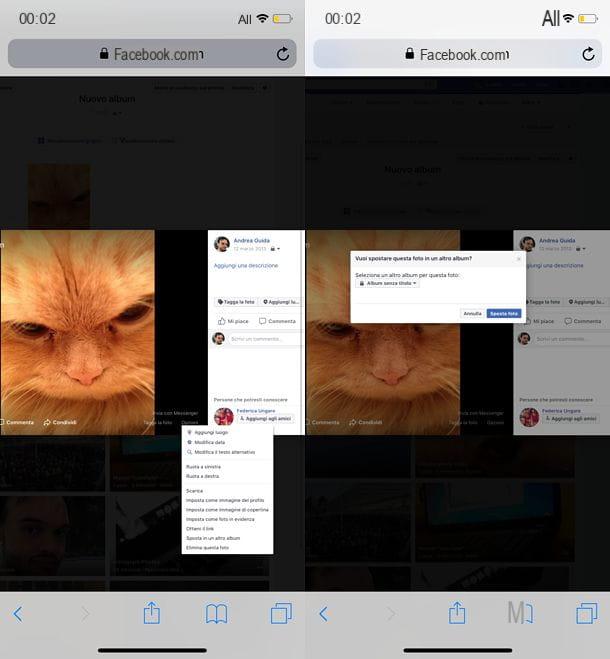
Now here we are: all you have to do is find the miniature of the photos to transfer to another album, move the mouse cursor over it, click on the icon pencil that appears at the top right and select the item Move to another album give the menu check if you press.
Alternatively, if you prefer, you can click on the thumbnail of the image to be transferred to another album, click on the item options located at the bottom left in the enlarged version of the photo and select the item Move to another album give the menu check if you press.
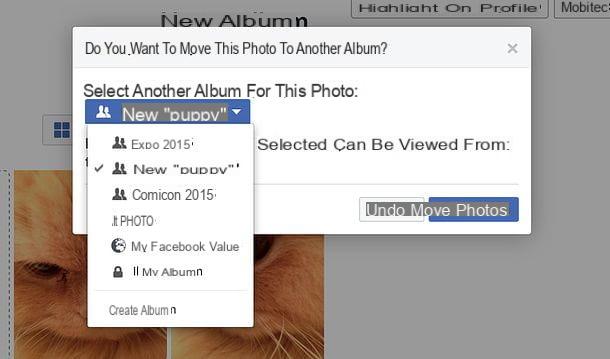
Finally, expand the drop-down menu Select another album for this photo, choose the album in which to move the image you have selected and press the button Move photos to confirm.
If you want to transfer the photo to a new album, select the option Create album and, on the page that opens, type title e Description of the album in the appropriate text fields. Then press the button Save to conclude.
As mentioned at the beginning of the post, the album Diary photo requires additional steps to be modified. To begin with, therefore, select the album in question by going to the tabs Photos> Your photos of your profile by moving the mouse pointer to the miniature of one of the photos you want to move and clicking on the item Diary photo that appears on it.
On the page that is shown to you (the album Diary photo), click on your button Modification placed at the top right, move the mouse pointer to the thumbnail of the photo to be moved, click on the arrow v that appears on it and selects the item Move to another album from the box that appears on the screen.
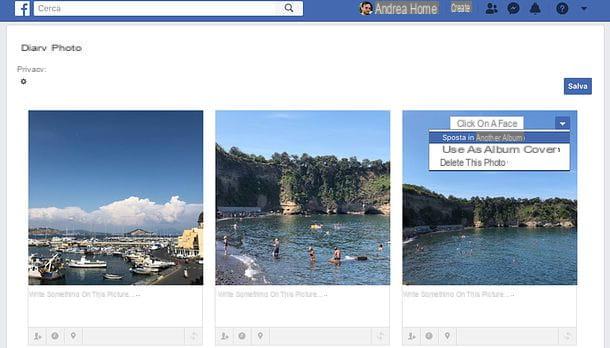
Now you just have to select the album in which to transfer the selected shot (through the appropriate drop-down menu) and click on the button Move photos, as explained a few lines above for "normal" albums.
Please note: the photos contained in the “Foto del diario” album are part of the posts in the Facebook diary. Therefore, by moving them to a different album, they are removed from the original posts and their privacy level is changed according to the privacy level of the target album.
It seems that following the Facebook update to its interface, introduced in 2020, it is no longer possible to move photos to other albums, nor to reorder those already present within it. Therefore the indications given in the previous paragraphs are valid only if you still use the "old" version of Facebook.
Move photos from one album to another on Facebook from smartphones and tablets

Do you use Facebook mainly from smartphones or tablets? No problem: you can move photos from one album to another even using your mobile device. However, as already mentioned at the opening of the post, you have to act as a browser, as it is not possible to use the official Facebook app for Android, iOS or Windows 10 Mobile, which has not yet introduced the function for moving photos.
To proceed, therefore, open the browser you usually use to browse the Internet from your smartphone or tablet (presumably Chrome if you have a device Android o Safari if you have one iOS), connected to facebook.com and, if necessary, log in to your account.
Once logged in, you need to recall the desktop version of Facebook (as the mobile version does not support the function of moving photos): to perform this operation on Chrome, press the ⋮ button located at the top right, select the item Desktop site from the menu that opens and clears the m. initial from the URL of Facebook in the address bar of the browser (in order to obtain the address facebook.com and no longer the address m.facebook.com and view the desktop version of the social network).
To perform the same operation on Safari for iOSinstead, it does a prolonged tap icon for reload the page located in the address bar (the circular arrow above), select the item Request desktop site from the menu that appears at the bottom and delete the m. initial from the Facebook URL in the browser address bar (in order to obtain the facebook.com address and no longer the m.facebook.com address).

The game is practically done! Now you just have to follow the same steps that I showed you in the tutorial chapter dedicated to the desktop version of Facebook and you will be able to move Facebook photos from one album to another.
Connect, therefore, to the main page of your profile (by tapping on the you don't know located at the top right), select the tab Gallery under the cover image and then go up Album, in order to select the album you want to act on.
If the album you want to operate on is one of Facebook's default albums, that is Diary photo o Uploads from mobile, select the scheda Your Photos, tap on miniature of one of the photos you want to move, close the enlarged version of the image that opens automatically and presses on the name of the album (Diary photo o Uploads from mobile) that appears on the thumbnail you selected earlier.
Now, press on miniature of the photo you want to move (in order to view an enlarged version), presses on the item options present at the bottom right of the large version of the image and select the item Move to another album from the menu that is proposed to you. Choose, therefore, the name of thealbum in which to move the photo from the appropriate drop-down menu and confirm by pressing the button Move photos. If you want to create a new album, select the option of the same name from the drop-down menu for choosing the destination album of the selected image.
If you want to act on the album Diary photo, as also mentioned in the previous chapter of the tutorial, you need to take a few more steps: after selecting the album in question, tap the button Modification located at the top right, touch the thumbnail of the image you want to move, press the button v that appears on it and choose the item Move to another album give the menu check if you press.
Then choose the destination album of the photo (as explained above) and confirm by pressing the button Move photos. As you can easily understand, the photos moved from the “Photos of the diary” album, being part of posts in the diary, are deleted from the latter and take on the privacy level of the album in which they are transferred.
How to move photos from one album to another on Facebook


