


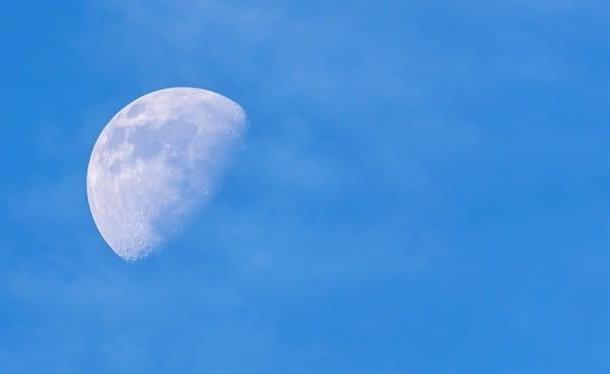
The quality of the photos you can take with iPhone has grown exponentially in recent years. Even if the cameras integrated in the "iPhone by phones" (as well as those of the smartphones made by competing manufacturers) are not yet comparable, for obvious technical reasons, to professional cameras, taking good photos with the smartphone of the Cupertino giant is not a utopia at all. . As a good photography enthusiast you are, you wouldn't mind being able to use your iPhone to take beautiful photos of one of the most immortalized subjects by photographers around the world: the Luna and, therefore, you are looking for suggestions in this regard.
Well, being able to immortalize the Moon with a smartphone is often defined as an impossible undertaking but, in reality, with the right conditions and a few small measures of a practical nature, it is absolutely feasible. I repeat: the results will not even be remotely comparable to those obtainable with a professional camera, but it is possible to pull out shots of decent quality, easily shared on social networks.
So, you are curious to find out how to photograph the moon with iPhone? Yup? So what are you waiting for? Run immediately to read the instructions I am about to give you and, above all, try to put them into practice to immortalize the natural satellite that orbits our wonderful planet. I wish you good reading and have fun!
How to photograph the Moon well with iPhone
So let's go into the heart of the topic by seeing some practical advice on how to photograph the moon well with iPhone: follow them and you will not regret!
Plan the shooting moment
Plan the shooting moment it is a fundamental operation when you want to take a landscape and / or astronomical photo. This is important when you are about to take pictures of the Moon with a camera and it becomes even more so when you want to do it with an iPhone (or any other smartphone).
Since the iPhone camera does not have the technical characteristics necessary to take pictures of very bright subjects, such as the Moon, it is important to choose a time of day when our natural satellite is not very high in the sky and the light solar has not completely disappeared yet. If you try to take a photo of the Moon when it is dark and it is now high in the sky, in fact, what you will see in the photo will probably be a big bright spot: nothing else.
How do you know when the Moon is still low and pinpoint where it will be best visible? Simple, using some apps suitable for monitoring the astronomical movements of celestial bodies (including the Moon), such as the excellent ones Night Sky e Star Map, which I explained how it works in the guide dedicated to apps for looking at the stars. Using them will also allow you to pinpoint the current moon phase, which is crucial.
When choosing the most suitable moment to immortalize the Moon, also take into account the weather (also in this case using an ad hoc app, such as Apple Weather e Yahoo! weather): if the sky is covered, it rains, there is fog or snow, it is useless to go out and photograph the Moon, since it would not be visible.
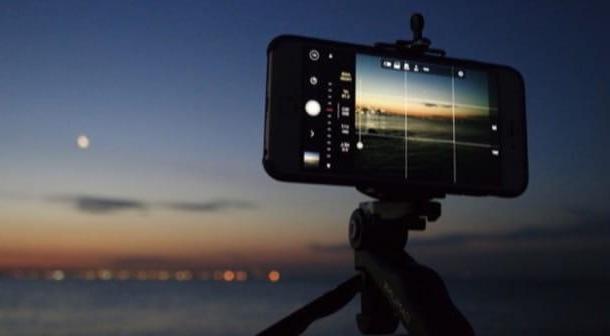
When planning the shot, also bring all the equipment you plan to use to take the photo with you. For example, you might opt to use a easel or tripod for smartphone. Using them is essential if you plan to use shutter speeds longer than usual (over 1/100 to be clear), because “freehand” you would almost certainly run into blur or, in any case, micro-blur. If you don't have a tripod / tripod, you can buy one at electronics stores in your city or online, for example on Amazon.
See offer on Amazon See offer on Amazon
Manually set the shooting parameters
Manually setting the shooting parameters is essential if you want to bring home photos that bring out the best of the Moon. Acting manually on the parameters that I will talk about shortly, in fact, will allow you to manage the iPhone camera in all respects and avoid problems that could arise due to the reflected light emanating from the Moon.
As you probably already know, the iOS Camera app does not offer this possibility, but it is easily fixed with apps suitable for the purpose. The best, in my humble opinion, are Halide e ProCam: both cost 9,99 € each and allow you to manually set the shooting parameters. In doing so, please note the following.
- ISO sensitivity - this is the value that indicates the degree of amplification of the electrical signal sent to the sensor cells. If you raise this value too much, the photo will be brighter, but you will pay the effort made by the sensor to capture more light with the presence of digital noise: that ugly grainy effect that, if it is too pronounced, could be difficult to remove in post-production.
- Shutter speed - indicates the speed the shutter takes to open and close. By increasing it, you will reduce the shutter speed and avoid running into micro-blur (which is essential if you do not have the possibility to hold the iPhone still with a support). However, increasing the shutter speed too much may result in an underexposed shot. Decreasing the shutter speed, on the other hand, will increase the shutter speed: this means that the shutter will let more light into the lens, which will make the photo brighter (even at low ISO), but even then it won't you will have to exaggerate, because you could get an overexposed photo (especially if there is still sunlight) or a photo with micro-blur (if you use the iPhone "freehand", without placing it on a stand). I advise against slowing the shutter speed too much for another reason: the Moon is moving and you risk getting a very ugly "swipe effect" when shutter speeds are long.
- Maximum aperture of the diaphragm - this value refers to the amount of light that can pass through the lens and is measured in the menu _f_-stop (Eg. f / 1.8, f / 2.5, f / 4.3, etc.). The lower this value, the more light will enter the lens. Keep in mind, however, that not all apps allow you to act on the aperture.
Therefore, try to balance the parameters that I have just listed to you in the best possible way, so as to obtain a photo correctly exposed and that does not have particularly evident defects, such as excessive digital noise or micro-blur.
If you don't feel like manually adjusting the above parameters and you have a iPhone 11 or iPhone 11 Pro / Pro Max, you can manage to get a correctly exposed photo by exploiting the Night Mode integrated into the app Camera of iOS: this is an automatic setting that takes advantage of the new wide-angle camera present in the iPhone models just mentioned.
Night Mode is activated automatically when the iPhone's ambient light sensor detects a low light situation. However, if you want, by pressing the icon of the Luna present at the top of the screen (after opening the Camera app), you can access the settings of the mode in question and adjust the duration of the photos in certain situations.
Compose the photo
Let's now move on to one of the most important phases: the photo composition. Considering the fact that you have an iPhone in one hand and not a camera equipped with a telephoto lens, being able to photograph the celestial body in great detail, with its countless craters, is impossible.
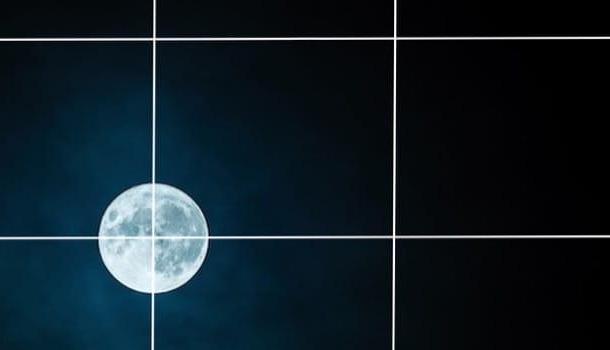
When composing the photo, how can you take this aspect into account? Trying to place the Moon in a position that captures the attention of the eye of the one who will see the shot, which can be done using the now known rule of thirds.
What's it about? When splitting the image into one grid formed 9 rectangles: instead of placing the subject (in this case the Moon) in the central rectangle, you should place it in the menu one of the four intersection points formed by the grid.
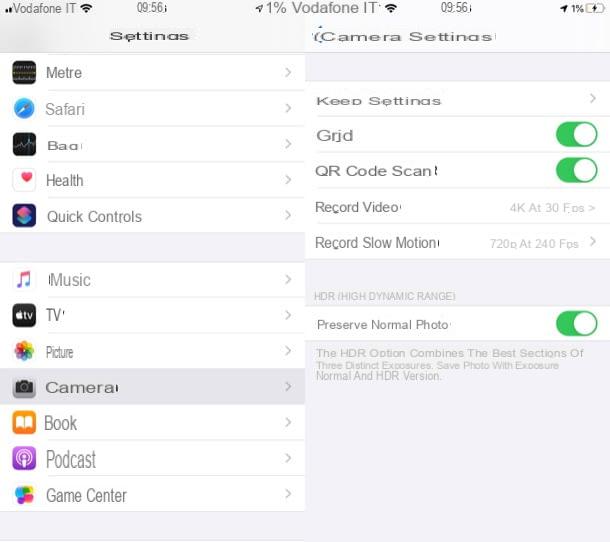
On the iPhone you have the option to activate the grid (if you haven't already done so), which is extremely useful for this purpose. To do this, go to the menu Settings> Camera and move on ON the switch lever located in correspondence with the wording Grid.
By doing this, you can be even more precise when shooting and bring out a more interesting photo. Try it and you will see that the Moon will stand out even better in the photo.
Do not perform digital zoom
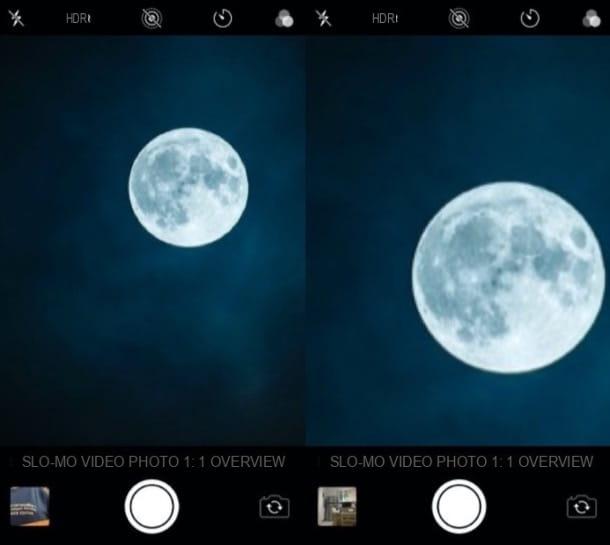
One of the most common mistakes made by novice photographers is the use of digital zoom. Unlike the optical one (only available on some iPhones as 2x and 4x zoom) digital zoom is a simple digital enlargement of the photo, which leads to a noticeable loss of quality.
This is why I invite you to do not perform digital zoom. If your iPhone allows you to do this, use it 2x optical zoom o 4x (depending on the device in your possession), but do not go further because the photo will lose us in terms of quality and final yield.
Shoot in HDR
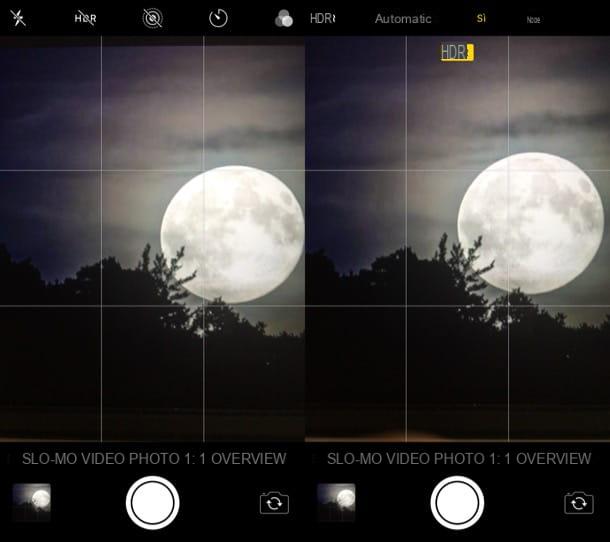
Another trick that I invite you to try to take beautiful photos of the Moon with your trusty iPhone is that of shoot in HDR. In case you didn't know,HDR (High Dynamic Range) is a technique that allows you to increase the level of details visible in a shot, as it combines multiple versions of the same image, with different degrees of exposure and brightness.
To activate this mode on iPhone, after opening the app Camera, tap on the item HDR located at the top of the screen and, in the opened menu, select the wording Yes.
If you want to further explore the topic concerning the HDR technique, know that I have published a guide in this regard: if you like, take a look.
Purchase additional iPhone lenses
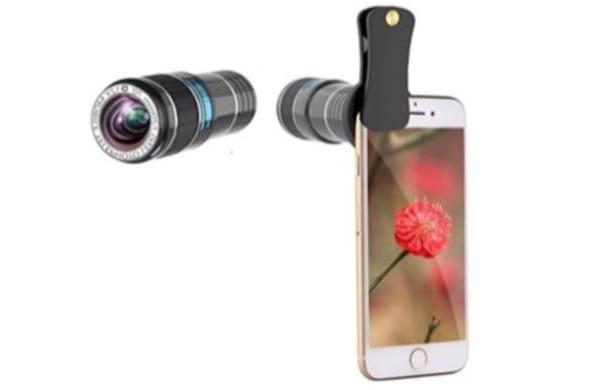
One last thing you could try to do to make Moon photos with your iPhone is purchase additional lenses, which may allow you to increase the shooting possibilities available. Some of these lenses, allow you to increase the wide angle, have a sort of telephoto lens, so as to make shots in some particular and funny ways.
Let's be clear: these are additional lenses, but they are not interchangeable lenses like those of professional cameras. Consider them accessories to use and try on if necessary, without too many pretensions, also because they cost a few tens of euros and their construction is far from excellent.
Vedi offers your AmazonIf you feel like trying out any of these additional lenses, know that they are available in the most well-stocked electronics stores and online stores, such as Amazon.
How to photograph the Moon with iPhone


