You have taken some photos in the company of your friends, you would like to share them on social networks but first, for privacy reasons, you would prefer pixellare the faces of some people portrayed in them. The problem is that you have never done anything like this before and, therefore, you have no idea how to do it.
That's the way it is, right? Then don't worry: if you want, I'll explain how to do it. If you give me a few minutes of your free time, I can in fact illustrate you how to pixelate a photo from computer (also directly online from your favorite browser) from smartphone and tablet. Contrary to what you may think, this is not a complex operation.
Then? Can I understand what are you still doing standing there? Position yourself comfortably, take a few free minutes just for you and immediately start concentrating on reading what is reported below. I sincerely hope that, in the end, you can feel very happy and satisfied with the results obtained.
How to pixilate a photo from a computer
You would like to understand how to pixelate a photo from a computer? I'll settle you immediately. Below are some of the best photo editing programs that you can use to perform the operation in question on both Windows and macOS. Have fun!
How to pixilate a photo with Photoshop
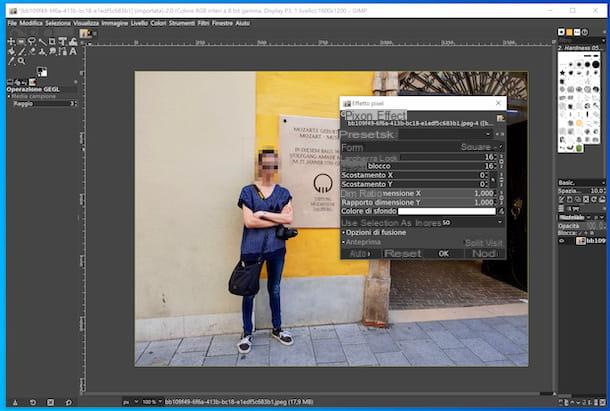
The first tool you can consider using for pixellating a photo è Photoshop, the famous photo editing software from Adobe available for both Windows that for MacOS. If you haven't downloaded and installed it yet, find out how to get its free 7-day trial version (after which it has prices starting from 12,19 euros / month) by following my guide on the subject.
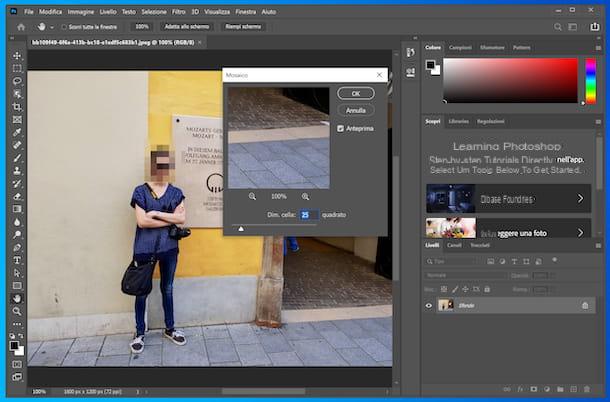
When you're ready to take action, launch Photoshop, click the menu Fillet, top left, and select the item apri from the latter to import the photo on which you want to go to act. Next, right click on the tool Rectangular selection present in the left sidebar, choose the selection tool you prefer from the menu that opens and select the portion of the photo you want to act on (holding down the click and moving the cursor).
Once this is done, go to the menu Filter (above) and choose your options Pixel effect e Mosaic from the latter. In the window that opens, select the size of the pixel cell you want to set (by moving the appropriate cursor) and click on the button OK to confirm the operation and apply the changes.
When finished, click on the item Save with name from the menu Fillet Photoshop and save the output image in the format and location of your choice. For more information on how the program works, you can read my guide on how to retouch photos with Photoshop.
How to pixelate a photo with Paint
Stai using Windows 10, you can pixelate a photo with Paint 3D, the "revised and corrected" version of the classic Paint. The only thing you have to take into account is that the software does not integrate a special function to apply the pixel effect, which is why you have to put into practice a "trick": reduce the resolution of the photo, save a copy and apply this 'last on the portion of the original size image that you want to censor, in order to obtain the grainy effect.
That said, in order to use Paint 3D, start the program by clicking on Start button (I cheer with the windows flag) che trovi nella part in fund to sinistra della taskbar and select the relevant one collegamento attached to the menu that appears. If Paint 3D is not installed on your computer, you can download it from Microsoft Store, by visiting the relevant page and pressing the button Get.
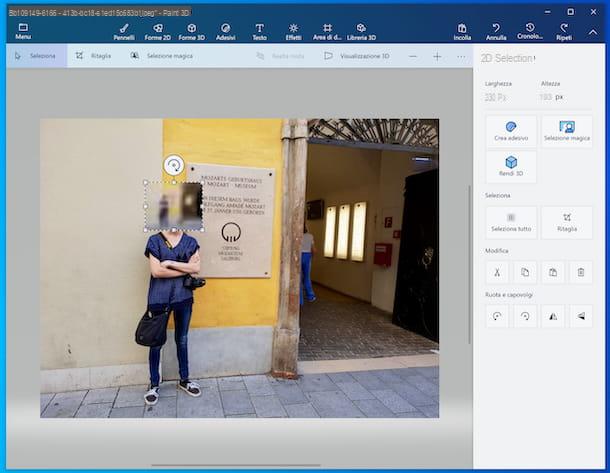
Now that you see the program window on the screen, click on the button apri, then on the button Browse files and select the photo you are interested in taking action. Now, to reduce its resolution, click on the entry Drawing area present at the top, by ticking the option Resize image with drawing area located on the right and reducing the width and height as much as possible, typing the values in the appropriate fields always on the right.
Once the changes have been made, click on the entry Menu in alto a sinistra, select the option Save with name from the box that opens, choose the option Image from the next menu and indicates the name you want to assign to the edited image and the position in which you intend to save her.
Now, click on the item again Menu of Paint 3D and open the image to which you intend to add the pixelated area, proceeding in the same way as I have already explained to you in the previous lines. Once this is done, press again on the item Menu, scegli l'opzione Inserisci from the proposed menu and select the copy of the current image whose resolution you previously reduced.
At this point, move the zoomed out image to the point of the photo where you want to apply the pixelated effect and adjust its selection rectangle, so as to enlarge it and cover the portion of your interest. By doing this, the image you previously zoomed out will be grainy, producing a pixelated effect.
To save the final result, click on the item Menu, top left, and choose the option Save. For more details about how Paint 3D works, I recommend reading my specific guide on the subject.
If you don't have Windows 10 and can't use Paint 3D, you can replicate the procedure with the classic as well Paint, available on all versions of the operating system. The steps to take are practically the same. More info here.
Other programs to pixelate photos
The solutions to pixellating photos that I have already recommended have not convinced you in a particular way and would you like me to suggest some valid alternatives? I'll settle you immediately.
- GIMP (Windows / macOS / Linux) - is considered as the best free and open source alternative to Photoshop and, as such, allows you to edit digital photos using numerous tools and functions, while also allowing you to apply a pixel filter to images to censor faces or other elements. It is completely in British and is multi-platform. For more information on how the software works, you can consult my guide on how to use GIMP.
- IrfanView (Windows) - it is a specific image viewer for Windows operating systems that includes various tools for editing photos. Among them there is also a tool to apply the pixellation effect. It is totally free.
- Pixelmator Pro (macOS) - it is a commercial software (costs 30,99 euros) specific for macOS. It allows you to perform professional-level photo editing operations, while being incredibly simple to use. I decided to mention it in my guide as it also allows you to apply the pixelated effect to images.
How to pixelate a photo online
You don't want or can't download new programs to your computer and would love to know how to pixelate a photo online, directly from the browser? I'll settle you immediately! Test one of the ad hoc solutions reported below and you will see that you will not regret it.
Facepixelizer
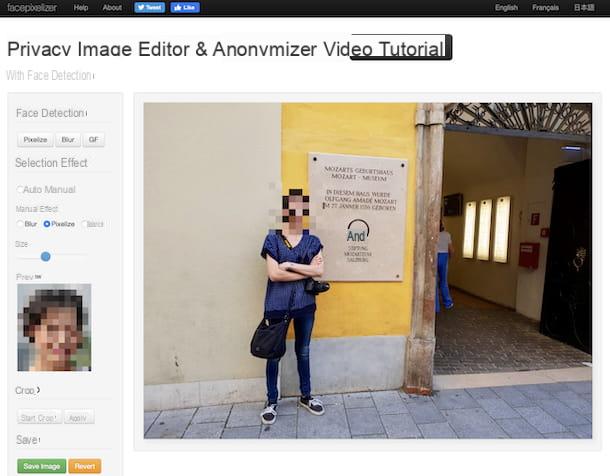
The first online photo pixelating tool that I recommend you consider is Facepixelizer. It is free, allows you to censor photos both manually and automatically, and includes various effects. It works from any browser and operating system and requires no registration.
To use it, go to the Facepixelizer home page and drag the photo on which you want to intervene in correspondence with the wording Drop Image Files Here. Once uploaded, select the option Manual che trovi in corrispondenza della dicitura Selection Effect in the menu on the left.
After completing the above steps, check the option Pixelize that you find under the heading Manual Effect and move the cursor on the adjustment bar Size to adjust the size of the pixelated effect you are about to apply.
Then see the preview of the final result in the box Preview (always on the left) and, if this satisfies you, apply the changes to your photo, drawing a selection rectangle on people's faces or on the elements you want to censor and waiting for the pixelated effect to be applied.
If you want, you can also have the service automatically censor faces. To do this, choose the option Car in correspondence with the wording Selection Effectclick on your button Pixelize that you find under the heading Face Detection and wait for the service to automatically detect faces and apply the pixelated effect on them.
When you have finished editing, download the edited image to your computer by clicking on the button Save Image which is on the left and it is done. It was easy, wasn't it?
Other online services to pixelate a photo
If you are looking for other online services with which to pixelate a photo, I suggest you immediately take a look at the ones you find in the list below.
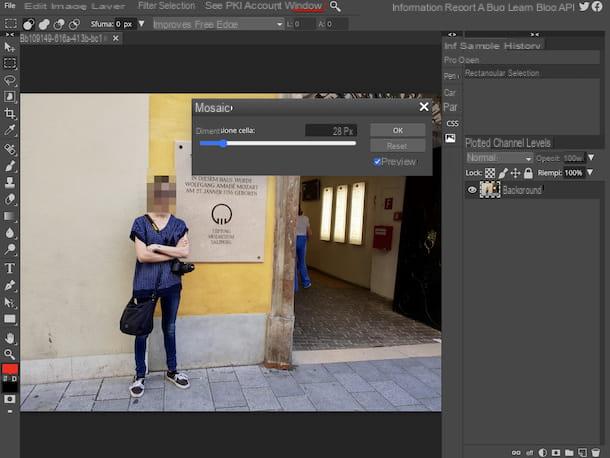
- Photopea - excellent Web tool to edit photos, very easy to use and with an interface completely translated into British. It includes various photo editing functions and tools, including the one to apply the pixel effect to images. It does not require plugins to work and it is free, but eventually it is possible to subscribe to a paid subscription (at a cost of $ 5 / month) to remove the banner ads.
- Photor - it is an image editor that can be used directly via the Web that includes various tools for editing photos, such as effects and correction tools. I decided to point it out to you as it also offers a filter that allows you to apply the pixelated effect to images. Registration is not mandatory and basic is free, but you can take out a paid subscription (at a base cost of $ 3,33 / month) to unlock additional features and remove ads.
- Pinetools - it is an online service that allows you to edit photos in various ways and that also offers a tool to censor faces and other elements in photos, applying the pixel effect to them (but not only). It's free, incredibly simple to use, and requires no registration.
Pixel photo app
Now I would like to recommend you some app to pixelate photos to be used directly on smartphones and tablets, if you need to act on the go.
Pixlr (Android/iOS/iPadOS)
Pixlr is a great photo editing app available that integrates multiple tools, including the one that allows you to apply the pixel effect to faces and other elements of your photos. It is available for both Android and iOS / iPadOS, it is very easy to use and it is free, but it offers in-app purchases (at a base cost of 1,09 euros) to unlock additional features.
To download and install Pixlr on your device if you are using Android, visit the relevant section of the Play Store and tap the button Install (alternatively, if you have a smartphone without Play Store, you can download it from an alternative store that may be present on your device). If you are using iOS / iPadOS, access the relevant section of the App Store instead, press the button Get, by your complaint Install and authorize the download via Face ID, touch ID o password dell'ID Apple.
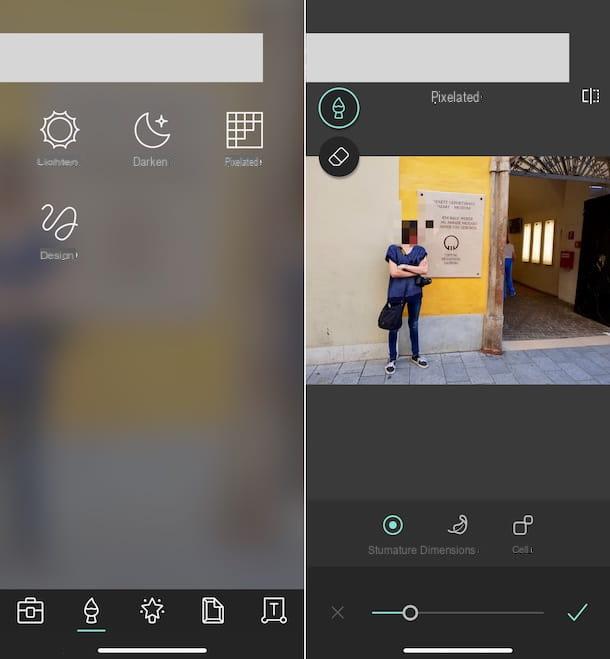
Afterwards, start Pixlrby touching the button apri appeared on the screen or theicon special addition on the home screen or in the drawer. Now that you see the main screen of the app, select the option photo, then the image to edit and tap on the icon brush present in basso.
In the new screen that appears, tap on the option pixilated, press on the screen in correspondence with the portion of the photo you want to pixelate and continue to hold down, dragging your finger, to intervene on the area of your interest. If you want, before applying the pixel effect you can use the commands located at the bottom to change the size of the brush, the degree of gradient and the number of cells, using the appropriate adjustment bar.
When the changes are complete, press on checkmark, at the bottom right, tap on the item done located at the top of the screen and choose the option Save immagine, to save the edited image on your device. Alternatively, you can decide to share the photo on one of the supported social networks or export it to other apps.
Other apps to pixelate photos
If you are looking other applications to pixelate photos, you can consider turning to the solutions you find in the list below: they will not disappoint you.
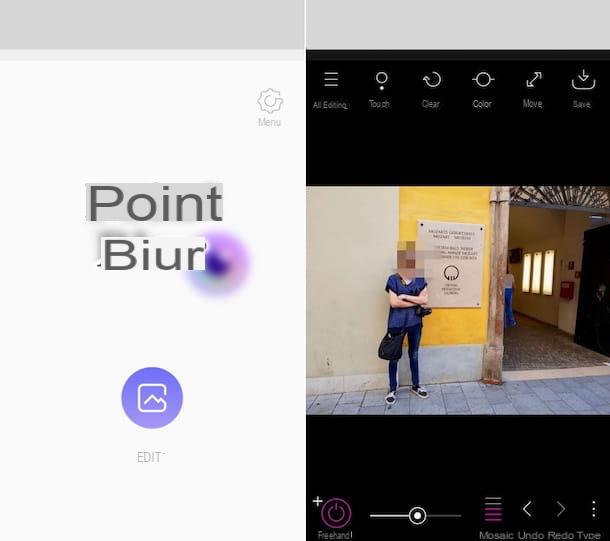
- Point Blur (Android) - free app that allows you to add pixelated and blur effects to faces and other elements in your photos, with the ability to select the size of the brush to use. It's free.
- ObscuraCam (Android) - excellent app that allows you to censor the images saved in the device Gallery or by acting on the photos to be taken at the moment. It supports the use of various ad hoc effects, including the pixel one. It's free.
- Censor photo (iOS / iPadOS) - application that allows you to pixelate faces and other elements in photos simply by swiping your finger. Basically it's free, but offers in-app purchases (at a cost of 1,09 euros) to unlock image sharing.
- Photo Blur Blur Effects (iOS / iPadOS) - application that allows you to apply many blur effects to images, as well as the pixel effect, in order to censor specific portions of photos. It's free, but offers in-app purchases (at a base cost of € 3,49) to remove advertisements and unlock additional features.