


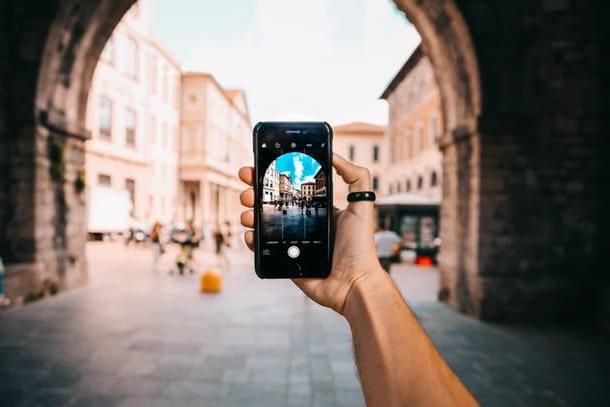
You took some photo and you would like to understand if there is a way to apply it above date, in such a way as to embellish them or in any case to remind you immediately when they were made? Would you like to insert the date of your photos in the properties of the related files, but you don't have the faintest idea how to do it? Either way, I'd say you've hit the right guide at the right time.
Be my dedicate every minute of your time, posso infatti spiegarti how to put the date on photos using some apps for smartphones and tablets or computer software used for the purpose. Contrary to what it may seem, it is not at all a complicated operation to complete, quite the contrary!
Then? Ready to get started? Yup? Great. I suggest you do not delay any longer and immediately get to work. I am sure that, in the end, you will be able to tell yourself very happy and satisfied with what you have learned and that, in case of need, you will be ready to provide useful suggestions in this regard to all your friends who are interested in the same topic. Let it bet?
Preliminary information
Before starting, it seems to me necessary to make a distinction regarding the practice object of this tutorial: when it comes to put the date on the photos, the reference can be made to two different activities, viz imprint the date directly on the images or add (or modify) the data in question in the file properties.
In the first case, it is very trivial to affix one scritta on the existing image, using apps and software suitable for the purpose; in the second case, however, we speak of the modification of EXIF data.
If you do not know what it is, I inform you that the EXIF data (acronym for "Exchangeable Image File") correspond to a series of information that the smartphone or camera used to take the photo is able to "store" at the moment. of the shot and which are then added to the file.
The information in question may refer to the creation date, place, model and brand of the camera etc. They could therefore be compared to a kind of photo ID card. They are usually added automatically to the shots, but they can still be edited or inserted “manually” (if missing).
How to put the date on photos with Android
Having made the necessary clarifications above, let's get to the core of the tutorial and let's find out, therefore, how to put the date on the photos using a smartphone or a tablet Android: you can do it through special apps, as in the case of those I have reported below.
Timestamp Camera Free
Are you interested in understanding how to put the date on photos with your Android smartphone, and stamp it directly on the images? Then use Timestamp Camera Free: it is a free and easy to use application, which, in fact, allows you to perform the operation in question, providing various options to customize the texts.
To download it on your device, visit the relevant section of the Play Store and tap the button Install. Then, start the application by pressing the button apri comparso sullo schermo oppure selecting the relative icon which has been added to the home screen.
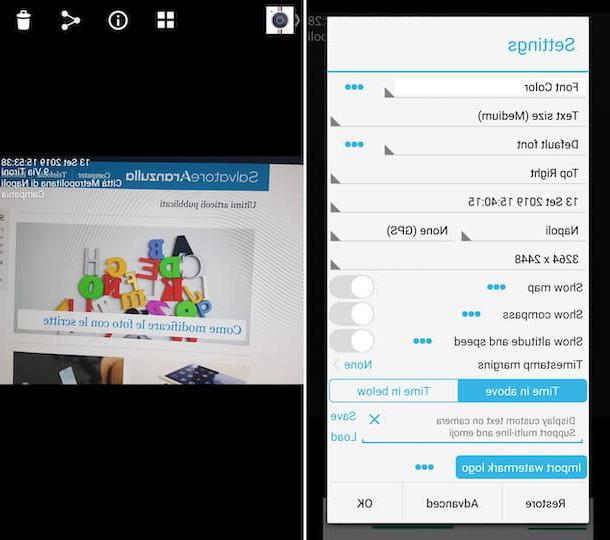
Now that you see the main screen of the app, tap on the item Consento, to allow Timestamp Camera Free to access your photos, microphone, files on the device and location, then press the icon with theclock located at the bottom right and adjust the date information you are going to imprint on the image, using the menus and options available.
Depending on what your needs and preferences are, you can change the font, text size, position etc. To access the advanced options, however, tap on the item Advanced which is located at the bottom. When the changes are completed, tap on the button OK, to confirm them.
Now that you see the main screen of the app again, take a photo, framing the subject of your interest and pressing on white circular button located at the bottom. You can also choose whether to use the front or rear camera by pressing the icon of camera, top right. To activate the flash, simply tap on the icon instead lightning which is located at the top left.
Afterwards, you will be shown the chosen image or the photo taken with the date (and any other information below) superimposed and the photo will be automatically saved in the device Gallery.
Photo Exif Editor
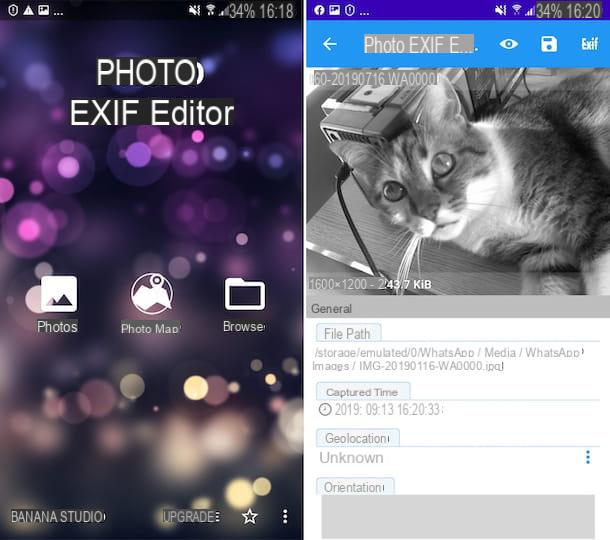
If, on the other hand, you are looking for an app that allows you to intervene on the EXIF data of the photos you have taken with your Android smartphone, I suggest you consider using Photo Exif Editor: it is a free app that allows you to view, add and edit the EXIF data of the photos, in fact. It has a clear and intuitive user interface and is easy to use. Note that, possibly, it is available in a paid variant (at a cost of 2,39 euros) which removes advertisements and adds other extra functions.
In order to download your device, visit the relative Play Store section and press the button Install. Then, tap on the button apri comparso sul display oppure selects the relative icon which has been added to the home screen.
At this point, fai tap sulla voce Allow, to allow the app to access the data saved on the device, press the button Photos and select the image you are interested in taking action. Then intervene on the fields attached to the screen that is shown to you to modify or add the EXIF data. In the specific case of the date, the field of your interest is the one below the item Captured time.
To remove the date or other information, instead, tap on the item EXIF located at the top right, check the box corresponding to the data of your interest (to remove the date, you must check the box Captured time) and tap on the icon floppy disk, top right, to confirm the changes.
Finally, save the changes made on the current photo by tapping on the del icon floppy disk that you find in the upper right part of the screen. It was easy, wasn't it?
How to put the date on photos with iPhone
Let's now pass to the side iPhone: if you are interested in understanding how to put the date on photos using iOS, read on: below you will find those that, in my opinion, represent the best applications belonging to the category in question.
Datestamper
If you want to insert the date on the photos that are in the photo gallery of your iPhone, so that it is visible directly on the image, the app used for the purpose that I would like to suggest is Datestamper. It is free, easy to use and takes the information to "print" on the image from the EXIF data of the shot of your interest. It also works in batches, on up to 10 photos at a time. Eventually, it is possible to circumvent this limitation through in-app purchases (at the base cost of 2,29 euros), which also allow you to unlock other extra functions.
To download it on your device, visit the relevant section of the App Store, press the button Geton that one Install and authorize the download via Face ID, touch ID o Password Apple ID. Then, start the app by pressing the button apri comparso sullo schermo oppure selecting the relative icon on the home screen.
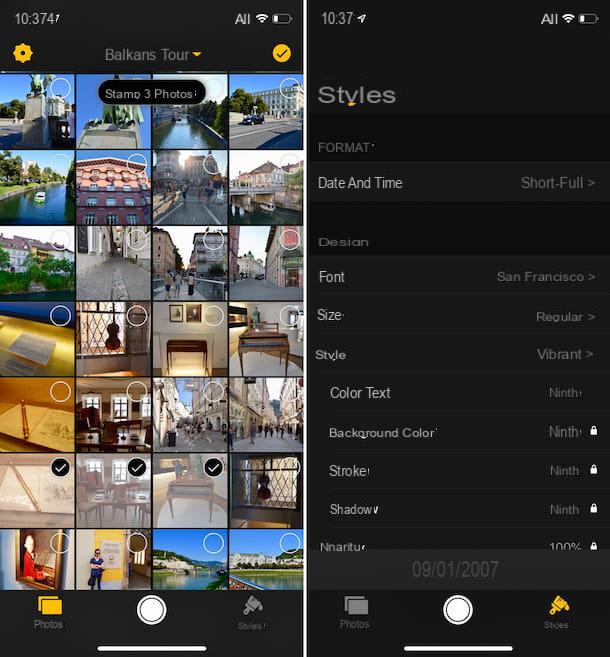
Now that you see the main application screen, tap on the item Skip, at the bottom right, to skip the intro, press the button OK, to grant it the necessary permissions to access yours photo, and select the images on which you want to intervene, placing a check mark on those in the list.
Afterwards, tap the button Stamp [n] Photo (instead of [n] the total number of selected images is indicated) placed at the top, press on the item Modification and then on that OK. Done!
If you want, moreover, before adding the date on your photos, you can make changes to the data in question: to do this, tap on the image of your interest on the main screen of the app, touch the icon of theclock at the top and set the date via the on-screen menus. Finally, confirm the changes made by selecting the item Change Date which is located at the bottom. If you want, you can also do the same with the timetable, after selecting the card Time.
Please note that you can also change the font, size, style, color and format of the data to be imprinted on the photos: to do this, tap the button Styles located at the bottom right of the main application screen and use the on-screen menus to make various adjustments. In the lower part of the display you will be able to preview the final result.
Exif Manager
If you are looking for an app that allows you to put the date on your photos, but going to act on the EXIF data of the same, you can try Exif Manager. It's free and, as the name implies, it does only one thing but does it great: edit image metadata.
To download the app on your device, visit the relevant section of the App Store, tap the button Ottieni / Installa and authorizes the download via the Face ID, touch ID or by entering the Password of your Apple ID. Then start the app by pressing the button apri comparso sul display oppure selecting the relative icon which has been added to the home screen.
Ora che visualizzi la schermata principale dell'app, fai tap sul pulsating OK, to grant you the necessary permissions to access the photos, and select the image you wish to intervene in.
Then press the button with the pencil and the calendar which is located at the bottom and use the menu that is proposed to you to adjust the month, year, day and time of shooting. Next, tap the button Edit and on the voice Modification, to grant the app the necessary permissions to be able to proceed with the changes.
How to put the date on photos from PC
You want to put the date on the photos by acting from computer? This is feasible, of course. To do this, I recommend that you use the program XnConvert: it's free, available for Windows, macOS and Linux, and allows you to edit photos in batches, applying a wide range of effects and filters to them. It also allows you to stamp the date on the images and to intervene on the EXIF data of the same, which is why I have chosen to suggest it.
To download XnConvert on your computer, go to the program's website and click on the button Win 64bit setup or on that Win 32bit setup (if you are using Windows, depending on the version of the system installed on your PC) or the one with written on it Mac DMG 64bit (if you are using MacOS).
A scaricamento ultimato, is stai using Windows, april il .exe file obtained and click the button Yes. Then click on the button OK, check the box I accept the terms of the license agreement and click sul bottone NEXT four consecutive times. Finally, press the buttons Install e end, but will conclude the setup.
Se, invece, stai using MacOS, april il package .dmg got it, drag theXnConvert icon present to your internal nella cartella Applications on your Mac, right-click on it and select the item apri twice in a row, in order to start the program, however, going around the limitations applied by Apple to applications from non-certified developers (an operation that must be carried out only at the first start).
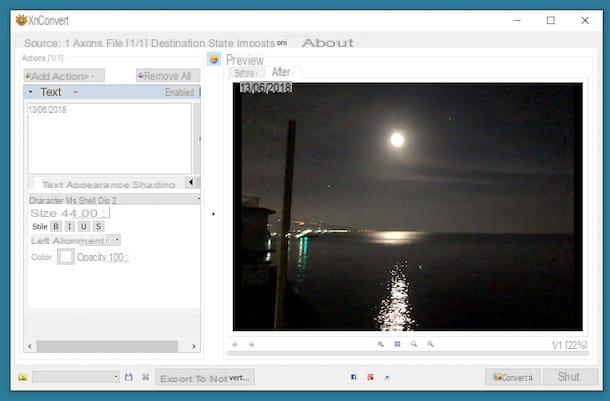
Now that, regardless of the operating system used, you see the software window on the screen, make sure that, at the top, the tab is selected Origin (otherwise you do it yourself), click on the button Add files at the bottom and select the photos you are interested in taking action. If all the photos are contained in a specific folder, you can also select it directly by clicking on the button Add folder or, again, you can drag the photos to edit into the software window.
Then, to stamp the date on the images, move to the tab Actions (above) of XnConvert, click on the button Add action, select the voice Imagewhy are you cheating? Text and type in the box you see appear on the left the date you want to insert on the photo. To make changes to the position, style and appearance of the text and to add a shadow to it, use the fields and menus that you find in the appropriate tabs located a little further down. The preview of the changes will be available on the right.
To change the EXIF data of the photos, however, always go to the card Actionsclick on your button Add action, select the voice Image, then that IPTC-IIM/XMP and fill in the fields available in the left section with the date and other information of your interest.
To conclude, in both cases, click on the button Converted, bottom right, and your photos will be saved in the same location as the original ones. If you want, however, you can change this behavior by going to the tab Destination (located at the top) of the program and adjusting, according to your needs, the various settings available.
How to put the date on Instagram photos
Still on the subject of dated photos, it seems logical to explain to you how to proceed even in the case of Instagram, the photographic social media par excellence, more precisely when stories are created and shared.
You must know, in fact, that the service provides special tools through which to decorate and enrich the images that are posted and that can also be used to add the date. Below you will find explained how to do it, acting both through the application for Android, iOS e Windows 10.
Android / iPhone

Su Android and iPhone, to put the date on Instagram photos, the first step you need to take is to open the application on your device and start creating a story or add new content to the one already created, by tapping on the symbol of the camera located at the top left (or on the your profile picture, which you always find at the top left).
At this point, if the photo you want to insert in the story is in the roll of the smartphone, tap on thepreview of images, at the bottom left, and select the content to publish from the next screen.
If the content has been created for more than 24 hours, the date will be added automatically. If you wish, you can change the color of the writing, by tapping on it, and the position, by pressing on it and, continuing to hold, by dragging it to the point you prefer.
If, on the other hand, you choose to share content created in real time or, in any case, for less than 24 hours, you will have to add the date manually. To do this, click on the icon Aa located at the top right, select the colore you want to use for the text (using the commands available below) and it style you prefer (from the menu at the top), type the date using the virtual keyboard and tap on the item end, top right. If, after adding the date, you want to move it to a different place, press on it and, continuing to hold, drag it to the new position.
Finally, to proceed with the online posting of the photo with the date in the story, touch the item The tua storia, bottom left, and that's it. If, on the other hand, you prefer to share the story only with your closest friends, select the item Closer friends that you always find at the bottom of the screen, while to set different sharing options, press the button Send, located at the bottom right.
Windows 10
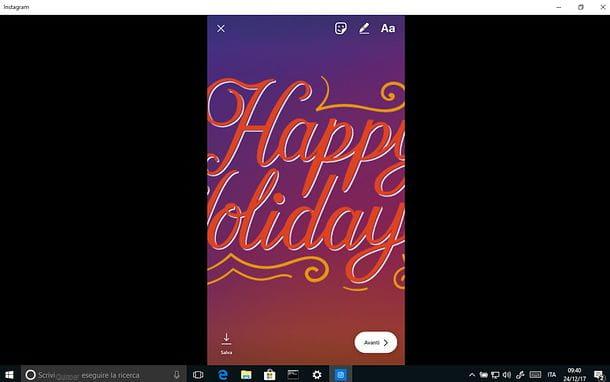
You use the Instagram application for Windows 10 and would you like to understand how to insert the date on the photos you publish in the stories? So do this: open the program on your PC, click on the button with the symbol oflittle man and selects the your profile picture, in order to start a new story or add further content to the one already in existence.
Select, therefore, the photo of your interest, by first clicking on the icon with the picture with the mountains which is located at the bottom left, or take a photo at the moment using your computer's webcam, by pressing on white circular button which is located at the bottom.
Then click on the icon Aa which is located at the top and enter the date of the photo "by hand", typing it with the computer keyboard. If you want, you can also customize the color to use for the text (using the commands available below) and the style (from the menu at the top). To move the added text to a different point, instead, click on it and, continuing to hold down, place it in the point you prefer, then release the "grip".
To conclude, click on your button NEXT and click your bottone Send, found on the next screen. If you want to make the story visible only to certain users, instead, put a check mark next to names of your interest (you can also search for them using the appropriate field at the top) and, to publish it, always press the button Send.
How to put the date on photos


