


How many times have I told you? The photos you take with your smartphone (or tablet) must not remain on the phone's memory: you must regularly archive them on your PC and create backup copies on hard drives and external memory cards. Alternatively, you can save them on a cloud storage service, so as to be sure that they are always accessible.
You, on the other hand, nothing, you have continued to do your own thing, and now you find yourself with a dozen shots you cared about a lot, vanished into thin air. How do you say? Is it the fault of an app that promised to delete useless files from Android and duplicates from the Gallery? It does not matter. The damage is now done and you must try to remedy it. So, roll up your sleeves right away and find out how to recover photos on android thanks to the programs and applications that I am about to recommend. With a bit of luck, you may be able to restore all lost shots.
Before you get to work, however, a premise must be made: you cannot work miracles! In other words, if the memory areas that hosted your photos have been overwritten by other data, unfortunately nothing will be able to recover them: neither the resources I'm about to tell you about nor anything else. Clear? For the same reason, it is good to use the device as little as possible while waiting for the recovery of the photos (to prevent other data from occupying the memory areas where there are the photos to be recovered). It will therefore be my concern to advise you first of the programs for recovering photos from PC and then of the apps to use directly on your smartphone or tablet. Having said that too, let's put the chatter aside and take action!
Preliminary operation
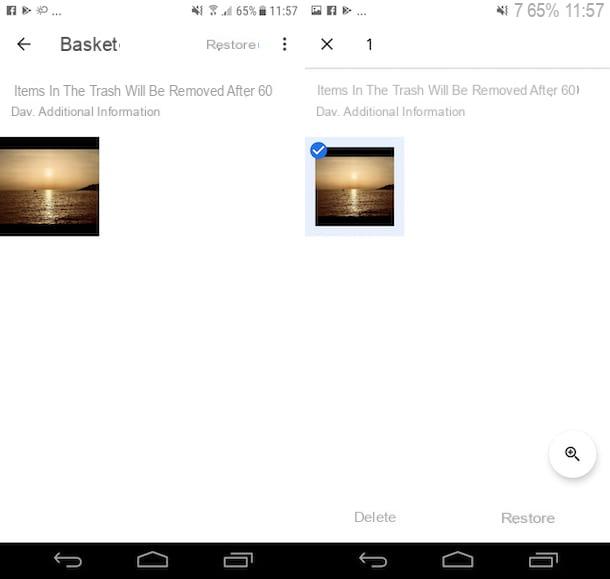
Before explaining yourself in detail how to recover deleted photos on android using data recovery solutions, I want to ask you a very important question: on your smartphone or tablet do you use Google Photos (the online image management and archiving service offered by Google)? So I have good news for you: when you delete a photo from the service, it is not permanently deleted from the device memory, but is moved to the Trash can, a temporary folder in which it remains for another 60 days before it is permanently removed.
So, if it hasn't been 60 days since you removed the photos you now want to recover, you can take a look at the Google Photos Trash and, if the images are inside it, you can restore them without any problems.
To do this, open the application in question on your smartphone or tablet by tapping on the relevant one icon that you find in drawer, press the button with the three lines horizontally collocato in alto a sinistra and selects the voice Trash can from the menu that opens. In the new screen displayed, long tap on the first photo you want to recover, select all the other images that interest you and press on the item Restore located at the bottom right.
Alternatively, you can also act as a PC, by connecting to this web page and logging in, if necessary, with the Google account configured on your smartphone or tablet. This will access the Trash of the web version of Google Photos and you can restore your photos from there.
Programs to recover deleted Android photos
Be vuoi scoprire how to recover photos on android in the case of photos deleted from the device and you have a computer at hand, you can make use of programs for the recovery of images (and other types of files) that you find below. There are both for Windows that for MacOS e Linux. I sincerely hope they can help you.
PhotoRec (Windows / macOS / Linux)
If your Android smartphone or tablet supports the use of a microSD, you can remove it from your device, insert it into the player connected to your computer and analyze its contents with PhotoRec, to attempt to recover deleted photos.
In case you have never heard of it, PhotoRec is a free and open source software that allows you to recover deleted files from any type of drive: hard drives, USB sticks, SD cards etc. It is compatible with Windows and macOS and Linux but only for Microsoft operating systems it comes complete with a graphical interface. Note, however, that it does not work if the device's SD card has been set as the primary storage unit. Comes bundled with TestDisk, another free software for partition recovery.
To download PhotoRec, the first step you need to take is to go to the program's website and, if you are using Windows, click on the link Windows 64 bit (if you are using 64-bit Windows) or on that Windows (if you are using 32-bit Windows) that you find under the heading TestDisk & PhotoRec x.x present at the top.
After downloading, extract theZIP archive obtained in any folder and start the file qphotorec_win.exe present inside. Next, insert the memory card of your Android smartphone into the reader connected to the PC.
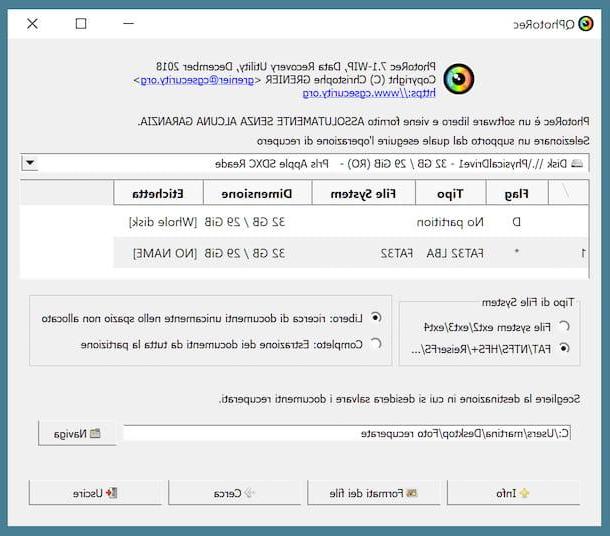
At this point, in the PhotoRec window that opens, select from the drop-down menu at the top theunit where you inserted the SD card, click on partition from which you intend to recover the photos (ex.
), select the items FAT / NTFS / HFS + / ReiferFS e Free that you find below and click on the button File formats.
In the additional window that appears on the screen, click on the button Reset, select i formats of files you want to recover from the SD card (eg. JPG e PNG) and click on the button OK.
Per concludere, premium pulsating You may also like..., indicate the folder in which you want to save the photos once they have been recovered and click on the button Search, to start the scanning procedure. When finished, you will find all the photos recovered by the program in the folder you chose earlier.
Se, invece, stai using MacOS, to use PhotoRec proceed as follows: after connecting to the program website, click on the link Mac OS X Intel, extract thearchive tar.bz2 which is downloaded to your computer in any folder and launches the executable photorec contained within it, by right clicking on it and selecting the item apri give the menu to compare.
In the window of the terminal that is shown to you, use the right arrow keypad to select the option Sudoschiaccia il tasto Submit (still on the keyboard) and type the Password of your user account on macOS, in order to start the application as an administrator.
Next, insert your Android mobile's memory card into your Mac's SD reader, select theunit from which you want to recover the photos, indicate the partition of your interest, choose the file system with which the latter is formatted and indicates whether you want to scan only the space marked as free (Free) or whether to thoroughly check the whole unit (whole).
Finally, select the folder in which to save the recovered images, press the button "C" on the keyboard to confirm the choice made and wait for the procedure to be completed.
iReparo for Android (Windows / macOS)
Another great software you can appeal to to recover deleted photos from Android is iReparo for Android: it is a program, compatible with Windows and macOS, which allows you to recover deleted photos, videos, messages and other files from smartphones based on the Google mobile platform.
It is paid (costs $ 49,95), but can be used in a free trial version, which allows you to check which files can be recovered with its full version.
To download the trial of the program, go to the official website of iReparo for Android and click on the item first Windows or your voice Mac (depending on the operating system you use on your computer) and then on the button Download.
When the download is complete, if you are using Windows, april il .exe file obtained and, in the window that appears on the desktop, click the buttons Yes e OK. Select quindi la voce I accept the agreementclick on your button Next for four consecutive times and, finally, press the buttons install e Finish.
Se, invece, stai using MacOS, start the package .pkg that contains the program and, in the window that opens, first click on the button Continue twice in a row and then on that Install. Type in the Password of your user account on macOS and complete the setup by first pressing the button Install software and, in no time, his quello Move.
Now that, regardless of the operating system used, you see the software window, connect your Android smartphone or tablet to your computer and wait for this to be recognized by iReparo for Android. If this does not happen, take the device, go to the section Settings> Developer options of the same and select the option USB debugging. If he menu Developer options is not available, go to Settings> About phone and tap 7 consecutive times on the item Build version or on that Serial number, in order to enable it.
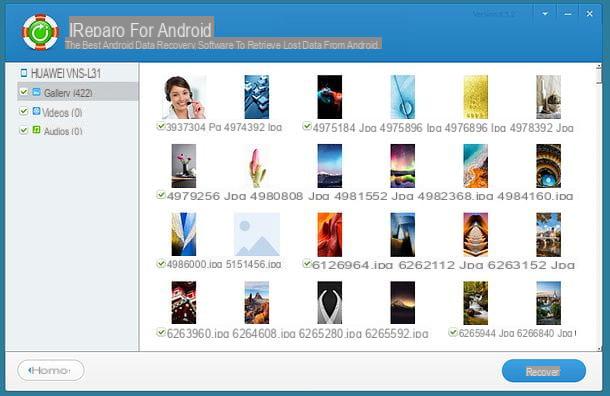
Successively click on your button Multimedia in the program window, select i formats of files related to the photos you want to recover (eg. JPG e PNG) and press the buttons Next e Home, to start the scanning procedure.
When the process is complete, select the item Gallery from the sidebar of the software window and you will be shown the photos that can be recovered. If you decide to buy the full version of iReparo for Android, you can select the thumbnails of the images of your interest and export them to your computer by clicking on the button Recover.
App to recover deleted Android photos
Let's move on now to the app to recover deleted photos on Android: these are tools that are easy to use, even by those who, a bit like you, do not consider themselves exactly a "geek". However, keep in mind that they require the presence of the root on the device.
In case you are not aware of it, root is a procedure by which you bypass the standard Android restrictions, in order to allow the execution of apps that need access to the deeper areas of the system. You can find everything explained in detail in my tutorial on how to root Android.
DiskDigger
DiskDigger is one of the best free apps to recover photos on Android. It has an extremely intuitive user interface and is able to do its job quickly enough. Eventually, it is also available in a paid version (which costs 3,37 euros), which also allows you to recover other file formats, but you shouldn't care.
To download it, visit the relevant section of the Play Store and press the button Install. If necessary, authorize the operation by also pressing on Accept. Once the download and installation procedure is complete, open the app by pressing the button apri appeared on the screen or by tapping on his icon in drawer (the Android screen where the icons of all the applications are grouped).
Once the main application screen is displayed, tap the button Conceded, to authorize it to run with root permissions. Then select the item No, thanks in response to the invitation to purchase the Pro version and choose theunit from which to restore the photos: it is almost certainly the one with the largest capacity and the name in bold.
Then put the check mark next to the item JPG and / or to that PNG (if you want to recover the screenshots too), tap the button OK to start scanning the drive and press on the item Allow to grant the app permissions to access the photos.
As DiskDigger does its work, you will see thumbnails of recoverable photos appear on the screen of your device: put the check mark on the ones you want to restore, press the icon of the floppy disk che si trova in alto a destra e seleciona la voce Save selected files locally from the menu that appears, to complete the operation.
Undeleter Recover Files & Data
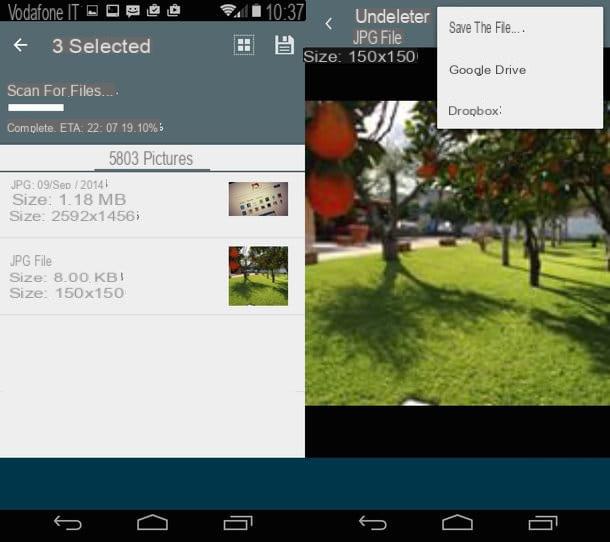
If DiskDigger fails to recover all the photos you care about, you can try Undeleter Recover Files & Data, another data recovery app that's a little slower than DiskDigger at finding files, but still does a good job. It is free, but only in its basic version, which allows you to recover only photos, while to restore documents, archives and other types of files you need to switch to the paid version, through in-app purchases (at a cost of 4,99 EUR).
To download the application, visit the relevant section of the Play Store and tap the button Install. If necessary, authorize the download by also clicking on Accept. Once the download and installation procedure is complete, open the application by selecting the button apri appeared on the screen or by tapping on his icon in drawer.
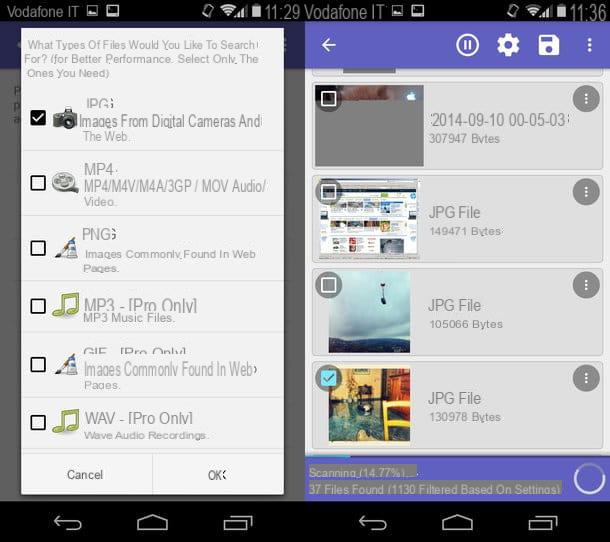
Now that you see the main screen of the app, tap the button first Next e poi quello Conceded, to grant root permissions to the application. When the operation is completed, press the button again Next and select l 'unit from which to recover images (eg. Internal storage). So choose the file types you want to restore (JPG e PNG) and tap the button Scan, to start the device check.
The thumbnails of the recoverable photos will automatically appear on the screen as the scan proceeds: to restore an image, touch its preview, press the button with the three dots vertically collocato in alto a destra and seleziona la voce Save the file give the menu to compare.
How to recover Android WhatsApp photos
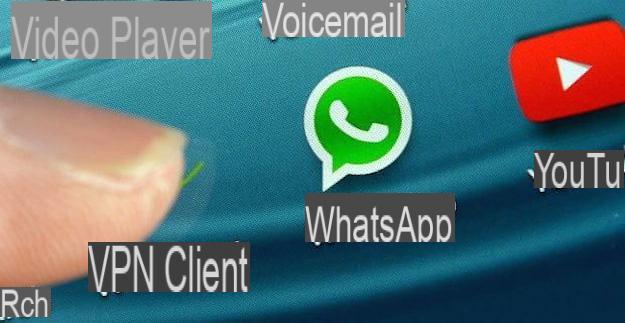
You are interested in understanding how to recover the photos on Android that you received through WhatsApp and what time have you canceled? Well, know that, to do this, you just need to use the programs and apps I told you about in the previous steps.
The procedures to be implemented are practically the same, nothing changes, as the images received through the famous messaging service are stored on the device's memory just like the photos in the Gallery.
Alternatively, you can try to recover photos from backup of the application, provided, however, that the last backup saved by WhatsApp on the Internet (on Google Drive, to be precise) or on the smartphone memory is prior to the date on which you deleted the images you intend to restore. For all the details of the case, I refer you to reading my guide specifically dedicated to how to recover WhatsApp photos.
How to recover broken Android photos
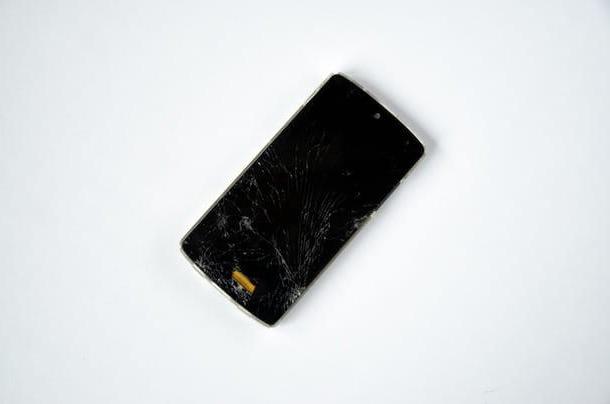
Your Android device accidentally fell to the ground, yes it is Broken and you can't turn it on anymore? Nice trouble! But if the thing that worries you the most are the photos stored in it, know that perhaps all is not lost.
If you use a external memory card to store photos and other data, you can try to recover the images saved in it by connecting the microSD to the computer and using special programs, as in the case of PhotoRec, which I told you about at the beginning of the guide.
If, on the other hand, you used Google Photos to store photos in the cloud, you can connect to the service with your account from another smartphone or tablet, and take the images saved on the Net from there, as I explained to you in my guide on how to recover photos from Google Photos, or, if in the past you had deleted them by mistake, you can try to restore them by putting into practice the instructions on what to do that I gave you in the dedicated step in the central part of this guide.
And if the device is not equipped with an external memory card, another way to go is to take it in assistance and request the recovery of the data contained within, but I must warn you that this is an expensive operation and that, not always, it is successful.
There are also other "tricks" suitable for the purpose. For example, you can try to bring the device back to life replacing the battery. For more details, I refer you to reading my specific tutorial on how to recover photos from a broken phone.
How to recover Android photos


