


Did you also delete some photos you cared about by doing a little cleaning on your smartphone? Do not despair, it happens to everyone to make mistakes, and then the last word is not yet said. If the portion of memory on which the images were hosted has not yet been overwritten, that is, it has not yet been occupied by other data, you can restore your photos and get them back (at least in part). I assure you it's not difficult, just use the right tools.
What are the "right tools" to which I refer? Fortunately, there are several you can turn to: some work directly from your smartphone, while others require the use of a PC. Choose the solution that best suits your needs and try recover deleted photos from mobile. Below you will find the instructions you need.
The solutions we are about to sift through work with both Android terminals and iPhones, are compatible with all popular versions of Google and Apple operating systems and do not require complicated configurations to be used. You just have to take a few minutes of free time and try them out. Cross my fingers so that you can recover the photos you accidentally deleted!
How to recover deleted photos from mobile: Android
You own a device Android and you would like to understand how to recover deleted photos from mobile? Then turn to the solutions useful for the purpose that I have reported below. They are very simple to use, even for those who don't really consider themselves a "geek".
Google Photos
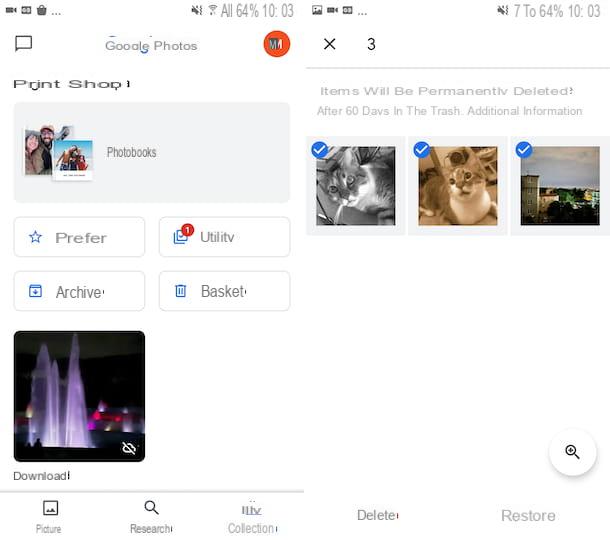
It was used Google Photos to view and manage photos on your Android smartphone, even if it may seem trivial as a suggestion, before turning to data recovery tools, open the Trash can application and check that the images of your interest are not in there. Don't you know what I'm talking about? So let's do some clarity.
By default, Google Photos moves deleted photos from gallery in a temporary poster: a sort of recycle bin in which the images remain for a few days before being permanently deleted. So, if you access the Recycle Bin before the final deletion of the photos, which occurs within 60 days, you have the possibility to restore the images without resorting to special software.
That said, to try to recover the photos deleted from the Android phone as I have just indicated, take your device, unlock it (if necessary), access the home screen and / or the drawer and start the Google Photos app by selecting the relevant icon (Quella with the colorful pinwheel).
Now that you see the main application screen, tap on the item Collection which is at the bottom right and on that Trash can present in the new screen displayed. If among the items in the trash there are also the deleted photos of your interest, to recover them tap on the item Select located at the top right, select the content you are interested in, tap the option Restore at the bottom and confirm your intentions by pressing again on the wording Restore in the menu that appears.
DiskDigger photo recovery
If looking in the Google Photos Trash, as I explained in the previous step, you did not find the images you intended to restore, you can consider turning to the use of DiskDigger photo recovery. It is, in fact, an excellent app to recover deleted photos in JPG format and images or screenshots in PNG format. It is also available in a paid version (which costs 3,37 euros), which allows you to restore compressed archives, apps and many other different types of files, but for now you shouldn't care. It is able to intervene both on the internal memory of the smartphone and on the SD cards, but to give the best of itself it needs the root.
To scaricare and install the app on your device, visit the relative Play Store section and press the button Install (if you are using a device on which Google services are missing, you can download the app from alternative stores). Then, launch the app by selecting its icon which has been added to the home screen and / or drawer.
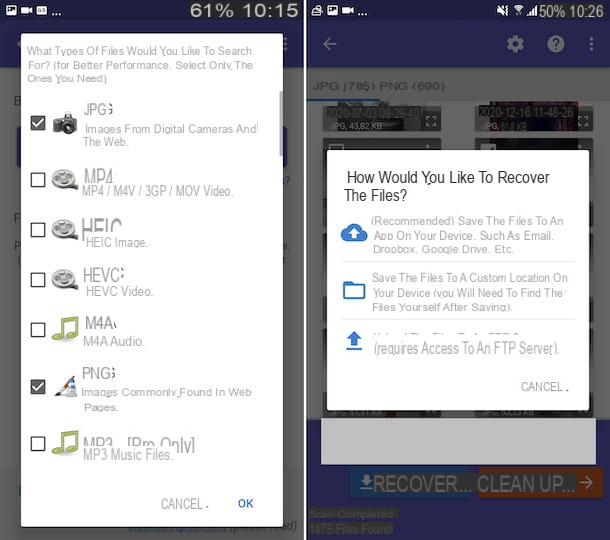
Now that you see the main screen of the app, grant the requested permissions, then refuse the upgrade to the Pro version, choose thedrive in which to search for photos (it should be the one selected by default), put the check mark next to the item JPG and/o all you PNG (depending on whether you intend to recover only the photos taken with the phone's camera or even the screenshots and images downloaded from the Internet) and press the button OK.
Then wait for the scanning procedure to be completed, then put the check mark on the thumbnails of images to be recovered possibly identified, press the button Recover at the bottom and select the icon of nuvola to auto-send you the photos via email or if you want to save them on a cloud storage service, that of folder if you want to save them on the phone memory or that of the arrow if you want to transfer them via FTP server.
Undeleter Recover Files & Data
Undeleter Recover Files & Data is another application for recovering photos, videos and various other types of files from Android terminals. It is free, but to save any recovered data you need to purchase the full version (at a price of 3,19 euros). It should be noted, then, that even in this case the root is required for correct operation (without it can only scan the app cache).
To use Undeleter Recover Files & Data, download the app from the relevant section of the Play Store (or from alternative stores, if you are using a device on which there are no Google services), then start it by selecting theicon added on the home screen and / or in the drawer.
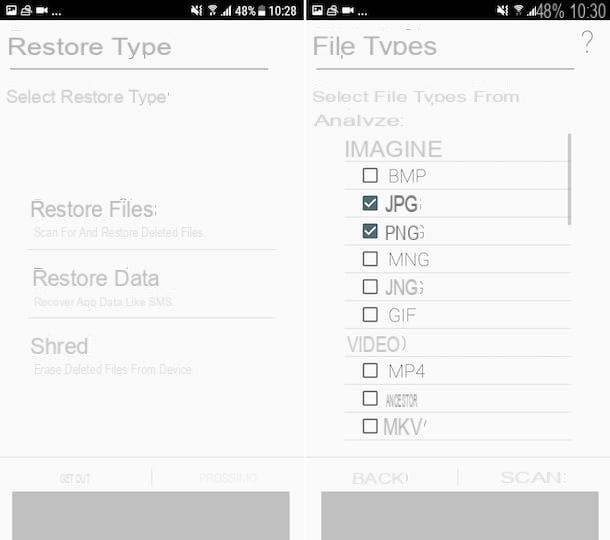
Now that you see the main screen of Undeleter Recover Files & Data, grant it i permits required, select the option Restore files, specify the position from which you want to recover photos, indicate whether to take one deep scansione or generic, select i file formats to restore (eg. JPG and / or PNG) that you find in the section Images and press pulsating Scan.
Wait for the analysis procedure of the selected position to be completed, then select the images of your interest, possibly detected that you intend to recover and, if you decide to purchase the full version of the app, press on the relative previews, tap the button with the three dots vertically at the top right, choose the item Save the file from the menu that opens and indicates the output location.
How to recover deleted photos from mobile: iPhone
Possiedi a iPhone and, therefore, would you like to understand how to recover deleted photos? Then, even in this case, I recommend that you open the Trash of the app Gallery, which is the default for managing images on iOS and to try to look if between the images delete of recete there are those in which you are interested in going to act.
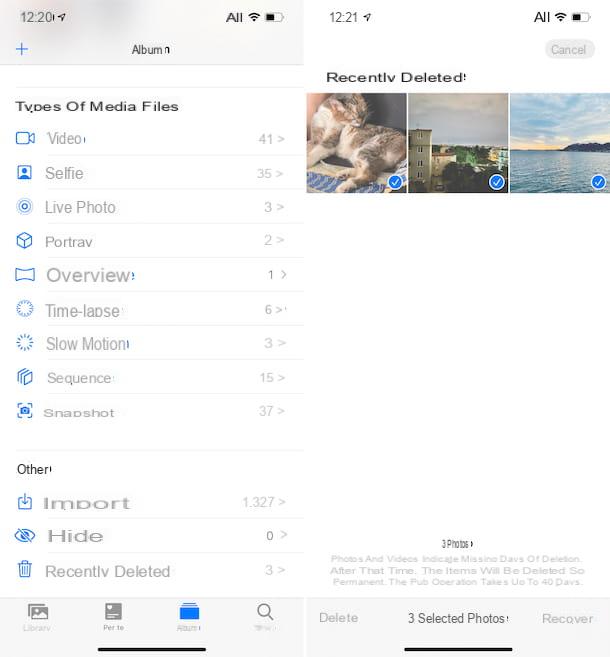
By default, in fact, the Photos application keeps deleted photos and videos for 30 days, moving the contents to a special section. During this period of time the contents of your interest can eventually be recovered, while once exceeded the automatic and definitive deletion takes place.
So, to try to recover deleted photos from your Apple phone, first take your device, unlock it (if necessary) and access the home screen and / or the app Library. Then, launch the Photos application by selecting its icon (Quella with the colorful flower and the white background).
Now that you see the main screen of the app, select the entry Album present at the bottom, then that Recently deleted that you find in the section Other, then if among the recently deleted images there are those you want to recover, tap the button Select at the top right, select the photos of your interest, touch the wording Recover located at the bottom, press the button Retrieve [number] photos And that's it.
If the photos you are looking for are not present among those recently deleted, I'm sorry to inform you that, due to Apple's restrictions, there are no special apps for recovering data that can be used directly from iOS, as happens on Android. However, you can try to use the alternative solutions working from a computer that you find reported in the next step.
How to recover deleted photos from mobile via PC
You can recover deleted photos from mobile also via PC, resorting to the use of some special programs, available for both Windows that for MacOS. To use them, just connect your smartphone to your computer in advance (or the memory card that may be used on the device, if this is not set as main memory) and start scanning. To find out more, read on.
PhotoRec (Windows / macOS / Linux)
If your smartphone has expandable memory and the images you deleted resided on a microSD, you can resort to using PhotoRec to recover deleted photos from mobile. It is a free and open source program, which allows you to recover deleted files from memory cards, hard drives, USB sticks and other devices. It is compatible with both Windows and macOS and Linux, but only on the Microsoft operating system does it have a graphical interface. Note that it comes paired with TestDisk, another free software that allows you to repair damaged disks and recover lost partitions, but for now we don't care.
To download PhotoRec to your computer, connect to its website and click on link related to the operating system you are using that you find in correspondence with the section TestDisk & PhotoRec xx (month day, year), Data Recovery.
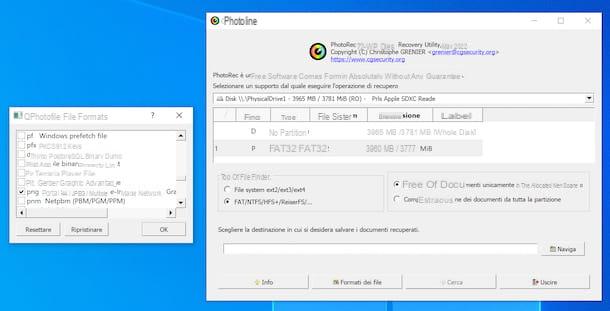
A scaricamento ultimato, is stai using Windows, extract theZIP archive obtained in a folder of your choice and start the file qphotorec_win.exe present inside. In the window that is then shown to you on the desktop, click on the button Yes and, once the main PhotoRec screen is displayed, expand the drop-down menu at the top, select the drive where your microSD resides, click on the primary partition of the card (the one named FAT32, FAT16 o exFAT) and put the check mark next to the items FAT / NTFS / HFS + / ReiferFS e Free.
At this point, click on your button File formats and choose the types of files to recover (eg. JPG and / or PNG), by clicking on the button first Reset, in order to reset the default selection of PhotoRec, then placing the check mark next to the reference items and pressing the button OK per salvare i Cambiomenti.
To conclude, click on your button You may also like..., select the folder to save the photos recovered from PhotoRec and press the button Search to start data recovery. All the images found by the program will be automatically saved in the folder you just selected.
If you are using PhotoRec on MacOSinstead, open the archive tar.bz2 downloaded to your computer, extract the content to a location of your choice and launch the file photorec present inside it, by right clicking on its icon and choosing the item apri give the menu to compare.
After completing the above steps, the terminal. At this point, use the right arrow keypad to select the option Sudo, press the button Submit and enter the Password of the Mac administration.
Next, select theunit relating to the microSD card of your mobile phone, indicates the partition you want to act on, select the file system with which the latter is formatted and choose whether to scan only the space marked as free or whether to check thoroughly all unity.
In conclusion, select the folder where you want to save the contents of the memory card after recovery, press the button C on the keyboard to confirm your intention to start analyzing and recovering photos and wait for the procedure to finish.
EaseUS MobiSaver (Windows / macOS)

If you have an iPhone and you want to recover deleted photos from your mobile using a computer, you can resort to using EaseUS MobiSaver Free, a software for Windows and macOS that allows you to restore images, messages, notes and contacts directly from the phone memory or, in the specific case of the iPhone, even from backups (both locally and on iCloud). Also note that on Windows it requires it to be installed to work iTunes. It turned out to be quite effective in my tests, however, I warn you, it is not completely free: its free version has no time limits, but unfortunately it allows you to recover only one file or five contacts at a time. To restore multiple images at the same time you have to buy EaseUS MobiSaver Pro, which is paid (costs $ 59,95).
To download EaseUS MobiSaver, connect to the program's website and click on the button Scarica free marked by the operating system logo che stai using.
When the download is complete, if you are using Windows, april il .exe file obtained, click on the button Yes in the window that appears on the desktop, choose thecityno give the menu to the dedication dedicated to the selection of the language and the prize OK. Then click on the button NEXT, select the voice I accept the terms of the license agreement and click on the button again NEXT (for two more times). Now, remove remove the check mark from the boxes related to the installation of additional tools and finalize the program setup by clicking on the buttons NEXT, Install e end.
Be invece impieghi MacOS, april il package .dmg ottenuto e trascina l 'EaseUS MobiSaver icon in the folder Applications of the Mac, then right-click on it and press on the item apri for two consecutive times, in order to overcome the restrictions applied by macOS to non-certified developers (an operation that must be carried out only at the first start).
After starting the program, connect the iPhone using its charging cable and click on the button Recover from iOS device, in order to indicate to the program your intention to scan the phone memory for deleted files. Next, select the device name from the next screen and click on the button Scan to start memory analysis.
Once the scan is complete, use the left sidebar to navigate through the recovered data. I suggest you put a check mark in the box next to the item Gallery e Photo app on the menu Photo / Video, to limit the display of the found data to images only. Once you have found the photos of your interest, select them and click on the button Recover, but save a copy on the computer.
If you cannot find the photo you are interested in in the iPhone memory, go back to the EaseUS MobiSaver home screen and try to start a scan of the iTunes backup, choosing the option to check i backups saved locally or the one to check i online salvati backup.
How to recover deleted photos from mobile


