


This just did not take! Your trust iPhone it fell out of your pocket, crashed to the ground and stopped working. Needless to remember that you could have been more careful but, by now, as they say, the omelette is done, so you must inevitably consider buying a new smartphone or, if the damage is not excessive, having the "iPhone by repair" "damaged. Your biggest concern, however, remains that you have inevitably lost all photo saved on the device.
How do you say? This is exactly how things are and you would like to know how to recover photos from broken iPhone? Don't worry, maybe I can give you a hand… I mean maybe, because the success of the operation essentially depends on the extent of the damage, as well as on the systems you have adopted for archiving shots and videos taken with your smartphone. In any case, there is no harm in trying, so I would say to get straight to the heart of the matter.
Are you ready to attempt this data recovery work? Yup? Very good. Position yourself comfortably, take some free time just for yourself and concentrate on reading and putting into practice the instructions that you find in the following lines. I promise you nothing, mind you, as the success of the operation does not depend on me or on you but on the above variables. Have a good reading and cross my fingers for you!
How to recover photos from broken iPhone without backup
Do you want recover photos from a broken iPhone and of which you have not previously made a backup? Bad situation, but not without way out. For example, if the device malfunction is attributable to the battery or if you previously chose to save photos to iCloud you could easily succeed in your intent. To find out more, read on.
Battery replacement
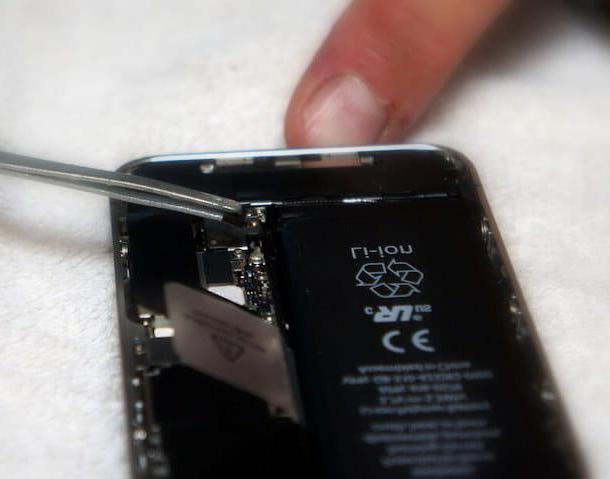
To recover photos from a broken iPhone, which doesn't seem to want to know more than to turn on, you might try to recover your shots by going to replace the battery and then to recover the data on the device, even without having previously made a backup (all provided that the problem of the device is actually attributable to the battery).
If your smartphone is no longer under warranty and the idea of DIY it doesn't scare you, you can try replacing the battery currently in use with another one, but taking into account that, if you don't know where to put your hands or in any case if you do the procedure carelessly, you could irreparably damage yours " iPhone by ".
That said, if you are interested in it, you can follow the instructions I have provided you in my tutorial dedicated specifically to how to change the iPhone battery. I already anticipate that you will have to equip yourself with a whole series of ad hoc tools as well as, of course, a battery to be used to replace the old one.
The best alternative, as well as the most reliable one, is however to entrust the device to theApple support, taking it to the Apple Store or sending it to the company, and having the battery in use replaced with a new one by competent personnel.
Contrary to what one might think, requesting an intervention to replace the battery is an operation that does not always have to be paid for. This essentially depends on the state of the phone. More precisely, if your iPhone has a battery defective and is still in the first year warranty, you are entitled to a free repair.
During the second year warranty or, in any case, if it was gods who caused the malfunction of the battery accidental damage, it is necessary to shell out 69 € for iPhone X and later models e 49 € in the case of iPhone 8 and earlier models. If you then bought the package AppleCare + to extend the warranty of your iPhone, you can replace the battery of the device for free even after the first year of warranty has elapsed.
For all the details of the case regarding the replacement of the iPhone battery through Apple and to book a replacement operation, I invite you to refer to the appropriate web page that you find on the website of the Cupertino company.
Once the iPhone battery has been replaced, to retrieve the photos on the device, try turning the smartphone back on as usual. If everything went well, the iPhone should be working normally again and you should be able to access the photos saved in the app. Gallery of iOS (and anywhere else).
After your iPhone has resumed working properly, I recommend, for preventive purposes only, to transfer your photos to your computer, following the instructions I provided you in my tutorial on how to transfer photos from iPhone to PC. In this way, you can be sure of the fact that, should there be further problems, you will always be able to access your shots from your PC.
Photo recovery from iCloud

If on your iPhone you had enabled syncing with iCloud, Apple's cloud service, being able to recover the images of your interest from your "iPhone by", even in the absence of a full backup, could be simple.
As I explained to you in detail in my guide on how to store photos on iCloud, on iPhones associated with iCloud, the photos are automatically uploaded to the Photo stream (which keeps them for 30 days) and, optionally, you can activate the Photo library of iCloud which, on the other hand, keeps them permanently (together with the videos), but going to erode the storage space on iCloud Drive.
Either way, if your iPhone is broken, to recover your photos, all you have to do is log into your iCloud account from another device and download your photos from there. You can perform this operation from the web, from another iOS device or from a computer (on which the above services have been previously enabled). Below you will find explained how to do it in all three cases.
- Web - if you have activated the iCloud Photo Library, open the browser you usually use to surf the Internet, go to the iCloud home page and log in to your account by filling in the appropriate fields on the screen with the required data. Once logged in, click on the icon Gallery, locate the photos of your interest, select their thumbnails (using the combination Ctrl + click on Windows or cmd + click on Mac) and download the original files by clicking on the icon with the cloud and the arrow going down present in the upper right corner of the page. Note that this procedure does not apply to Photo Stream.
- iPhone / iPad - take the device, unlock it, open the app Gallery by tapping on the relative icon (Quella with the white background and the multicolored flower) and you will have access to all your photos. To share or save them in other apps, select the thumbnails of those of your interest, tap onshare icon (Quella with the rectangle and the arrow) and choose the app or action you want to perform from the menu that opens. Clearly, the device in use must have previously been associated with the same Apple ID configured on the broken iPhone.
- PC - after installing and configuring the iCloud application on Windows, apr l 'File Explorer by clicking on the relevant icon (Quella with the yellow folder) that you find on taskbar, go to the location C:UsersUsersnome_utentePicturesiCloud Photos Download (instead of username you must enter your user account name) and you will be able to access your images. To save them in a different location, select them using the combination Ctrl + click, use the key combination Ctrl + C to copy and paste them in the position you prefer, using the key combination Ctrl + V.
- Mac - start the application Gallery selecting the relative icon (Quella with the white background and the multicolored flower) located on the Dock bar and you will be able to view all your photos. Select the photos you want to download using the combination cmd + click and export them to your preferred location by selecting the items File> Export> Export N Photos that you find in the upper left part of the menu bar. Clearly, the Mac in use must have previously been associated with the same Apple ID configured on the broken iPhone.
For further information about the practices I have just indicated, I invite you to refer to my guide focused specifically on how to download photos from iCloud.
How to recover photos from iPhone with broken display
Now I want to explain to you how to recover photos from broken display iPhone. In this case, considering that the device is working but that you cannot use it correctly or, in any case, you cannot view what is shown on the display, you can rely on the use of iTunes on Windows or the application Gallery on macOS or, again, to the use of third party software specifically designed for data recovery: everything is explained below.
Standard procedure
You can try to recover photos from an iPhone with a broken display using iTunes on Windows or the application Gallery on macOS. In this case, the first thing you need to do is to first connect the smartphone to one of the USB ports computer using the appropriate cavo Lightning / Dock supplied with the device.
Subsequently, if you are using Windows, download and install iTunes on your PC following the instructions I gave you in my guide on the subject, start the program and, if this is the first time you connect the iPhone to the computer, authorizes communication between the two devices by pressing the appropriate buttons on the screen (and typing the unlock code on the iPhone).
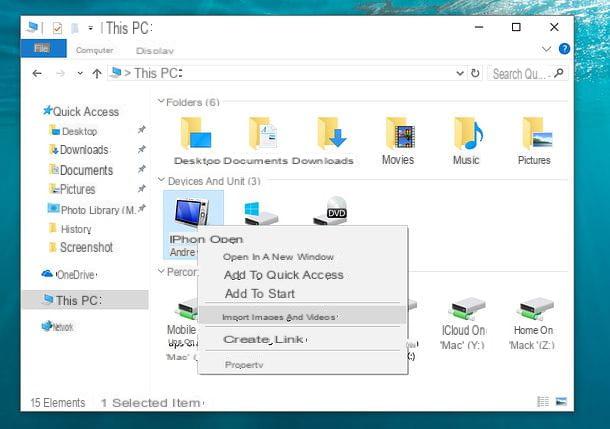
Afterwards, open theFile Explorer Windows by clicking on its icon (Quella with the yellow folder) che trovi nella part in fund to sinistra della taskbar, select the voice Computer / This PC from the left sidebar, right click on theiPhone icon and select the item Import images and videos give the menu to compare.
In the window that opens, click on the entry Other options, located at the bottom left, and adjust your preferences for importing photos; then select the item Review, organize and group the items to import and click on the button Import. Then divide the photos to be imported on the PC according to groups based on the creation date and confirm what your intentions are, by pressing the button Import.
Se, invece, stai using MacOS, open the application Gallery, by clicking on his icon (Quella with the white background and the multicolored flower) that you find on Dock bar and, if this is your first time doing this, authorizes communication between Mac and smartphone by answering affirmatively to the warnings you see appear on the screen (and by typing the unlock code on the iPhone).
In the Photos application window that you now see on your desktop, select the name of your iPhone from the left sidebar, corresponding to the section devices, and select the preview of all photos to recover using the combination cmd + click. Then choose the album in which you want to save the photos, using the drop-down menu at the top, and click on the button Import all new photos.
For more details about the above practices, you can refer to my guide specifically focused on how to move photos from iPhone to PC.
Alternative procedure
As an alternative to the practices described in the previous step, you can try to access the photos on your broken iPhone again using appropriate ones third-party software parts designed for data recovery, as in the case of the excellent EaseUS MobiSaver Free: it is, in fact, a free program that allows you to recover deleted files and contacts from Apple-branded smartphones.
Yes, it can be used on both Windows and macOS and is possibly also available in a paid variant (costs € 64,95) which allows you to circumvent some limitations imposed by the free version (eg the maximum number of contacts that can be recovered). Note that it requires the latest version of iTunes installed on your computer to work.
To download the program on Windows, visit this webpage, click the button Free download and on that Download now. Once the download is complete, open the .exe file obtained and, in the window that appears on the desktop, click on the button Yes.
Then, press on the buttons OK e NEXT, select the voice I accept the terms of the license agreement and click to lock your button NEXT twice in a row. Then remove the check mark relating to the installation of any additional software, click the button again NEXT and finally select the buttons Install e end.
Se, invece, stai using MacOS, link to this other web page and click the button Scarica free. Once the download is complete, open the package .dmg ottenuto e trascina l 'icon of EaseUS MobiSaver Free in the folder Applications say macOS.
Next, right click on the program icon, select the item apri from the context menu and click on the button apri in the window that appeared on the desktop, in order to circumvent the limitations imposed by Apple on applications from non-certified developers (an operation that must be performed only at the first start).
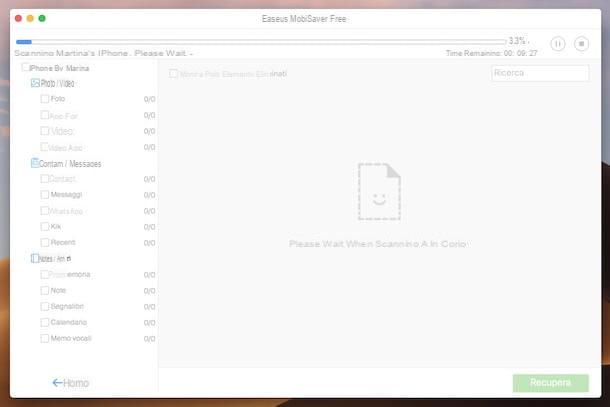
Now that, regardless of the operating system, you see the program window on the screen, connect your iPhone to the computer using the cavo Lightning / Dock supplied with the smartphone and click on the button Scan.
When the scanning process is complete, put the check mark in the box Gallery in the right part of the program window, click on the button Recover located at the bottom right and select the folder to export the images to.
If this interests you, I would like to point out that the program is also able to recover data from device backups made with iTunes and saved on your computer. To take advantage of this functionality, go to the section Recovers from iTunes Backup by clicking on the relevant item in the left part of the EaseUS MobiSaver Free window, select the backup of your interest and, finally, the photos to recover. That's all!
How to recover photos from broken iPhone


