


After taking a photography course, you became passionate about this world and decided to buy a professional camera to take your shots and deepen your knowledge. The course and, above all, the practice, begin to bear fruit and your photos have been so appreciated by your friends that they have shared them on social networks. To take advantage of this form of advertising, you would like to apply a logo with your name but, having hundreds of shots, you wouldn't be spending too much time editing every single photo.
This is actually the case but you don't know any program that meets your needs? No problem: if you want, I'm here to help you. If you give me a few minutes of your free time, I can explain to you how to put a logo on multiple photos at the same time indicating a series of programs to succeed in your intent. In fact, there are so many solutions that you are spoiled for choice: some software allows you to choose the logo to use, set its size and position and create a script to automatically add it to the photos of your interest; other software, on the other hand, also allows you to add effects to the logo, set its transparency and automatically insert it to the selected images. Then there are apps that allow you to get the same result even on smartphones and tablets. Interesting, right?
If you can't wait to find out more, let's not waste any more time chatting and let's get to the heart of the matter immediately. Courage: make yourself comfortable, take all the time you see fit and dedicate yourself to reading the next paragraphs. Choose the solution that best suits your needs, put into practice the instructions I am about to give you and I assure you that, in no time at all, you will be able to add your logo to all the photos you want. Enjoy the reading!
Photoshop (Windows / macOS)
If you are wondering if it is possible put a logo on multiple photos at the same time us Photoshop, the answer is yes. However, to succeed in your intent, it is first necessary to create an action indicating the logo to use and the commands to be executed for subsequent insertions.
If Photoshop is not yet installed on your computer, you should know that it is included in the suite Creative Cloud, available as a subscription service starting from € 12,19 / month, with the ability to test its features for free for 7 days.
To download the trial version of Photoshop, connected to the official Adobe website and click on the item Free trial version present in the top menu to start the download. Now, you are you have a PC Windows, double-click the file Photoshop_Set-Up.exe e pulsing sul pulsating Run to start the installation. If, on the other hand, you use a Mac, april il dmg package just downloaded, double-click the file Photoshop Installer and inserted the Password of your user account on macOS to proceed with the installation.
To complete the installation, both on Windows and on macOS, press the button Log in and enter your Adobe account details. If you don't have one yet, click the button Subscribe, insertion and date richiesti nei campi Your name, Last name, Email address, Password e Birthday e pulsing sul pulsating Registration. Finally, press the button Start installing, wait for the installation to reach 100% and that's it. To learn more, you can read my guides on how to download Photoshop for free and how to install Photoshop.
You are now ready to add a logo to your photos with Photoshop. First, launch the program and open a single image, then click the button Story (l'icona dei three squares and one arrow top right), select the tab Actions and click the button Create new action (l'icona del sheet of paper). Then enter the name of the action in the field Your name (for example Insert logo) and presses the button Register to start recording commands.
To add the logo to the previously inserted image, click on the item Fillet present in the top menu, select the option Insert embedded from the menu that opens and indicate the logo you want to use. In order for the action to be valid for all images, regardless of their size, select the entire photo by pressing the Ctrl keys+A on Windows and cmd + a on Mac, then set the position of the logo by pressing one of the buttons visible at the top (Align top edges, Align Bottom Edges, Align horizontal centers, Align right edges etc.) all represented by the icon of a line and two rectangles.
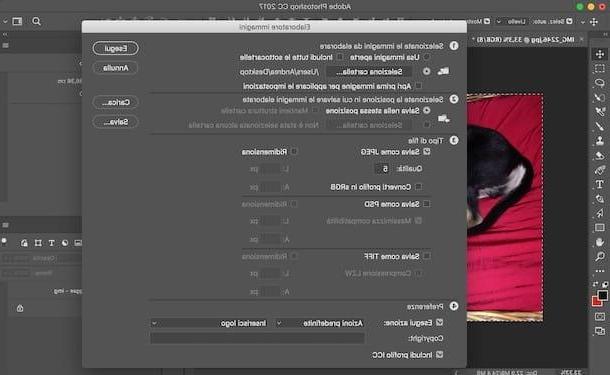
After choosing the location of the logo, click the button Stop playing / recording (l'icona del square) to finish recording the action started just now. Now, if you wish, you can save the image used as a "sample" to create the automatic logo insertion action, then click on the item Fillet and select options Script e Image processor.
In the new window that appears, click the button Select folder and indicate the folder that contains the images to which you want to add the logo. In the section Select the location to save the processed images, put the check mark next to the item Save in the same location to save the images in the same folder indicated above (the original photos are not overwritten) or press the button Select folder to specify a different location for saving. Finally, in the section Pref Renze, put the check mark next to the item Take action and select the action created earlier. Press the button Run And that's it.
FastStone Photo Resizer (Windows)
FastStone Photo Resizer, as the name suggests, is a Windows program that allows you to resize photos. In addition, among its features, it also allows you to apply a logo on multiple images at the same time, setting their position and choosing to apply some effects. It's free, but for personal or educational use only.
To download FastStone Photo Resizer on your computer, connected to the official website of the software, click on the button Download relative to the box FastStone Photo Resizer and, in the new open page, presses the button Download present under the heading exe. Once the program has finished downloading, double-click on the file RFResizerSetup [version] .exepigia sui pulsanti Next, I agree e install and wait for the progress bar to reach 100%, then click on the button Finish to complete the installation and close the window.
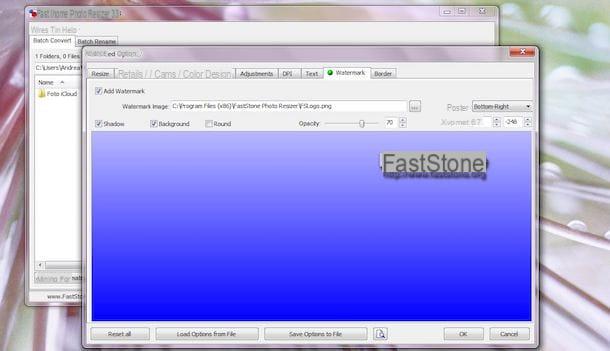
Now, start FastStone Photo Resizer, put the check mark next to the item Use Advanced Options e pulsing sul pulsating Advanced Options. In the new open window, click on the tab Watermark, place a check mark next to the option Add watermark and presses the icon of three dots present next to the field Watermark image to select the logo you want to apply to your photos.
Once you have made your choice, you can set its position via the drop-down menu Position by choosing one of the options available from Bottom-right (bottom right), Bottom-center (bottom center), Bottom-left (lower left), Center (in the center of the image), Top-right (top right), Top-center (top center) e Top-left (top left). Alternatively, you can establish a different position by entering its coordinates in the fields next to the item XY Offset.
After setting the position, choose whether to apply the shadow effect to the logo by placing the check mark next to the item Shadow, and move the cursor next to the option Opacity to set its transparency. Press the button OK to save the changes and return to the FastStone Photo Resizer main screen.
Now, click on the gods icon three dots present at the top, select the folder that contains your images and press the button OK. Then select the images of your interest, press the button Add (o Add all if you want to change them all) and click on the button KATEGORIEN to set the destination folder of the edited images, then presses the button Convert to apply the logo to all selected images, click on the button Done And that's it.
Visual Watermark (Windows/macOS)

Visual Watermark is another software that allows you to apply a logo on multiple photos at the same time. It is available for Windows and macOS in a free 30-day trial version, after which to continue using it you need to purchase a license starting at 19,95 euros.
To try Visual Watermark by downloading its trial version, connected to the program's website, press the button Scarica free located at the top right and, in the new open page, presses the button Free download for Windows / PC o Free download for Mac.
Once the download is complete, if you have a PC Windows, double-click the file vmark-installer- [version] .exe, pigia sul pulsating Run and click on your voice Install Visual Watermark. Wait for the installation to complete and press the button end to close the window and start the program.
If, on the other hand, you have a Mac, april il dmg package just downloaded, drag the icon of Visual Watermark in the folder Applications and open the latter, then right-click on the program icon and choose the item apri from the menu that appears (this is necessary only at the first start, to bypass macOS restrictions for programs that come from non-certified developers).
You are now ready to apply a logo to as many images as you want with just one click. In the main Visual Watermark screen, press the button Select images and choose the images you want to edit, then click on the item Next step, select the option Add logo and choose one of the available options: Upload the logo from the file to choose a custom logo that you have previously created and available on your computer or Choose the logo from the gallery to use a standard logo available in the Visual Watermark gallery.
Made your choice, set the size transparency and rotation of the logo by moving the relative sliders, then put the check mark next to the item On if you intend to apply the logo several times and repeat it on the whole image. Finally, if you wish, click the button Modify present next to the option Effect to apply one of the many effects available to the logo. Once the logo has been changed, press the button Next step.
Now, click on the entry Modify to choose the folder in which to save the photos with the logo, set the image size and quality by choosing one of the available options (original format, PNG, GIF, JPEG Maximum, Good JPEG etc.), choose whether to resize the photos and rename the files and press the button Enter the Watermark to complete the change.
You should know that Visual Watermark, in the free trial version, adds its own watermark. To remove it, you need to purchase the full version by pressing the button Buy Now.
PhotoMarks (macOS)
PhotoMarks is another good solution for Mac to add a logo to multiple photos at the same time. It allows you to save the edited images on your computer, also allowing them to be sent via email or uploaded via FTP or Flickr. You should know that the trial version of PhotoMarks applies its own watermark to the edited photos. To remove it, you need to purchase the full version of the software, which costs $ 29,95.
To download the trial version of PhotoMarks, connect to the program's website and press the button Try Free. Once the download is complete, open the dmg package downloaded just now, presses the button Agree and drag PhotoMark to the folder Applications macOS, then open the latter, right-click on the program icon and select the item apri from the menu that appears to start the software and avoid macOS restrictions for applications from non-certified developers (this is necessary only for the first run of the program). Press the button again apri, select the option Continue trial to activate the free trial and, if you wish, press the button Next to discover the features of PhotoMarks.
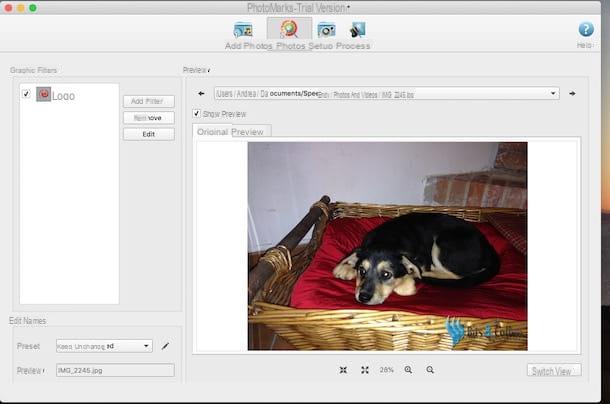
Now, drag the photos of your interest into the PhotoMarks window or press the button Add Photos to select the images of your interest. Then click on the option Edit phots, pigia sul pulsating Add filter, select the voice Logo and click sul pulsating OK. In the new screen displayed, press the button KATEGORIEN present below the field Logo Path to choose the logo you are interested in, then set its position and effects by acting on the sections Placement e Transformation e pulsing sul pulsating OK but I will modify it.
Then select the item Setup, specify where to save images via options Destination e Folder, choose the format of your interest using the drop-down menu next to the item Output format e pulsing sul pulsating Process placed at the top. Once the process is complete, press the button OK to view the edited images.
Other programs to put a logo on several photos at the same time
In addition to the solutions proposed in the previous paragraphs, you must know that they also exist other programs to put a logo on several photos at the same time: here is a list of the ones you can consider.
- CoolTweak (Windows): is a free program that allows you to apply a logo or writing to multiple images with a simple click. In addition, it offers numerous other features, such as the ability to resize photos or mass sharing on social networks (Facebook, Twitter, Picasa, Flickr etc.).
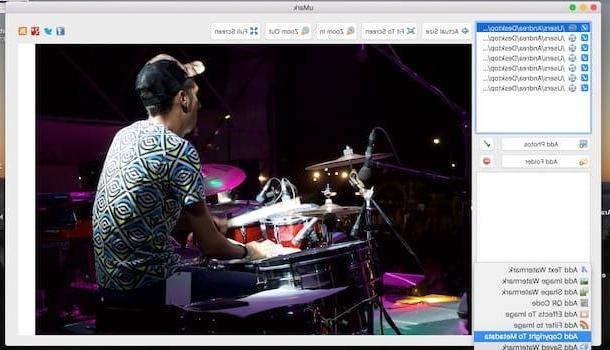
- uMark Photo (Windows/macOS): Allows you to add a custom logo to multiple photos simultaneously. It also allows you to add custom text and shapes or use ready-to-use logos. It costs $ 29 with the ability to test its operation for free for 15 days.
- Image Tuner (Windows): is another free software that allows you to apply the same logo on multiple photos at the same time, setting their position and transparency. It has a simple and intuitive interface, albeit in English.
- Preview (Mac)- The macOS default application for viewing and editing images and PDFs allows you to add a logo to your photos. Although it does not allow you to automatically add a watermark to multiple images at the same time, it is possible to carry out the operation manually with simple copy and paste.
App to put a logo on multiple photos at the same time
You don't have a computer available or do you prefer to add a logo to the photos on your smartphone or tablet? No problem: in that case, you can rely on app to put a logo on multiple photos at the same time. Here are some that might be right for you.
- Watermark Photo (Android/iOS): is a free application that allows you to insert a logo on multiple photos at the same time. It allows both to import a logo from your device and to create a text watermark. In the free version it applies a small writing on all the photos, which can be removed with an in-app purchase of 2,29 euros.
- SALT (Android): is an application that allows you to automatically add a logo to all the photos taken with your device. It's free with the ability to make in-app purchases to add new fonts and watermarks.
- Logomatic (iOS): it is only available for iPhone and iPad and allows you to add a logo to multiple photos at the same time. You can either create a logo directly using the app or import it from your device. It costs € 1,99.
- PhotoMarks (iOS): is the version for iPhone and iPad of the program mentioned above. It costs € 5,49.


