


Thanks to the powerful camera supplied on your smartphone, you took a very high resolution photo but, after sending it to a friend over the Internet, he pointed out that the image quality is far from the best. How is this possible? Don't worry, it's not a problem with your phone or the computer you used to send the photos: much more simply, some popular email services and messaging apps tend to compress the multimedia content exchanged by users, in order to speed up the transfer.
That said, there are some things you can do to mitigate the problem. Which? Read on and you will find out: in the lines to come, in fact, I will explain to you in detail how to send photos without losing quality using the most popular e-mail and messaging programs, sites and apps, quickly and easily.
Courage: make yourself comfortable, read what I have to offer and try to put my suggestions into practice: I'm sure that, at the end of reading this guide, you will be perfectly able to send the images you want, in original quality and without any compression. Let it bet?
How to send photos without losing email quality

To send photos without losing quality means e-mail it is necessary to forward the content in the form of a generic file / document and not an image, in order to avoid the action of any compression algorithms (with consequent loss of details) provided by the client or by the Web Mail service in use.
So, to send a graphic file away e-mail without it losing quality, it is necessary to insert the file in the form of attached and not of image, using the dedicated option: below I'll explain how to do it on the most popular e-mail clients and Web Mail services.
- Windows 10 Mail: after starting the composition of a new message, select the box dedicated to inserting the email text, click on the menu Inserisci located at the top, press the button Fillet that appears immediately below and, subsequently, select the image (or images) to send using the File Explorer proposal.
- MacOS Mail: start composing a new message, click on the text area for writing the email, press the button showing a clip which resides in the upper right and uses the panel of the Finder that appears on the screen, to select the image (or images) to attach without compression. Next, in the drop-down menu Image size that appears at the top right make sure that the item is selected Real size.
- Gmail Web: start the creation of a new email, click on the symbol of clip located at the bottom and select theimage to attach, using the next screen.
- Gmail per smartphone/tablet: After starting composing a new email, tap the text field Write email, tap on the symbol of clip posto in alto, selects the voice Attach file from the proposed menu and choose the photo to send, using the next panel.
- Outlook Web: after starting the composition of a new email, click on the symbol of clip which resides at the bottom and selects the item Search this computer from the menu that appears. Finally, select the photo of your interest, to attach it to the message without compression.
- Outlook per smartphone/tablet: start typing a new message, touch the box dedicated to entering the text, touch the icon of clip which resides at the bottom and selects the item Choose from files from the menu that appears. Finally, select the image of your interest using the next screen.
- IOS / iPadOS Mail: after starting the composition of a new message, tap on the box dedicated to entering the email, touch the symbol that appears immediately above the keyboard and then tap on the icon depicting a sheet with folded corner, to select the image of your interest (which, in this case, will not undergo any compression).
Although there is a huge number of e-mail clients, you will be pleased to know that the steps seen above are valid for everyone: it is essential, when creating the email, to insert the image with the dedicated button generic attachments and not with the one dedicated to image files (in the latter case, the photo may be automatically compressed).
How to send photos without losing WhatsApp quality
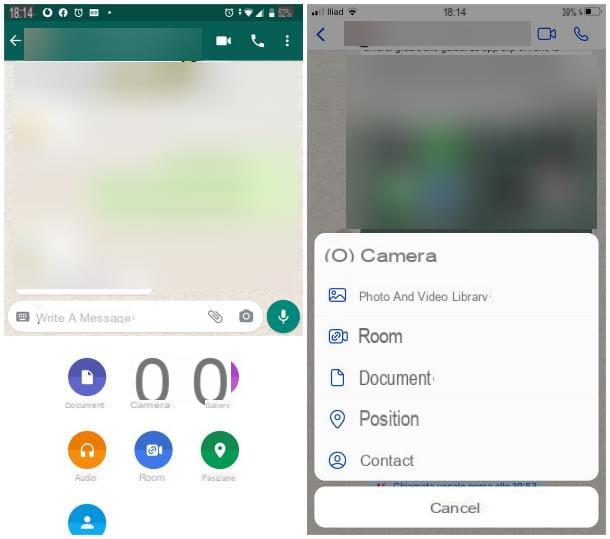
The same argument is also valid for WhatsApp: to send images at original quality and without compression, it is essential to use the tool dedicated to sending generic documents (and not the one that allows you to quickly send a photo).
It was used WhatsApp for Android, open the chat with the user / group to which you want to send the image, tap on the symbol of clip located at the bottom, next to the text entry field, and press the button Document, resident in the panel that appears. Finally, tap on the item Browse other documents ... and uses the file manager installed in the system, to choose the image of your interest.
Su WhatsApp for iPhone, on the other hand, the steps are slightly different: after opening the chat dedicated to the contact you intend to send the image to, tap the button capacitor positive (+) lead which resides to the left of the text entry field, touch the item Document attached to the proposed panel and use the system manager to select the image of your interest. If necessary, tap the card Shop by Department to view all available locations, via Apple's Files app: among these, you will notice that the photo gallery is missing.
To export a photo from the iPhone Gallery to the Files app, open it in the app Gallery iOS, press the share icon and select the item Save your File from the menu that opens. Also be aware that photos taken with iPhone are in HEIC format: to convert them to more popular formats, such as JPG, without major quality losses, you can use an app like HEIC to Jpg.
Finally, if you use WhatsApp per computer/WhatsApp Web, click on the symbol of clip located next to the text entry box, then on the button depicting the sheet with a small fold (option Document) and use the Windows File Explorer or macOS Finder to select the photo of your interest.
How to send photos without losing Telegram quality
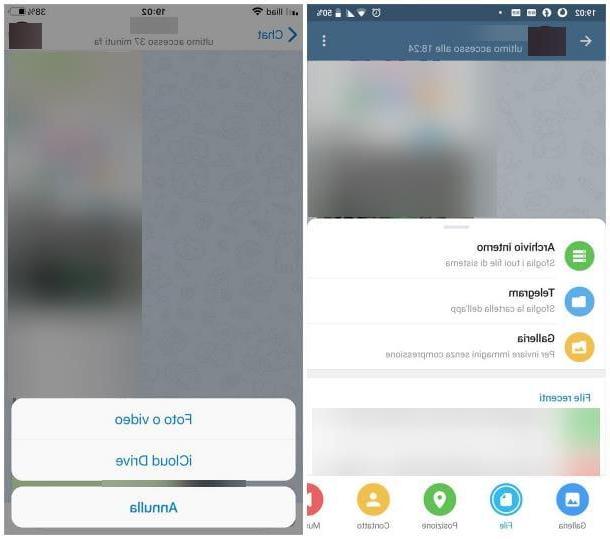
Also for Telegram the speech is identical: to be able to send photos without losing quality, after opening one chat with the contact / group to send it to, it is necessary to use the option dedicated to sending “generic” files, instead of the one dedicated to photos and videos.
To do this, if you use Telegram per Android, tap on the symbol of clip located at the bottom right, tap the button Fillet (depicting the symbol of a sheet) and then the voice Gallery - To send images without compression, which resides above; to finish, select the preview image to attach with a tap and touch the icon of theairplane, to send it. To make a multiple selection, put the check mark on each of the previews of your interest, using the appropriate box located at the top.
The steps to take on Telegram per iPhone they are quite similar: touch the symbol of clip located at the bottom left, select the item Fillet from the proposed menu and then tap on the option dedicated to Photo or video. Finally, touch the preview of the file (or file) to send and touch the item Send, per proceeding.
For Telegrams per PC, things are even simpler: to send a file, click on the clip located at the bottom left, choose the image you are interested in using the panel that appears on the screen and, once you have made your selection, make sure that the box Compress images is unchecked. Finally, click on the item Send And that's it.
Alternatively, to speed things up, you can directly drag the icon of the image file into the Telegram chat window: also in this case, pay attention that the box Compress images is not checked before sending it!
How to send photos without losing quality


