


You took a bunch of photos with your smartphone, happy with it, you rushed home to be able to transfer them to your trusty PC and look at them in all their glory but… argh! A real disaster! Almost all the images lack the right amount of sharpness and the subjects immortalized are far from clearly visible. I know, it's a real tragedy but luckily nothing is lost! If you allow me a few minutes of your precious time I can in fact explain to you how to sharpen a photo.
How do you say? You do not believe me? Well, you hurt, very bad! In fact, you must know that thanks to the use of some special programs and online services, sharpening a photo is not only possible but, I'll tell you more, it is also very simple. To use them, in fact, it is absolutely not necessary to be a perfect connoisseur of the art of the photo shoot, just a few moments of concentration and a minimum of patience and the game is done, really. Obviously, I do not assure you miracles (it all depends on how badly the original photo is "tanned") but the results obtained can be more than satisfactory!
Then? Do you want to try? Yup? Fantastic! So I would say not to waste any more precious time, to ban the chatter and start immediately to get busy. You will see, in the end you will be able to tell yourself more than satisfied as well as, of course, very happy to have figured out how to sharpen a photo all by yourself (or almost). Are you ready?
Software to sharpen a photo
PhotoScape X
The first program I want to suggest you appeal to in order to sharpen a photo is PhotoScape X. It is a very easy to use graphics software for Windows 10 and macOS that allows you to edit digital images quickly but effectively. Using it, you can make your photos beautiful in no time by applying automatic corrections as well as special effects of various kinds. The program, keep in mind, is paid but you can use the free trial version for an unlimited period of time (basically you don't have access to some PRO features).
To download PhotoScape X, the first step you need to take is to connect to the program's website via the link I just indicated and press the button for the download for free corresponding to the operating system you are using.
Then wait for the connection to the app store of your computer's operating system to be made, click on the button to start the button again download for free and l 'installation of the software (in the case of Windows 10 remember to select the trial version) and wait a few moments for the procedure to be started and completed.
At this point, if you are using Windows 10 log in to Start menu, type photoscape x in the search field and click on the first result in the list. If you are using a Mac instead, access the folder Applications, look for theicon of the program and click on it twice consecutively to start it.
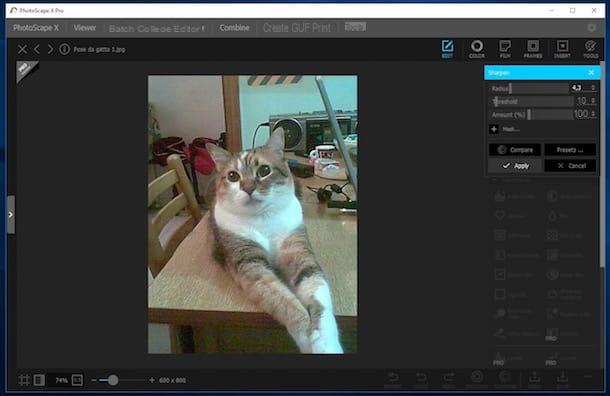
Once the main PhotoScape X window is displayed, access theeditor, drag the photo on which you intend to go to act inside it, click on the menu Adjustments that you find on the side and then click on Sharpen. Then use the sliders Radius, Threshold e Amount which are now shown to you by moving them until you get the result that suits you best and then click on Apply to apply the changes. If you want, you can also use the available loans by clicking on the button Presets … and selecting one of the options that are shown to you that you think would be more suitable for you.
Before applying the changes, you can also compare the result obtained with the original image by simply clicking and continuing to hold down the button Compare.
If the changes made to the photo are not to your liking and you wish to further intervene on the image, use the other commands that are always attached to the section Adjustments and adjust its settings. For example, you can vary the brightness and color of the image, apply a vignette effect, adjust the intensity of the white and much more.
When you are satisfied with the result, save the edited image by clicking on the button first Save located at the bottom right and then on the one attached to the window that will subsequently open.
Please note: If you are using a PC with an older version than Windows 10 installed, you can download the older version of PhotoScape. You can use it in an almost analogous way to what I have just indicated.
SunlitGreen Photo Editor
Do you want to understand how to sharpen a photo but the software that I indicated in the previous lines did not satisfy you? So why don't you try with SunlitGreen Photo Editor? It is a free program for Windows operating systems that allows you to adjust colors, brightness, contrast and many other values of the photos, a bit like in Photoshop but in a much simpler and faster way.
To use it, first of all connect to the download page of the program on your computer via the link I have just indicated, then click on the item Download Free Photo Editor and wait a few moments for the software to download.
At the end of the download, open the file obtained by double clicking on it (SGPESetup.exe) and, in the window that is shown on the desktop, first click on Run e Yes (to authorize its installation, if requested) and then on Next. Then accept the conditions of use of the program, putting the check mark next to the item I accept the agreement, and click on first Next for four consecutive times and then on install e Finish to finish the installation process of SunlitGreen Photo Editor. Click for your Decline e Refusal to avoid installing additional promotional programs.
Eventually, the software is also available in a portal version (that is, it does not require installation in order to be used). If you prefer this variant, after connecting to the SunlitGreen Photo Editor download page click Download Portable that you find under the writing Free Photo Editor, open the downloaded folder and then double-click theprogram icon.
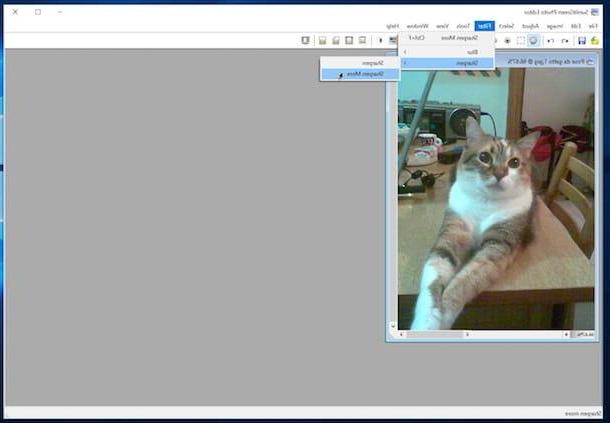
Now start the program and open the image to be improved in it by clicking on gialla poster located at the top left and selecting the file on your computer. With the photo open, you can immediately correct the degree of sharpness by accessing the menu Filter and clicking twice in a row on Sharpen. If you want to increase the degree of sharpness even more, select the item Sharpen more from the menu visible after moving the mouse cursor over Sharpen.
If the final result is not to your liking, you can correct further parameters of the photo by accessing the menu Adjust of the program. You can then select the item Levels to adjust the overall or individual color levels for the various shades of the photo using convenient scroll bars, the item Curves to adjust the color curves or the classics Hue / Saturation to vary hue / saturation level e Brightness/Contrast to adjust the contrast and brightness of the photo.
If you prefer to act faster, you can also let the program automatically optimize the parameters of the photo by clicking on the menu Adjust and selecting you Auto Levels ed Auto Contrast.
To save and permanently apply the changes made, select the item Save as from the menu Fillet of the program. In the window that opens, indicate the folder in which to save the image, type the name you want to assign to the photo in the field File name and click on the button Save to complete the save.
Online services to sharpen a photo
Pixlr Express
When it comes to services dedicated to online photo editing and correction of the degree of sharpness it is practically impossible not to mention Pixlr Express. It is in fact an online service that allows you to apply filters / corrections to photos as well as create beautiful collages with an Instagram-style approach (with the push of a button you can do everything, in a nutshell). It's free, it works on all operating systems and browsers but it requires Flash Player.
To use it, connected to its main page via the link I just indicated and choose whether to upload an image from the PC (by clicking on the button KATEGORIEN), open an image already on the Internet (button Open URL) or take a snapshot from the webcam (button Webcam).
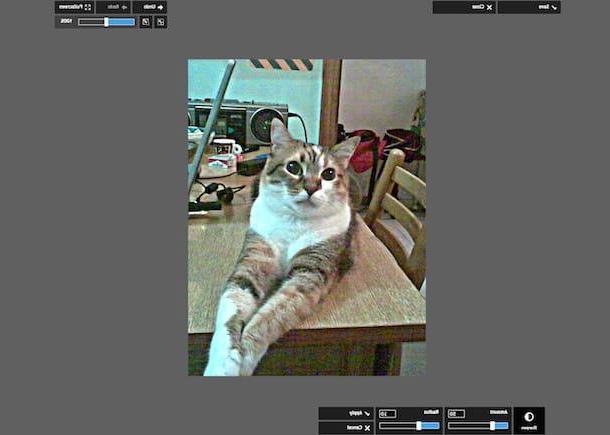
Then click on the button Adjustment located at the bottom, then click on the button Sharpen. The correction will be made automatically but if you don't like it you can adjust everything with your own hands by moving the sliders related to the options Amount e Radius until the desired final result is obtained. When you are satisfied, click Apply. To cancel the changes made, just click on the button instead Cancel.
Sharpness aside, you can apply other corrections as well, they are all always accessible by clicking on the button Adjustment. For example, you can get rid of red eyes from your shot, adjust focus, contrast, colors, and so on.
Finally, remember to save the edited photo on your computer by clicking on the button Save present at the top left, indicating the name you want to assign to the file, the overall quality and clicking on the button again Save.
Enhance.Pho.to
As an alternative to the online service above, to sharpen a photo you can also contact Enhance.Pho.to. It's free, works on any operating system and any web browser, and allows you to improve overall image quality in just a few clicks. Its use is extremely simple and, moreover, it is a usable solution without making any registrations. In short, try it now and you will see that you will not regret it.
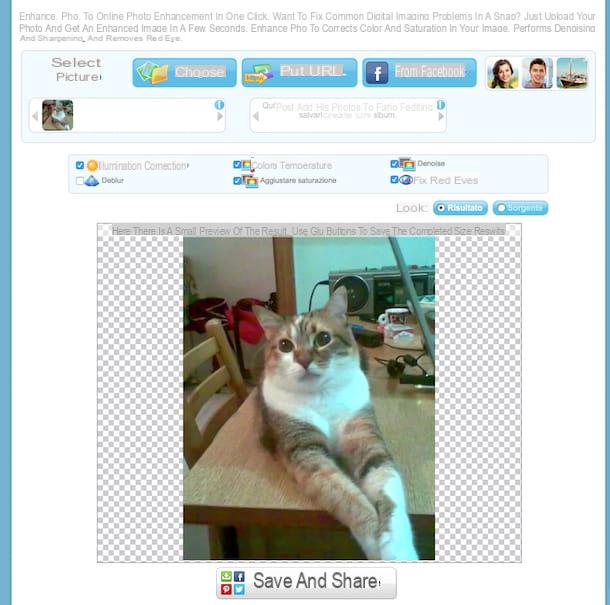
To use it, connected to the website of the service via the link I have provided you just now, click on the button Scegliere located at the top and select the image on your computer on which you intend to go to act. In addition to selecting the photos to be sharpened from the computer, you can choose the images on which to intervene from the Internet, specifying the url by clicking on the button Put URL, or from Facebook, by clicking on the button first From Facebook.
Once the photo upload is complete, you will immediately be shown the enhanced version of your image. If it is not to your liking or in any case you want to further improve the features, you can manually set which corrections to apply and which not by putting or removing the check mark from the items at the top: Lighting correction corrects photos with too low brightness, Color temperature makes colors more vivid, Denoise eliminates the "noises" that may be in digital images, Deblur makes photos sharper, Adjust saturation optimally adjusts color saturation while Staring at red eyes eliminates the annoying red eye effect.
Then compare the corrected image with the original one to realize the changes made by clicking on the buttons, respectively Outcome e Source located at the top right.
When you are satisfied with the result, save your mythicized photo on your computer by clicking on the button Save in the say located at the bottom or send it by e-mail to friends by clicking on the button Send an e-card. The button To exhibit instead, it provides a link to share the image online on Internet sites and social networks.
Other solutions to improve photo quality

In addition to how to sharpen a photo, are you interested in understanding how to improve other aspects of your shots such as enlarging images that are too small, removing unwanted elements from them and correcting the perspective? No problem, I can help with that too! You ask me how? Well, take a look at the guides listed below and you will see that you will not be able to.
By reading my article on how to increase photo resolution you can find out how to use a useful free program thanks to which it is possible to enlarge digital images without affecting too negatively on the quality of the latter. In my guide on how to delete people from photos I showed you how, using the free program GIMP, you can delete unwanted people or items from your photos professionally.
By reading my guide on how to straighten a photo you can then understand how to straighten an image by correcting any orientation imperfections. If instead your problem is the blurred photos, run to read my tutorial on how to edit the blurred photos, you will see that you will be able to cope with it.
Instead of acting as a computer, are you interested in understanding how to improve the display of one or more images from mobile? Then you can read my post dedicated to photo editing apps, I'm sure it will be of great help to you.
How to sharpen a photo


