


Since when Instagram introduced the function Stories in its official app, all you do is update the followers who follow you on the photographic social network by posting new content with which you "tell" your days. While appreciating the function in question, you recognize that objectively it still has some limitations and one of those that annoy you most is the fact that it is not possible to resize the photos that you decide to share in the Stories, a problem that you encounter especially with photos taken in mode portrait (i.e. vertically).
If that is the case, you obviously want to know if there is a way to shrink photos on Instagram Story and, if so, how to proceed. Since you want to find a solution to this problem, you've come to the right place at the right time! In the next few lines, in fact, I will be able to provide you with some indications that will certainly be useful for "overcoming" the limits of Instagram (if we can define them that way) which, at present and of things, do not allow you to shrink the photos that you want to post in the Stories.
Know that there are various solutions you can turn to. The first, of course, is the official app of the photographic social network which, when publishing a new content in its History, allows you to zoom out the photos that have been taken horizontally. In the case of images shot vertically, however, you must first reduce them using the cropping tools available "standard" on your device and then publish them in the Stories. Find everything explained in the next paragraphs. I wish you good reading and, above all, have fun!
Instagram (Android / iOS)
As I mentioned earlier, if you want to reduce the photos to be published in the Stories directly in Instagram, you can only act on an image shot horizontally. Otherwise, it is not possible to proceed, if not by adopting alternative solutions which I will tell you about shortly.
To succeed in your intent, all you have to do is start the official Instagram app, log in to your account, press the button with which to start the creation of a new Story, select the photo you want to publish and zoom out by zooming out with two fingers.
Therefore, start the Instagram app on your Android or iOS device, log in to your account, press the icon of thelittle man which is placed in the lower right corner of the screen (or on the thumbnail of yours profilo's photo, in case you have registered multiple accounts) and presses the blue button capacitor positive (+) lead placed on yours current profile photo, which is located in the upper left corner.
At this point, in the screen that opens, presses on thumbnail of the last photo taken which is on the right (on Android) or bottom left (on iPhone) and select a photo that you know you have taken in landscape mode, by tapping on its preview.
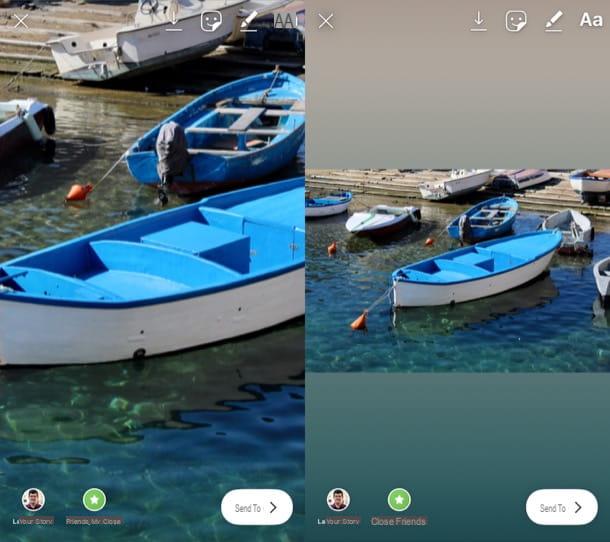
As you can see, although the photo you have selected is horizontal, it is automatically enlarged and displayed in full screen: to make it smaller, you simply have to place two fingers on it and then close them, so as to make one Zoom out. If everything went well, the photo will not be displayed in full screen and, as a result, will be made smaller. As soon as you are ready to do it, press the button The tua storia to publish the content.
Photo / Gallery (Android)
You took a vertical photo with your smartphone Android and would you like to know if it is possible to make it smaller when you go to publish it in the form of an Instagram Story? The answer is yes, but to do that you need to do some editing by cutting the shot in question and turning it horizontally.
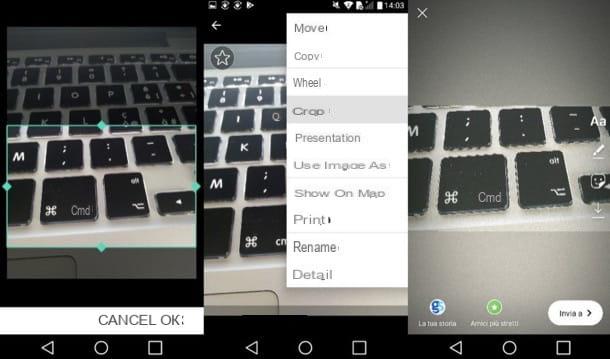
To crop a photo on Android, open the app Gallery o Gallery (depends on the version of Android installed and the brand or model of device in your possession), locate the image you are interested in editing and tap on its preview.
Then press the button with i three dots posto in alto a destra and selects the voice Cut out from the menu that opens. Then use the indicators that appear on the screen to crop the image in landscape mode. Once you have completed the necessary changes, press the button OK or your voice Save. On other devices, the procedure to follow and the names of the buttons and menus may be slightly different, but the steps to follow are basically the same as I just described.
Once you have cropped the photo and transformed it horizontally, you can finally start the Instagram app, log in to your account and follow the instructions I gave you previously regarding the publication of the content on the photographic social network. Pigia, therefore, on the icon oflittle man which is placed in the lower right corner of the screen (or on the thumbnail of yours profilo's photo, if you have registered multiple accounts) and presses the button capacitor positive (+) lead located on yours current profile photo, located in the upper left corner.
In the screen that opens, then presses on thumbnail of the last photo taken which is on the right, tap thepreview that you have previously edited, place two fingers on it and then close them, so as to make one Zoom out. Finally, press the button The tua storia to publish the content and that's it.
Photo (iOS)

The procedure you need to follow on iPhone it is almost the same as the one I explained to you in the previous chapter. Also in this case, in fact, you have to open the Photos app, crop the photograph taken in portrait mode, so as to transform it into horizontal and then publish it on Instagram, first having the foresight to make it smaller.
Then start the application Gallery pressing the icon depicting a stylized flower located on the Home screen, find the shot you want to edit and tap on it preview. Then presses on the voice Modification at the top right and, in the screen that opens, tap the button Cut out located in the lower left. At this point, use the indicators that appear on the screen to crop the image in landscape mode and save the changes made by pressing on the item end located at the bottom right.
Now, start the Instagram app, log in to your account, press the icon of thelittle man or on the thumbnail of yours profilo's photo (bottom right) and tap the button capacitor positive (+) lead located on yours current profile photo (top left). In the screen that opens, presses on thumbnail of the last photo taken which is at the bottom left, tap on thepreview of the photo you have previously edited, place two fingers on it and then close them, so as to make one Zoom out. In conclusion, post the content by pressing the button The tua storia located in the lower left. Simple, right?
How to shrink photos on Instagram Story


