


You recently moved into the Apple world by purchasing your first one iPhone and one of the activities you most enjoy doing with your new smartphone is taking pictures. However, not being, in spite of yourself, a professional photographer, you do not have the right skills to make quality shots and so you would like some "tips" on the subject. Don't worry: if you want, I'm here to give you a hand.
In the guide you are about to read, you will find some very useful tips on how to take beautiful photos with iPhone. For obvious reasons, the quality of the shots you will be able to get will not be comparable to that guaranteed by professional cameras, but by putting my advice into practice you will certainly be able to pull out appreciable photos, which you can easily share online and / or send to friends. and relatives.
So, do you want to know more? Yup? Very well: make yourself comfortable, take all the time you need to concentrate on reading the next paragraphs and, more importantly, try to follow the instructions I will give you step-by-step. There is nothing left for me to do, except wish you good reading and have fun!
Tips for taking beautiful photos with iPhone
Let's start with some tips for taking beautiful photos with your iPhone, which will undoubtedly be useful for taking quality shots with your Apple scraper smartphone: follow them and you will not regret!
Clean the camera lens
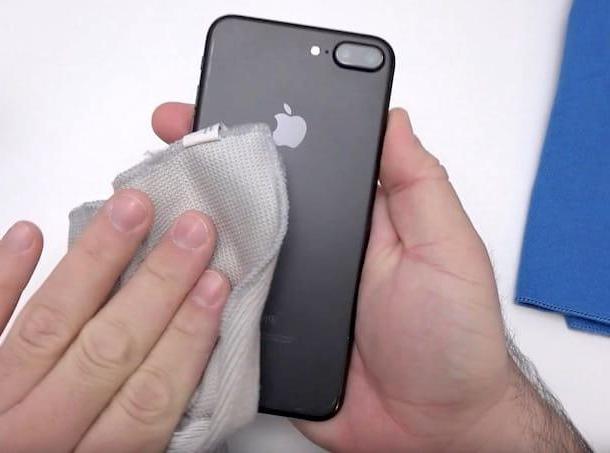
Clean the camera lens is one of the first steps that I invite you to adopt for take beautiful photos with the iPhone. If the lens of your "iPhone by" is not clean, has halos, stains and other traces of dirt, this will negatively affect the shot you are going to take.
To clean the lens of your iPhone, you can use a simple antistatic microfiber cloth (like what is used for cleaning prescription lenses). Alternatively, you can also use a deerskin cloth or one in suede leather. The important thing is that you avoid paper towels, abrasive cloths, compressed air products, etc. because they could ruin the lens.
When you have found everything you need to clean the camera of your smartphone, take the cloth and rub it gently on the lens of the front and rear camera, then look at it against the light to make sure there are no traces of residual dirt (if so, repeat the procedure until you get the desired result). For more information on how to clean the iPhone, see the in-depth analysis I dedicated to the topic.
Use the right lighting

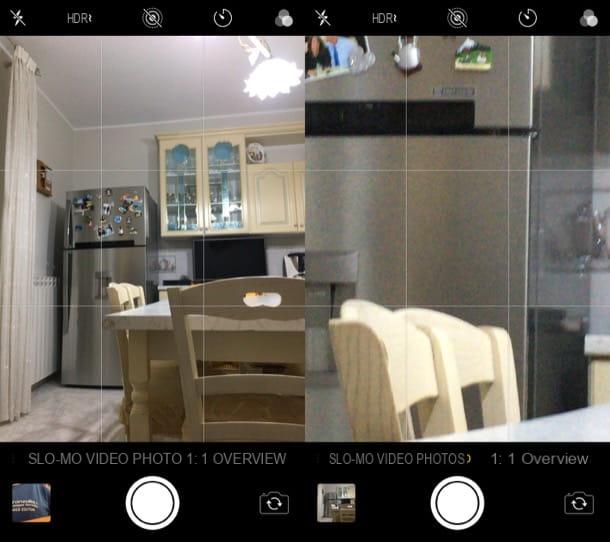
When you are about to take a picture, use the right lighting it is crucial to obtain an appreciable final result. Without good lighting, in fact, it could be difficult (if not impossible) to be able to take home a quality shot.
Therefore, whenever possible, choose a location bright enough to take your photos (eg outdoors, using the light of a lamp or a window, etc.). When this is not possible, try to brighten the photo by raising the ISO value, which is the sensitivity of the sensor to light, and slightly increases i exposure times. To change these values, however, know that you will have to resort to third-party apps (later I will recommend a couple that can be for you), because the iOS Camera app does not allow you to act on them.
Obviously, in addition to avoiding poorly lit environments, it also avoids those where the light is too intense: in this case, in fact, you can risk getting "burnt" shots or, in any case, overexposed that can hardly be recovered in post production.
Choose the right composition
In photography the composition it is one of the most important elements in obtaining an interesting and quality shot. To take beautiful photos with the iPhone, therefore, you have to choose the right composition. How can you practically do it? I'll explain it to you right away.
A first factor you need to take into account is the choice of background: avoid positioning the subject in front of a backdrop that is too "messy", unless you want to "hide" it by blurring the background with the bokeh effect. Speaking of the latter, if you have an iPhone capable of taking pictures with a blurred background (eg. 7 iPhone Plus, 8 iPhone Plus, iPhone X, iPhone Xr, iPhone Xs e iPhone Xs Max), open the app Camera, swipe left or right, and select shooting mode HD Portrait. By doing so, you will be able to take a photo focusing only on the foreground subject leaving the rest out of focus (if you have an iPhone Xs or an iPhone Xs Max, you can even change the intensity of the bokeh effect in post-production thanks to some functions. available in iOS 12 and later).
If you have an iPhone that does not integrate the feature that allows you to blur the background, you can try to hide it by taking the photo from a different angle (when this is possible). Practice following these tricks and you will see that your shots will take on a more refined and interesting air.
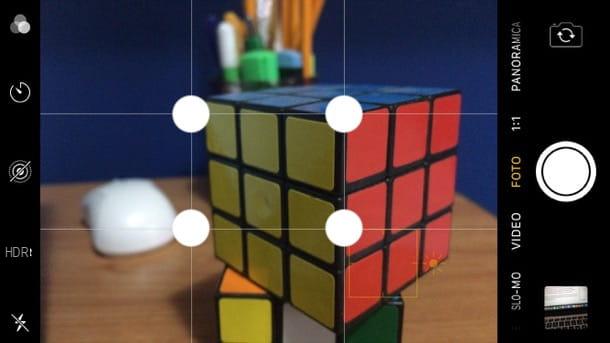
When it comes to composition, one cannot fail to mention the rule of thirds. Haven't you ever heard of it? Don't worry, this is a very simple rule to apply and quite effective: you have to keep an eye on the composition of the image by dividing it into an imaginary grid composed of 9 rectangles.
Instead of taking a picture by placing the subject in the rectangle in the center, it is better to position it at one of the intersection points of the grid (i white dots that you find in the figure at the beginning of the chapter), so as to make it stand out more.
Do not use digital zoom
Another trick that I invite you to follow to take good photos with the iPhone is to do not use digital zoom. The digital zoom, in fact, unlike the optical one (which has only been implemented in recent years on some iPhone models that allow it to be obtained using a "game" of rear camera lenses), is a simple digital enlargement of the photo, the which means that the image is enlarged but with rather evident grains (and very annoying!).
Since the optical zoom actually brings the subject of the image to be shot closer by resorting to optical and mechanical elements that shorten or lengthen the focal length, the digital one simply enlarges the image without using any optics: this explains why it involves loss of quality.
Use manual shooting settings

Use manual shooting settings can help you get more beautiful photos. By manually adjusting settings such as ISO sensitivity shutter speed or l 'aperture openingin fact, it is possible to create more interesting and original shots. Since the application Camera present "standard" in iOS does not offer the possibility to manually act on the shooting parameters, you have to resort to third-party solutions, such as the very famous ProCam (6,99 euros) or Halide (6,99 euros).
As for the shooting parameters, below you will list the most important ones, so that you can take them into account when you go to modify them through the aforementioned apps.
- ISO sensitivity - this value indicates the degree of amplification of the electrical signal that is sent to the sensor cells. By increasing this value, you can get brighter photos even in low light conditions. However, there is a downside to take into account: "straining" the sensor to get a brighter shot, the photo becomes noisier.
- Shutter speed - by increasing this value, it is possible to minimize the possibility of running into photos with blur or micro-blur due to the shaking of the photographer's hand and / or the movement of the immortalized subject.
- Maximum aperture of the diaphragm - this value indicates the amount of light that passes through the lens and is measured in F-stop (Eg. f / 1.8 o f / 2.7, etc.). The lower this value is, the more light enters the lens and, therefore, the brighter the photos will be.
- White balance - correcting the color casts of a photo is very important to obtain a final result that is characterized by a faithful reproduction of colors, especially if you decide not to take the photo in the format RAW (which allows you to keep a lot of shooting information, allowing you to make more incisive changes in post production).
Take more photos
Since even the best photographers get it wrong, it's always better take more photos to avoid "wasting" your time and work. If you take more photos, in fact, you will increase the chances of being able to get at least some interesting and quality images.
Maybe you could use the function that allows you to do this take "burst" photos (To use it, just press and keep pressing the shutter button with your finger). However it is clear: the function just mentioned is not the same that we find in mirrorless and reflex cameras, so don't think about using it to try your hand at sports photography: you would be disappointed.
How to take beautiful photos at night with iPhone

You would like to know how to succeed take some nice photos at night with the iPhone? I already anticipate that there is no "secret" to do it, as the quality of photos taken in low light conditions depends on many factors. First of all, the brightness of the iPhone lens in your possession. The latest generation iPhones (such as iPhone Xs / Xs Max) have significantly brighter lenses than older iPhone models (eg iPhone 7, iPhone 6s, etc.) and, therefore, return less noisy and brighter shots.
To try to make the shots taken at night brighter, you can try increase the ISO value (but don't exaggerate, otherwise you could make the photo very noisy) or ad increase the shutter speed, so as to let more light into the lens (if you decide to do so, use a tripod to avoid taking pictures with blur or micro-blur). As I have already indicated to you in the previous lines, to be able to adjust this parameters it is necessary to resort to the use of third-party apps, such as ProCam or Halide (which cost € 6,99 each).
How to take beautiful photos of the Moon with iPhone

Photographing the Moon with the iPhone it is not very simple, as the technical characteristics of the camera integrated in the latter (and in general on all smartphones on the market) do not offer the possibility of immortalizing our natural satellite in detail.
As I suggested in the previous chapter, you can try to improve the quality of the photo by "playing" a bit with the shooting parameters (ISO, aperture and shutter speed), but even in this way it is not possible to do much . While it is true that you cannot photograph the Moon in detail, it is also true that you can adjust the composition of the photo, for example using the rule of thirds, in such a way as to make it stand out within the image.
To get a good result, I suggest you to turn off the flash, as its light could “contrast” the natural light of the Moon, ruining the photo. To turn off the flash, after starting the app Camera, tap the lightning at the top left and select the item No from the menu that opens. Then take the photo by pressing on shutter button and verify that you have taken a quality photo.
How to take beautiful photos with iPhone


